
Tea Light Village - Hexagon Bases - Tutorial
Tea Light Village - Penta Bases - Tutorial (5 sided)
Project Description:
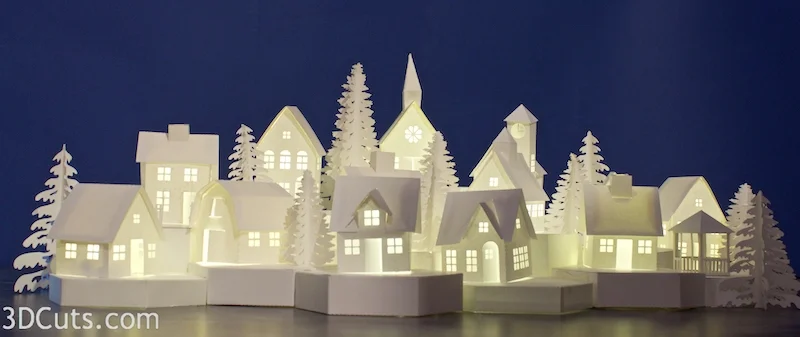
Tea Light Village is a series of tiny buildings designed specifically to fit over small LED Tea Lights. If you have made the village you have discovered that turning the Tea Lights on and off is a chore. I designed this base system to both display the village but also use the base area for string a single strand of LED fairy tea lights from building to building. These all can be turned on and off with one switch. The also are powered by 3 AA batteries so they last much longer. I first designed the hexagon bases in 2017. I followed it up with the pentagon shaped ones in 2020. The two sizes works together but the pentagon bases allow you make a skinnier arrangement for a mantle or a shelf.
These bases are universal and can be used for many different projects not just Tea Light Village. Any creations that you would like to display on multi-levels will benefit from these bases.
Warning: Only use LED Lights. DO NOT use regular candles or other lights that get warm.
This specific tutorial is for the assembly of the Hexagon bases including the wiring I did for Tea Light Village. I have updated it to include information about the pentagon bases which go together the same way.
There are many tutorials for the Tea Light series including:
Tea Light Village Hexagon and Pentagon Bases 2017- updated 2020

Supplies Needed:

Cutting Files - Available here.
ScorTape 1/4"
Card Stock
Scissors
Classic Hole Punch - 1/4" hole
Hot Glue Gun
String of 100 Fairy Lights (see below)
Parts Sizes- See orientation in diagram to right.
The size can be anything you want to create your display. Just be sure to size things grouped together. My set for Tea Light Village has the Hex tops being 4" h x 4.67 " wide.
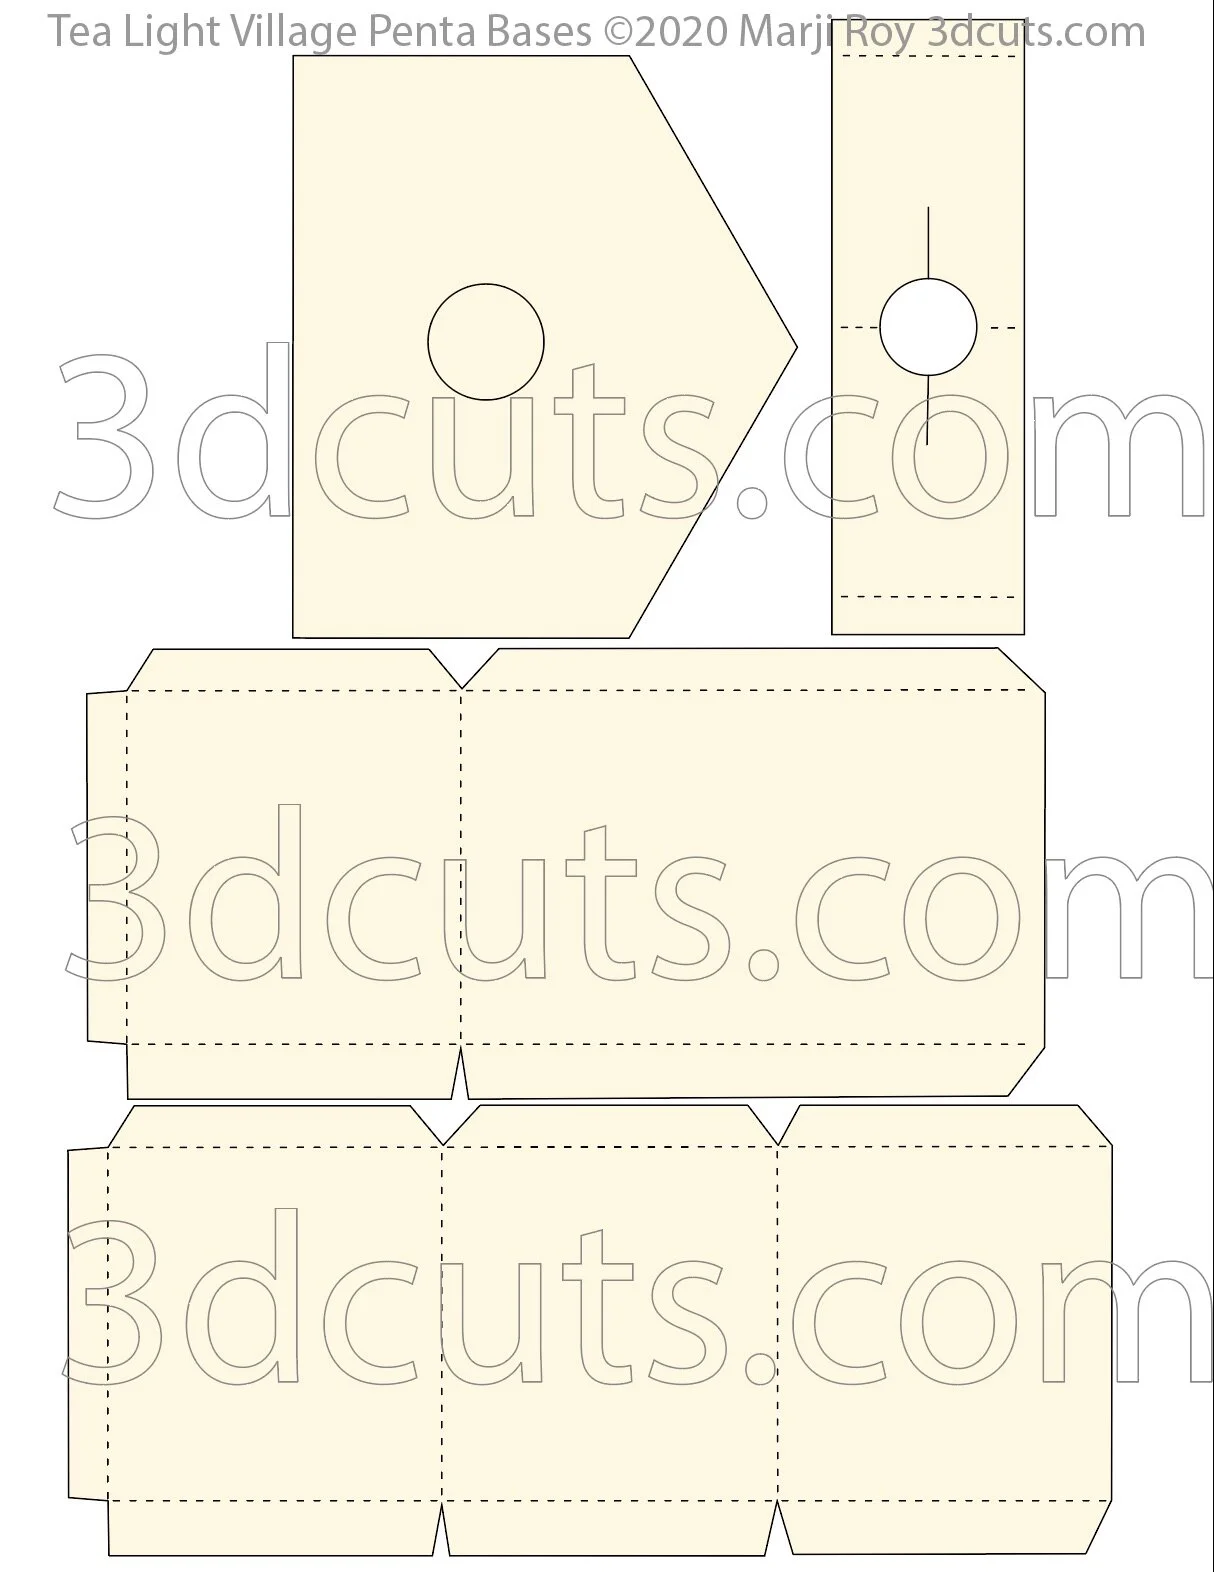
Each base file includes the top, the sides and a light support.
The Pentagon version is sized to match the hexagons but with one side cut off. This allows for a smaller footprint. You can use all one shape, all the other, or the two mixed together.
Below are dimensions if you want to match your sizes to mine. All are as downloaded and grouped together.
.75” tall hex base grouped 7.598” w x 7.464” h
1” tall hex base grouped 7.278” w x 9.002” h
1.5” tall hex base grouped 7.278” w x9.002” h
2” tall hex base 7.296” w x 9.833” h
2.5” tall hex base grouped 7.383” w x 10.67” h
3.5” tall hex base grouped 7.525”w x 8.604” w (cut 2 of side)
3.5” tall hex base flat side grouped 14.12”w x 8.603” h
Hex base cover for all - 4.670” w x 4.046” h
.75 tall Hex base with flat side grouped 7.765” w x 7.924”h
Order supplies from Amazon:
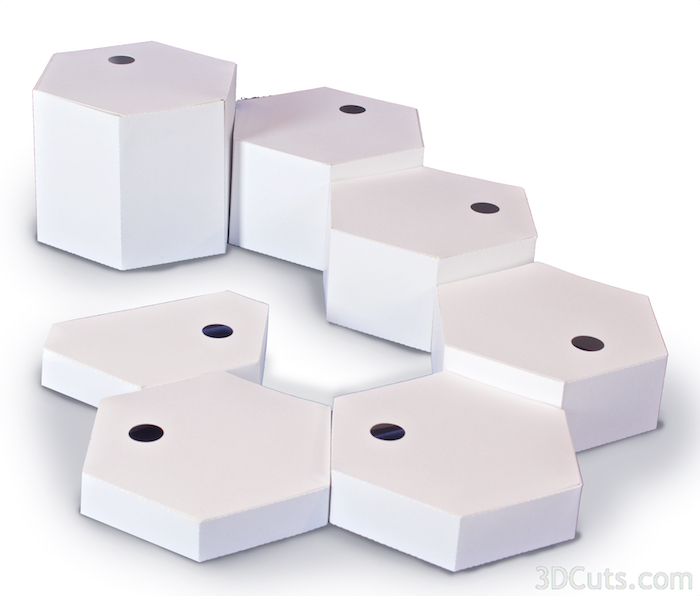
The Hexagon download includes the cutting files for 7 different sized bases plus two tops.
The bases are in the following heights although you can adjust the sizes to anything you need - 3.5",2.5",2",1.5", 1", .75". It also includes a partial hexagon at a height of.75".
The files include a hole in the top for wiring into the Tea Light Houses but also include is a top without the hole in case you would like to use these bases for displaying other projects as well.
The Pentagon bases download includes the cutting files for 6 different sized bases.
The bases are in the following heights although you can adjust the sizes to anything you need - 3.5",2.5",2",1.5", 1", .75".
The files include a hole in the top for wiring into the Tea Light Houses.


Steps for completing the both base styles Bases:
Special Note: I update the instructions online. Check here for adjustments and additional information. Don't just rely on the pdf file that comes with the download.
1. Download the cutting files for your cutting machine from the 3dcuts.com store here.
2. Load the files into your cutting software following the steps for your cutting machine.
3. Prepare the files:.
For the Silhouette:
SIL Files from upload SVG purchased from 3dcuts.com:
The SVG files may need to be turned into cutting files. Click here for detailed steps on how to use SVG files on your Silhouette. http://www.3dcuts.com/tutorial-upload-svg-silhouette
DXF files can be opened in the basic edition of Silhouette Design Studio but often require modifications. I recommend using the Designer Edition and using svg files. DXF files do not always maintain file sizes and you may need to adjust according to sizes noted above.
For Cricut Explore:Remember to ATTACH files before cutting in Cricut. Here is a guide for importing into Cricut Design Space. http://www.3dcuts.com/tutorial-adding-3dcuts-files-to-cricut.
For Brother ScanNCut: The svg files will need to be transferred to files for your particular machine. You can change SVG files to FCM files at http://www.canvasworkspace.com/ or Google "How to import SVG files into a ScanNCut" for links to tutorials. Some models of Brother Scan N Cut can directly import the SVG files.
4. Cut the files.
All pieces are cut from card stock. I use the Neenah Exact Idex Card Stock from Amazon. I like how it cuts.
You need to only cut one top for each hex base. The download includes the tops both with holes and without. The holes allow you to thread wires up into house. Cut those if you will need the wiring access, or cut the solid top if you will not be adding the fairy lights.
I cut using a premium blade. It works wonders on the tiny windows. I set my Silhouette to blade depth of 4, speed of 4 and thickness of 27. This is a little different from the normal card stock settings because the Neenah Index Card Stock is a little thicker.

5. Fold on all dotted lines.
Every dotted line is a fold line. Fold all of them crisply in the same direction.
Be careful with the side pieces. They must all fold in the same direction and if you flip one over you will have challenges.
The Pentagon bases go together the same way but only have 5 sides.

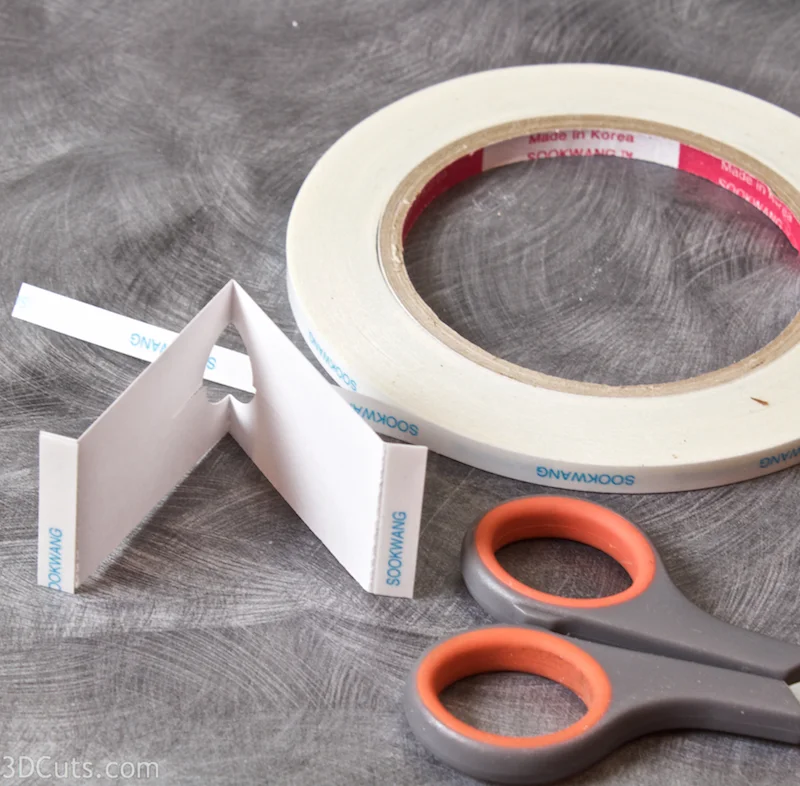
6. Apply Scor-Tape to all tabs on the side pieces.
Leave the Scor-Tape backing on.
You may use the adhesive of your choice.
I like using Scor-Tape because it keeps my hands clean and I can leave the backing on until I am set to adhere each tab.
Look at the image. All areas highlighted in pink have Scor-Tape applied. Scor-Tape isn't pink. I have just added that to help you.
On the side pieces the edge with the shorter tabs with bigger V grooves are the ones you add the Scor-tape to.

7. Adhere the two sides together to make one long piece.
Remove the Scor-Tape from one of the end tabs and adhere it to the other end of the second one as shown in the photo.

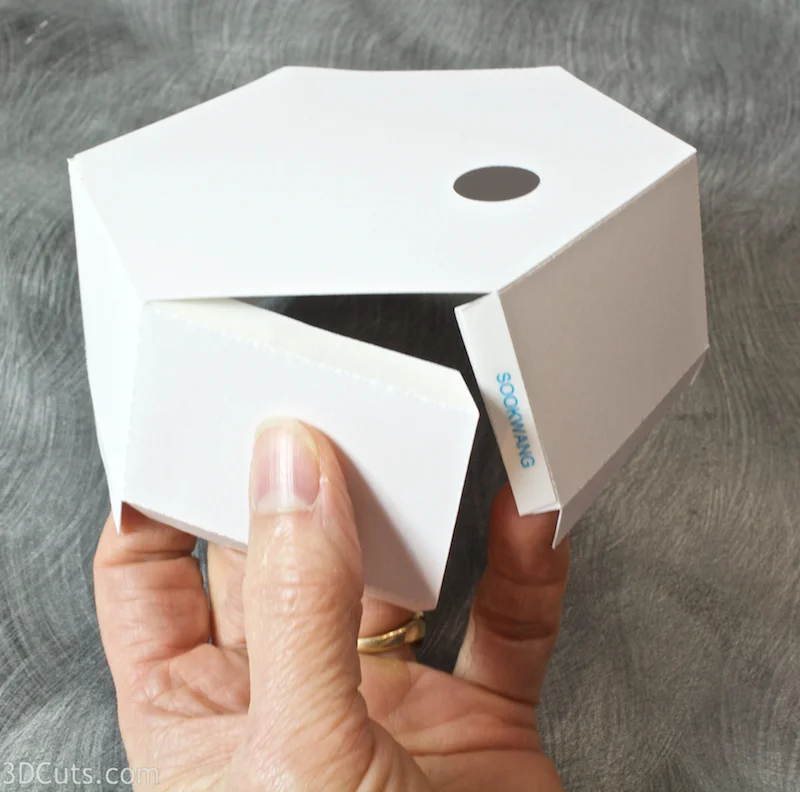
8. Adhere the top.
Start at one end and peel the Scor-Tape backing off.
Carefully position one side of the top over the tab aligning the edge of the top with the dotted fold line. If making the odd shaped base (non hexagon base) make sure to match up correct sides.
Turn one edge, and repeat.
Continue around the box and adhere all 6 sides being careful with alignment.


When you reach the final side you will also have to peel the other end tab tape and adhere the last edges together forming your solid base.

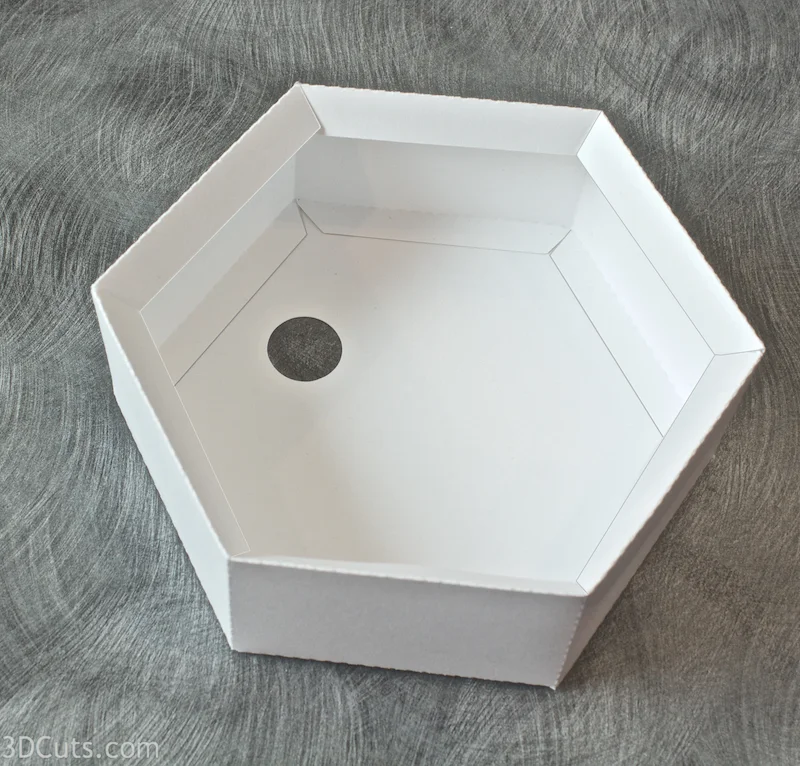
9. Fold up the bottom tabs
Turn the base over and fold all the bottom tabs up into the base.
Gluing these is optional. It isn't necessary. They just make the bottom edge stronger.
Now make more bases. How many do you need? Well that depends.

Stunning 3D illuminated tea light village by Marji Roy of 3dcuts.com. SVG, PDF, PNG and DXF cutting files and complete tutorials available.
10. Preliminary set-up
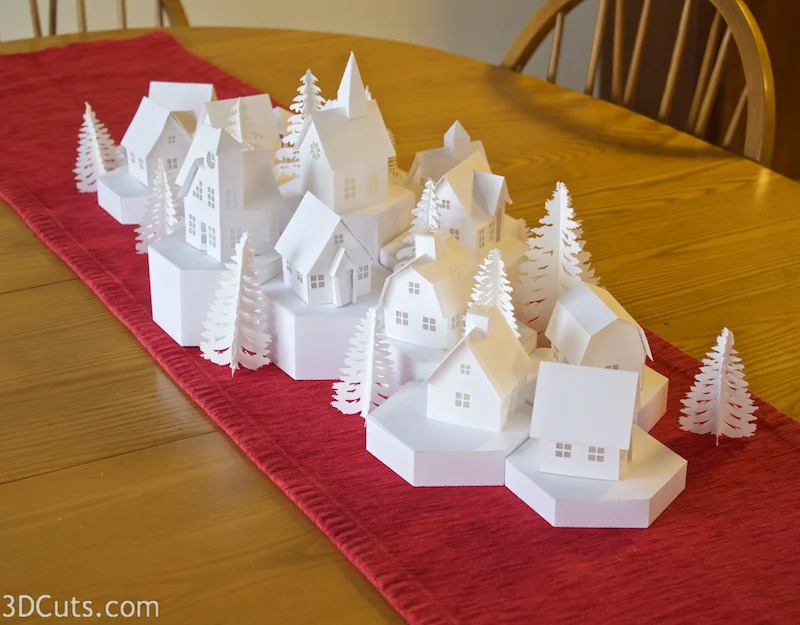
How you display the village depends on your location and how many buildings you will include. I will show you a couple of options and encourage you to explore your own. The hexagon arrangements can be very flexible.
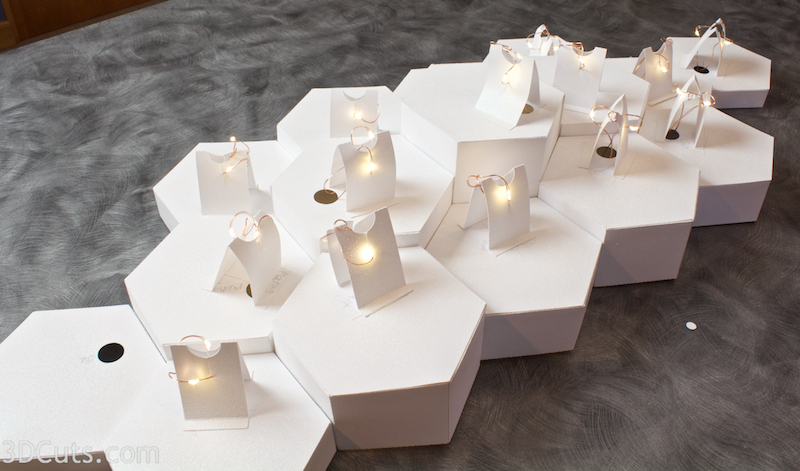
The photo to the right shows a quick set-up on my dining room table before lights were added. I often display the village here during the holiday season. For this type of arrangement I want to view it from all sides. I like it taller in the middle shorter near the ends. And my table is big enough to show all the buildings plus a few duplicates.

For this arrangement above I used the following:
3.5" deep - 1
2.5" deep -2
2" deep - 2
1.5" deep - 3
1" deep - 4
.75" deep - 3

Here is another arrangement. This is for my hall console table. It would also work for a fireplace mantle. It is longer and less deep. It uses:
3.5" deep - 1
2.5" deep -2
2" deep - 2
1.5" deep - 3
1" deep - 4
.75" deep - 3
You can design your own arrangement to fit your display location.
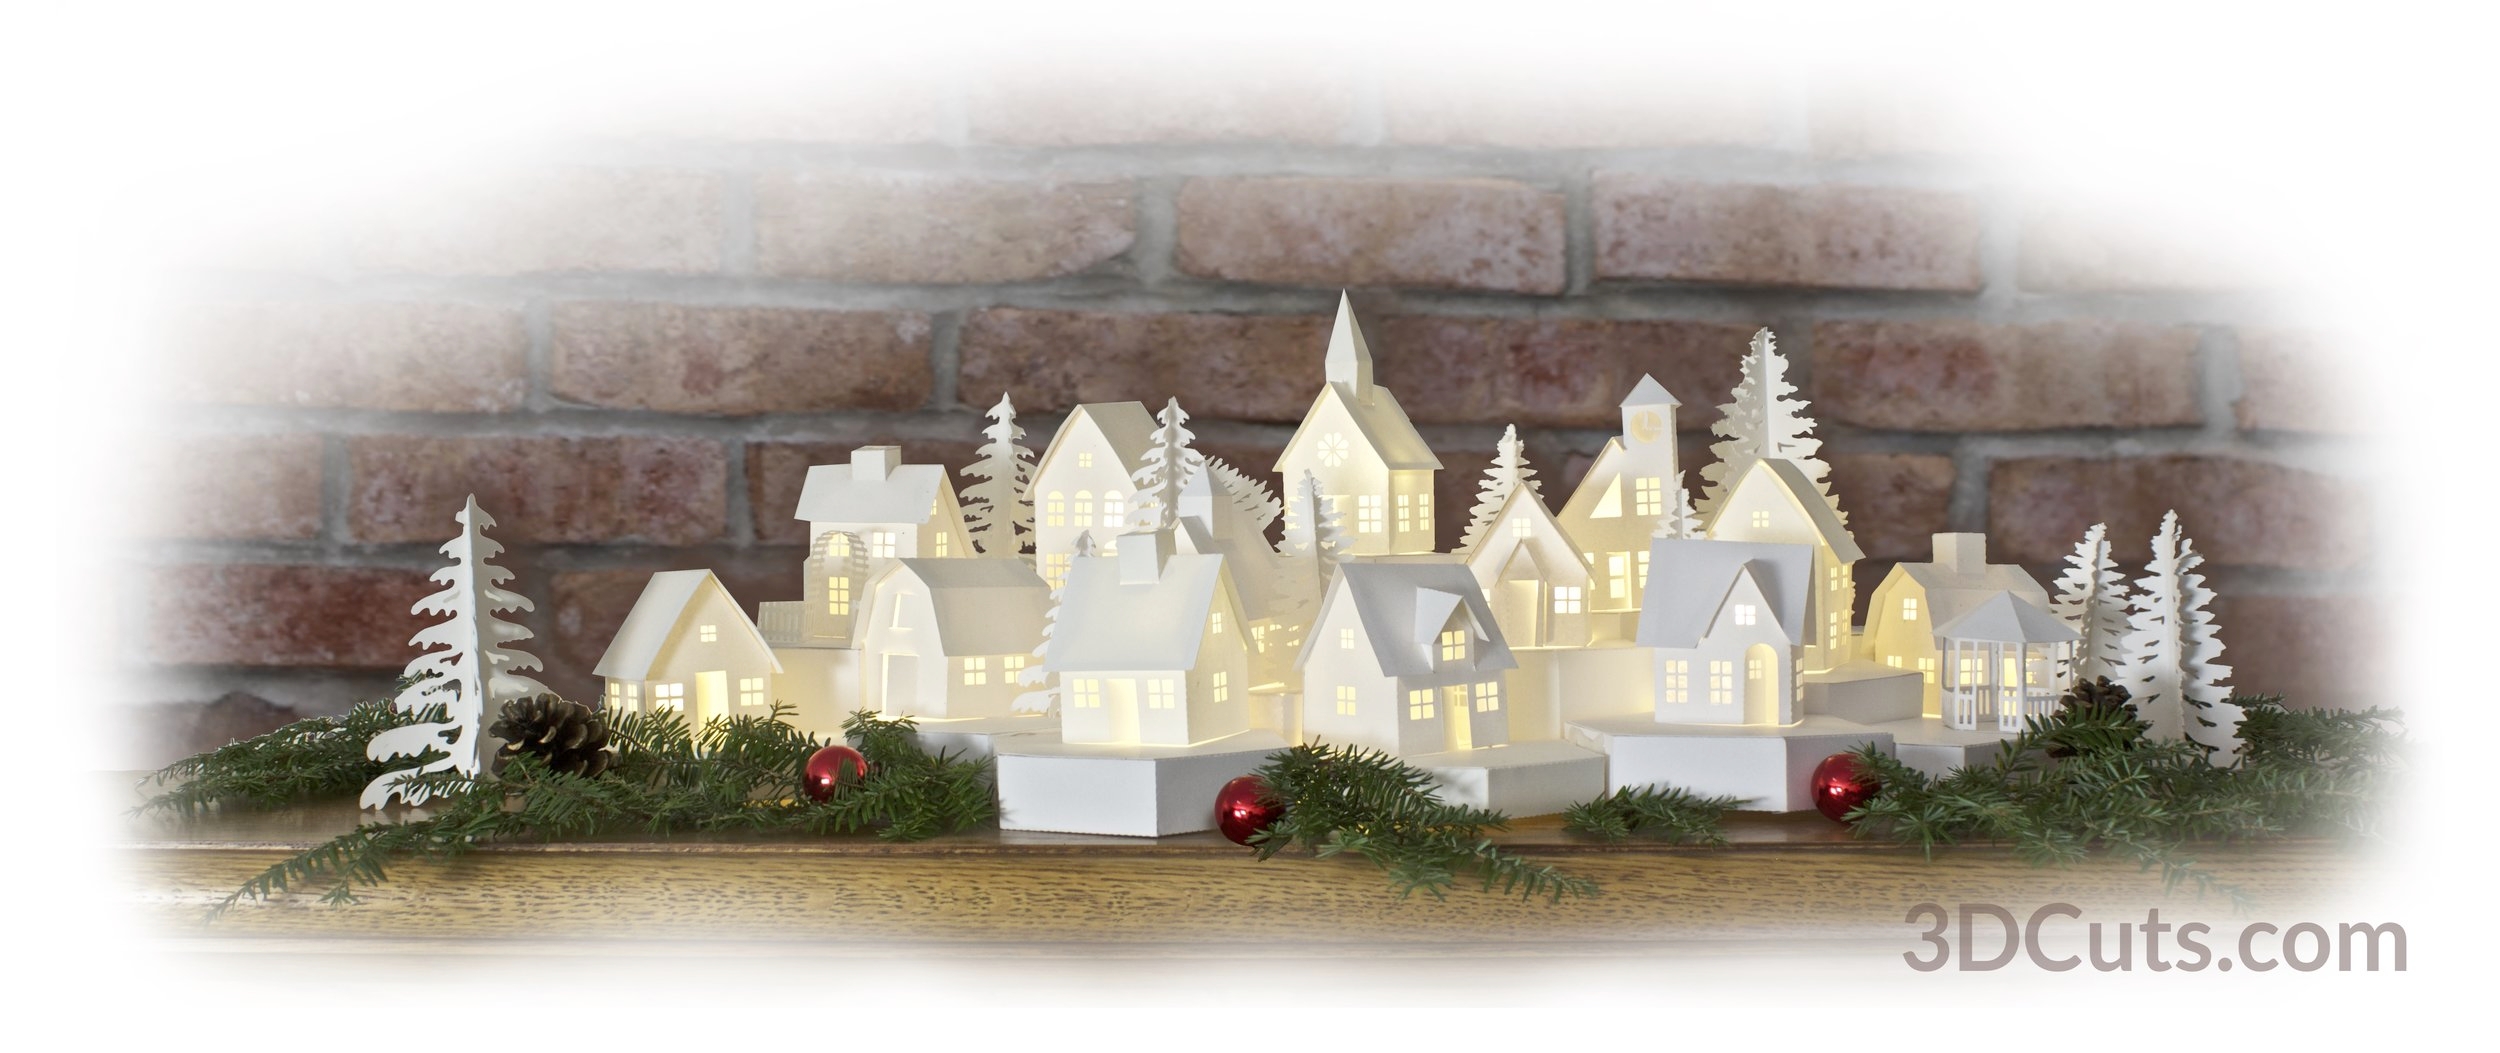
In 2020 I added another group of bases- the pent bases. These have 5 sides and next together with the hex bases. I designed these to better fit narrow shelfs and mantles. Here is a photograph of my 2020 display on a mantle.

And here is the layout of bases. It is mixed Penta and hex bases. I have noted the different deaths I used. Notice the gap to the right. I did that so the covered bridge actually spanned a gap.

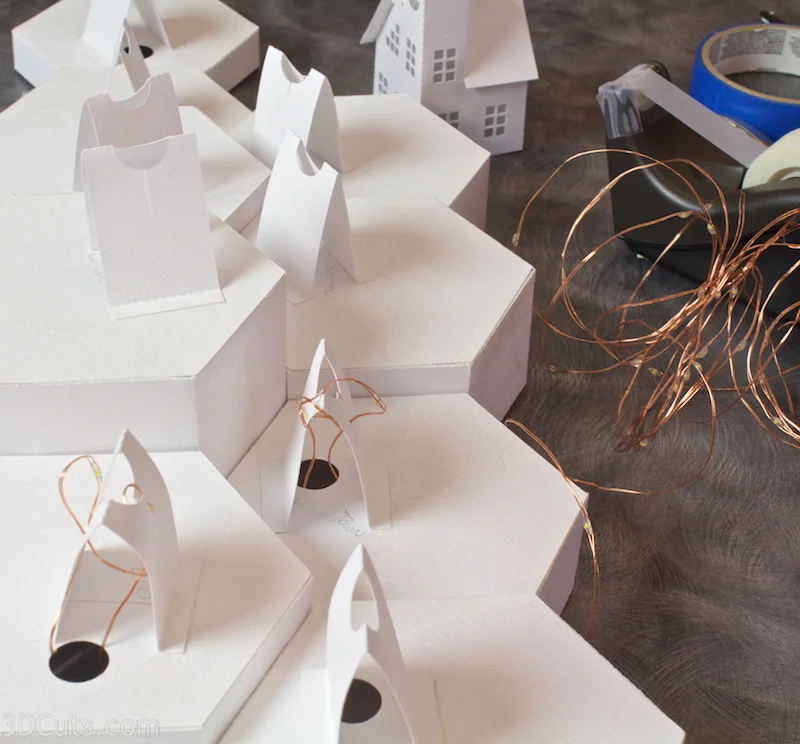
11. Base Assembly
First, I set my entire village up with out attaching anything on my craft table. Here I adjusted hexagons and arrangement.

What you will be doing is adding a light support tent, attached to each base. It should be positioned so it goes under the building and you need to understand where you want the buildings to be. This view shows how one of the tents will be positioned over the hole and then the building will be placed over that. You set the village up first so you know where to position the holes.

Using pencil, Under each house I put a label and the direction I wanted the fold of the tent to go. I always wanted the flat side of the light support tent to face the door so if it is open you don't see the harsh light and open tent sides inside. You could use sticky notes for this as well.

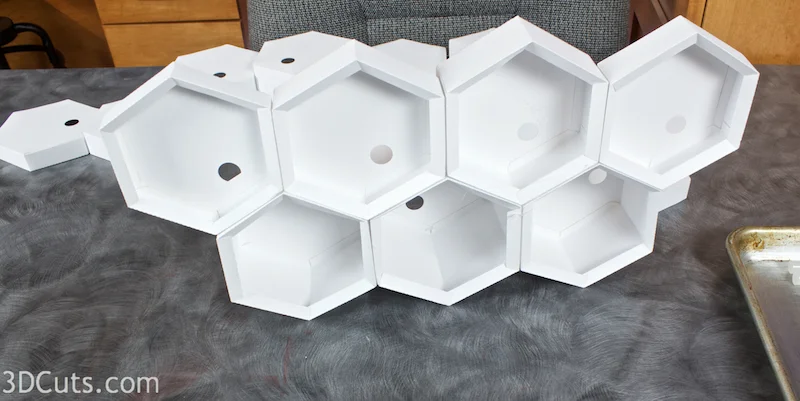
Remove all buildings and starting with the two tallest hexagons start hot gluing them together.
I put hot glue in an upside down U shape on the matching side of the shorter of the two hexagons, then pressed them together making sure the bottom was flat.


Continue gluing the hexagons together working from tallest to shortest, always applying the glue to the shorter of the hexagons you are working with.

You will quickly reach a point where a hexagon meets up with two or even 3 others. Apply glue to all sides that meet with others being sure to always apply the glue to the shorter of the sides. You will need to work quickly to prevent the glue from hardening before you place.

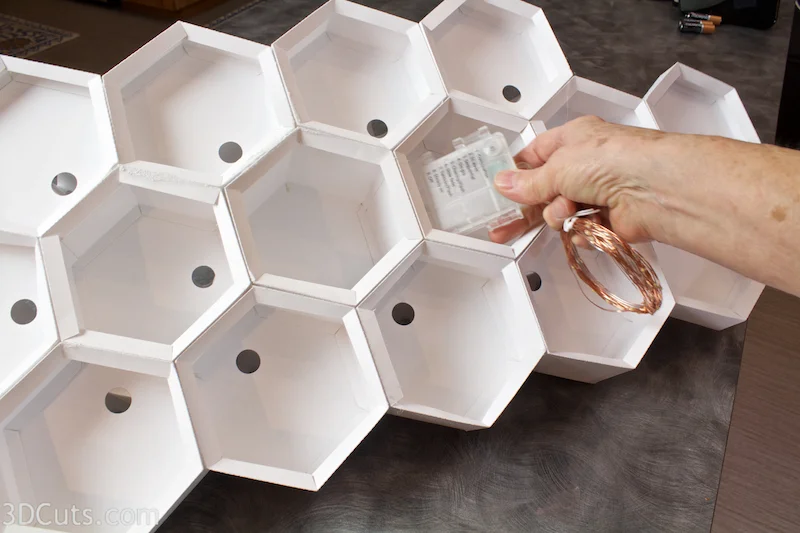
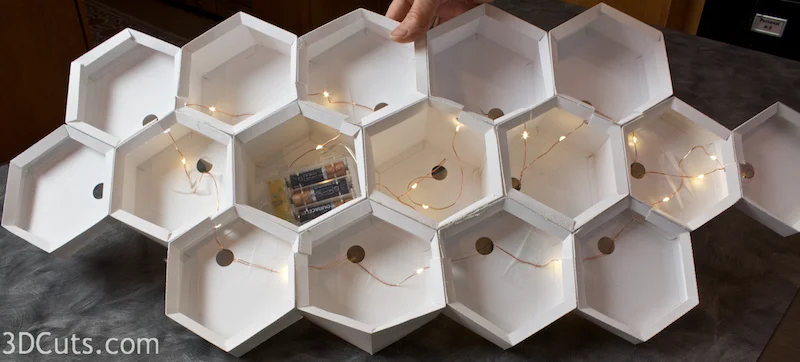
This is a bottom view of the growing hexagon base. It looks like a honey comb.
Fold and add Scor-Tape to all the light support tents.
Peel the Scor-Tape and position the tents on the hex base and adhere in place. Postioning depends on your preference. Remember you want them so the blank side faces the building door. The distance between the ends of the tent would be about 1" and it should be over the hole in the top of the hex. Wires will come up through that hole.
Apply a tent to every hexagon that will have a building (although not to the gazebo because that has no internal light.

13: Optional - Adding Glitter Spray.
On my most recent village I decide to add a touch of glitter to all the roof tops and hex tops to give the essence of fresh fallen snow.
At this point I quickly sprayed both the tops of the hex base as it is glued together, and the roof tops of all the buildings.
I used Krylon Glitter Blast in the diamond dust color.
It added a subtle texture and sparkle which is impossible to catch in a photograph.


14: Add the Fairy Lights.
I used a 100 count string of fairy lights from Amazon. (Link above in the supplies section). I chose these because of the batteries, the remote and the number of lights. With these lights, ALL the lights in the village can be turned on and off with a single click. So much easier than the individual tea lights I originally used.
First, layout a plan. You need the lights to go to every hexagon (unless one has no building or is the gazebo) and you don't want to have to double back or you will run out of lights.
Start with one of the deeper hex boxes so there will be room to store the battery pack under it, and try to end with another deeper one incase you have extra lights at the end. You will want to roll those up and hide them inside the base.
Here is my plan for the layout for my dining room table. Yours may well look different depending on the arrangement you decided to use.
The string of fairy lights I used was good for 15-16 buildings. If your display is more than that you may need two sets.

Test your light package. The recommended one works with 3 AA batteries and it is smart to test the lights before installing.
After I tested the lights I took the batteries out. The battery case flips around a lot while installing all the lights and it is lighter without the batteries.

Refer to the plan you made for placing the wire. My plan started in the cell next to the tallest one in the center. The battery pack will be stored here once complete but before you put it in there you need to wire the top side for that cell.
You start with the lights closest to the battery pack and work away from that. Take the first 2 lights and fold them into a loop as shown. It is hard to see but the lights are about half way out on the loop, one on each strand.
If the first light is really close to the battery pack you may need to skip it and start with lights 2 and 3.

Pass the loop of wire through the hole in this cell and up into the tent shaped light support on top.

On the top side feed the loop up through the hole in the top center of the tent and spread the wires bringing one down each of the slits on the lower rim of the hole. You want 1 light to be positioned out side the tent on one side, and the other light to be positioned outside the tent on the other side. The slits will help hold the lights in place.
Aim to have two lights inside each building. I found that to be an appropriate amount of brightness with this set of lights.
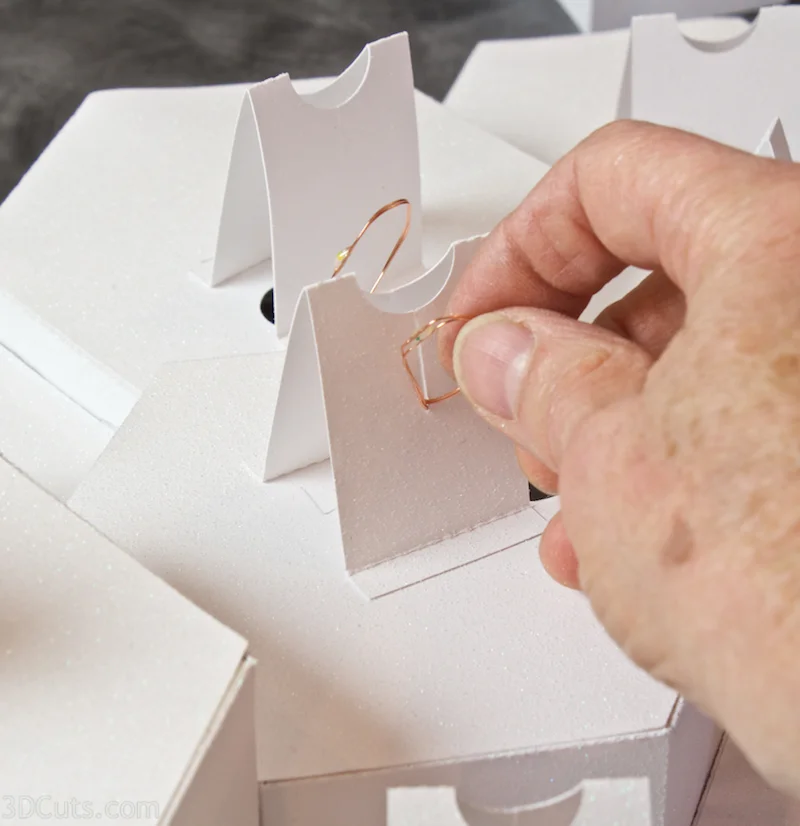
If you have enough wire between the two lights, hook it around the side of the tent to help hold things in place.

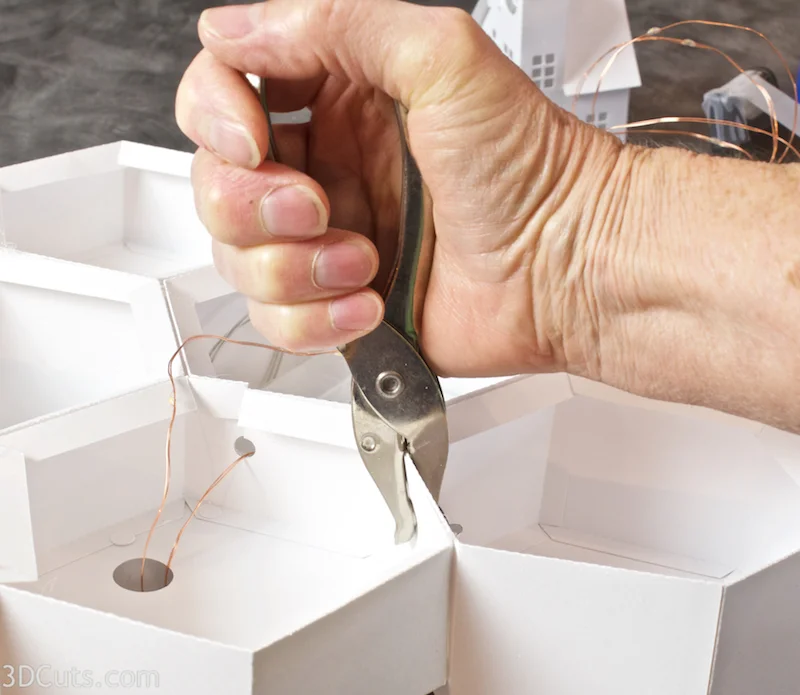
Take the hole punch and punch a hole in the side wall between the first cell you put the wire through and the second one on your planned route. Go as deeply as the punch lets you.
Take scissors and snip a straight line down to the hole you just made.

Thread the wire through this slot and through the hole into the second cell on your route.
Notice where the next light on the string is. In most cases the next light will be too soon on the wire to make it up top to the next tent. That is ok. You will leave those extras below the surface in the cells. You want to try and position them so they are not against a visible wall.
At this point I took removable tape and temporarily taped the battery pack inside cell 1. This is just to keep it from flip flopping around as you continue the the electrical work.

In cell 2, fold the wire to again make a loop with two lights on the loop, one on each side.
Thread that loop through the hole in cell #2 and up through the tent on top and repeat them same attachment steps on the tent above.

Using the same steps continue from cell to cell adding wires to every tent on your display. Remember that the gazebo has no light so if you are including that, watch for that cell and skip it.
You can add scotch tape to hold wires in place on the underside. Any place where wires run along a flat area is a good place to add tape, Don't tape a light next to the paper. It will shine through on the outside so bend any lights away from the paper.

Once you have all the holes wired, roll up any extra lights and leave them inside the last cell.
Add batteries to the battery pack and check out the lights.
Here is a view from the bottom. You can see I left a fair number of lights hidden in the cells below but had about 4 leftover which are curled up in the cell to the right of the battery pack.
Once there are batteries in the battery pack you can use blue painter's tape to hold the pack in place. I criss-crossed the cell and wrapped a piece around the pack and taped it to the crisscross. This isn't necessary but it keeps it from banging around. When it is time to change batteries you can simply peel off the tape, switch batteries and use new tape to again tape the pack in place.

Flip the hex base over and add the houses.
Note that my finger is pointing to a "hot" spot. The light is too close to the card stock on the under side, so I adjusted that.
I didn't glue my buildings down because I use them in different settings but I think it will be easier to store if the houses can come off. I may change my mind on that.
I did use removable glue dots on the bottom of each tree to hold it in place.

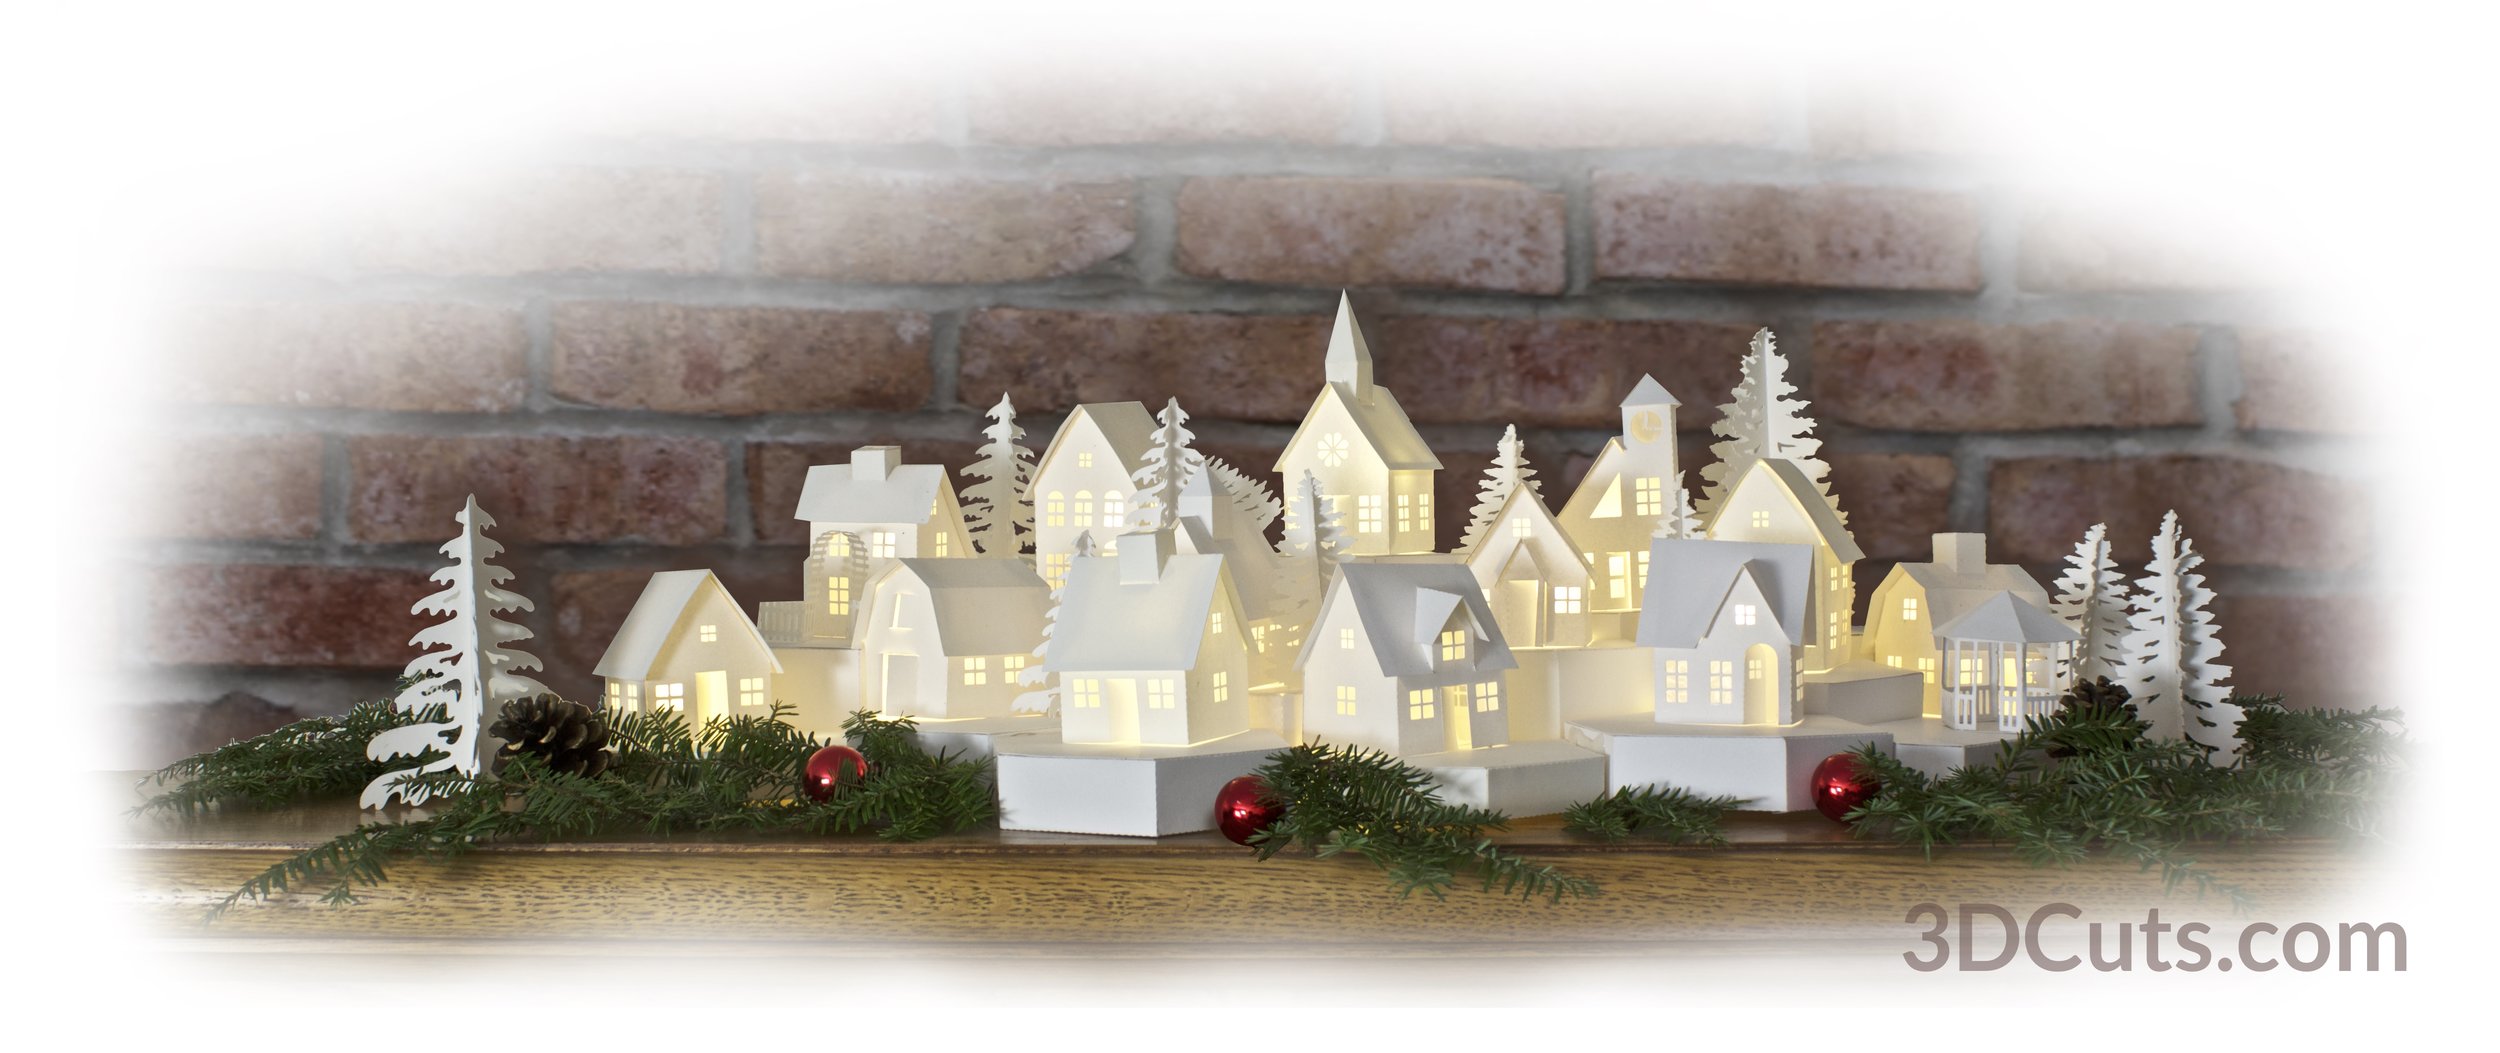
Think about creative ways to display your village. Here I added fresh hemlock boughs, a few red ornaments and pine cones to the edge. There are so many possibilities!
