Patriotic Stars on Display

I made a plethora of stars for the All-Star Cutting files series with a goal in mind. I have a wonderful display corner in the portico over the main entry to our home. I have used it as a display area for tons of crafty ideas but have always shied away from using paper because of the elements. I like a display to be able to last a month or two. The span between Memorial Day and July 4th includes Flag Day so a patriotic theme is appropriate. Here is what I completed.

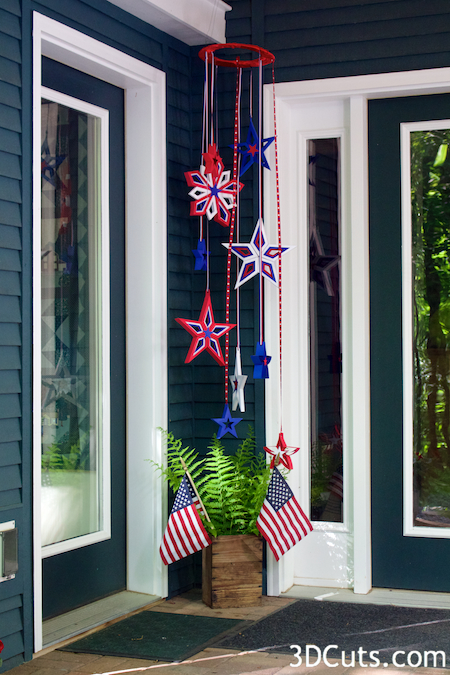
These stars have been hanging here for 2 weeks and are doing just fine. They are protected from the rain with a roof but not from mist and wind and humidity. I don't expect them to last for two years but that is ok because I keep creating new designs.  I did spray them with Mod Podge acrylic Sealer but I know I didn't cover all the nooks and crannies. I'll try a different display without the sealer for another season and see how it goes.

These stars are available through my store here. You can buy the patterns individually or as a group of 6 different styles. I have uploaded step-by-step tutorials as well. Check them out.

  • Star 1 - Cutting File here - Tutorial here
  • Star 2 - Cutting File here - Tutorial here
  • Star 3 - Cutting File here - Tutorial here
  • Star 4 - Cutting File here - Tutorial here

Two New Shapes for the 3D Shadow Boxes

People have made a few special requests for shapes to be added to the growing library of 3D Shadow Boxes.  Today I uploaded cutting files for both a Breast Cancer Awareness Ribbon.......


and a Question Mark....

Looking forward to seeing what people do with their own paper combinations.

Files are already available here on my website store and should be available at the Silhouette Store tomorrow.

For those of you using my SVG files with the Cricut Explore note that I am learning! These two files include some better formatting on my part to make file prep easier on your part.  The dotted lines come in as dotted lines and many of them are grouped so you can quickly label them as SCORE lines. I have down a step-by-step tutorial for newbies on this process here.

Additional Sizes for the Shadow Box Series in Cricut

Nicole Nolan with 3dcuts sizes

Requests have been coming in for additional sizes for making the Shadow Box series. This is especially important for those importing into Cricut because it doesn't maintain a relative size with .SVG imports.

The first set of numbers below was expanded to make better use of 8.5 x 11 card stock.  ( I am sure the thousandths place probably doesn’t matter in these numbers.)

  • Layer 1 - 7.875 h x 7.9 w  (Finished about 6.1" Square)
  • Hanger - 1.635 h x 6.025 w
  • Layer 2-7.290 h x 7.225 w
  • Layer 3 - 6.725 h x 6.725 w
  • layer 4 - 6.360 H x 6.320 w
  • Layer 5 7.770 h x 7.785 w
  • Layer 6 5.960 h x 5.960 w


  • Layer 1 - 9.805 h x 9.835 w (finished about 7.59" square)
  • Hanger - 2.035 h x 7.495 w
  • Layer 2-9.070h x 8.995 w
  • Layer 3 - 8.370 h x 8.370 w
  • layer 4 - 7.915 H x 7.865 w
  • Layer 5 9.670 h x 9.690 w
  • Layer 6 7.420 h x 7.425 w


  • Layer 1 - 10.625 h x 10.650 w (finished about 8.2" square)
  • Hanger - 2.205 h x 8.120 w
  • Layer 2-9.830h x 9.745 w
  • Layer 3 - 9.035 h x 9.070 w
  • layer 4 - 8.575 H x 8.520 w
  • Layer 5 10.475h x 10.500 w
  • Layer 6 8.035 h x 8.045 w

Here is another set that will maximize a 12 x 12 paper. It hasn’t been tested yet so give it a try on unimportant and inexpensive paper first. I am not sure if it will start to get wobbly at big sizes. Let me know what you find out.

  • Layer 1 - 11.470 h x 11.505 w  (finished about 8.92" square)
  • Hanger - 2.380 h x 8.770 w
  • Layer 2- 10.610 h x 10.520 w
  • Layer 3 - 9.790 h x 9.795 w
  • layer 4 - 9.265 H x 9.210 w
  • Layer 5 - 11.310h x 11.335 w
  • Layer 6 - 8.675 h x 8.685 w

And here is the original size for the smallest 5X 5 series.

  • Universal 1 (Just the box without hanger) - 6.4505 W x 6.4307 H
  • Layer 2 - 5.8991 W x 5.9503 H
  • Layer 3 - 5.4915 W x 5.4908 H
  • Layer 4 - 5.1632 W x 5.1938 H
  • Universal Layer 5 - 6.3563 W x 6.3879 H
  • Universal Layer 6 - 4.7708 W x 4.7643 H
  • Hanger - 1.33 W x 4.9" H
  • Hanger and Layer 1 together - 6.4505 W x 8.488 H

Keep sharing photos of your projects. I love seeing all the variations and creativity out there!

3D Paper Stars with a Twist

My new series of cutting files were uploaded to the store and Silhouette this week.  What excited me most about this group of files is how I used a little geometry to make the star files a little more valuable.  Here is an example. Buy Star Style 1 which is a 5-pointed star, but make 10 of the diamond 3D units and assemble them in the opposite direction.

Two different stars from 1 cutting file.  To achieve this I had to work on the geometry of the angles and makes sure they complemented each other. Although I was aiming for this, I didn't nail it on the first try. It took a couple of designs before it worked.

  • This file is 3d Star Style 1 available as an individual file here.
  • It is also available as an All Star group with 5 other files here.
  • An online tutorial for making the star is here.

Love by Jessica Anderson

Jessica Andrews Love

People are starting to expand on my Alphabet Shadow Box concept. Here is one that appeared in a Silhouette Facebook group yesterday by Jessica Andrews.  She combined letters in a classic arrangement with some creative font and design work. She used gradated papers for the layers which I have been wanting to try. Too busy designing new things though to spend time doing additional versions of the letters!

3DCuts Coupon Code

Visit Melody Lane's newest video about constructing my shadow boxes here and find a coupon code for 3DCuts.com good for 1 week from May 13, 2014 - May 20, 2014. She is using one of the new shape shadow boxes in a project. Check it out.

The great thing about these files is the endless possibilities. Here are a few of my projects using the shapes.

They are available in my store for 99¢ each or $2.49 for the set of 6. Or you can check out Melody's video.....!


Another Assembly Video - Melody Lane

Melody Lane has uploaded another video tutorial today, this one showing how to assemble the Alphabet Shadow Boxes. They really are easy to assemble. I recommend you watch the video plus also check out my written tutorial here. It also is a pdf in your download folder for those that need to print. (Only applies to those that bought the file here. Doesn't come if you purchase on the Silhouette Store.) Melody and I did many things the same way and other things our own ways. You get to choose what works best for you!

I am curious about using hot glue instead of the glue dots. Do you use hot glue on paper and do you find it lasts? I have never used it on paper projects only other crafts.

Once I assembled the first alphabet shadow box, I got a regular production line going. It took me just a little less time to assemble each box than it did to cut the next layer.  And I have made tons of these over the past month!

And, as teaser.... I am working on more shapes to keep the heart company. Should arrive here and at the Silhouette Store next week.