
HoHoHo Christmas Tree • Tutorial

Project Description:
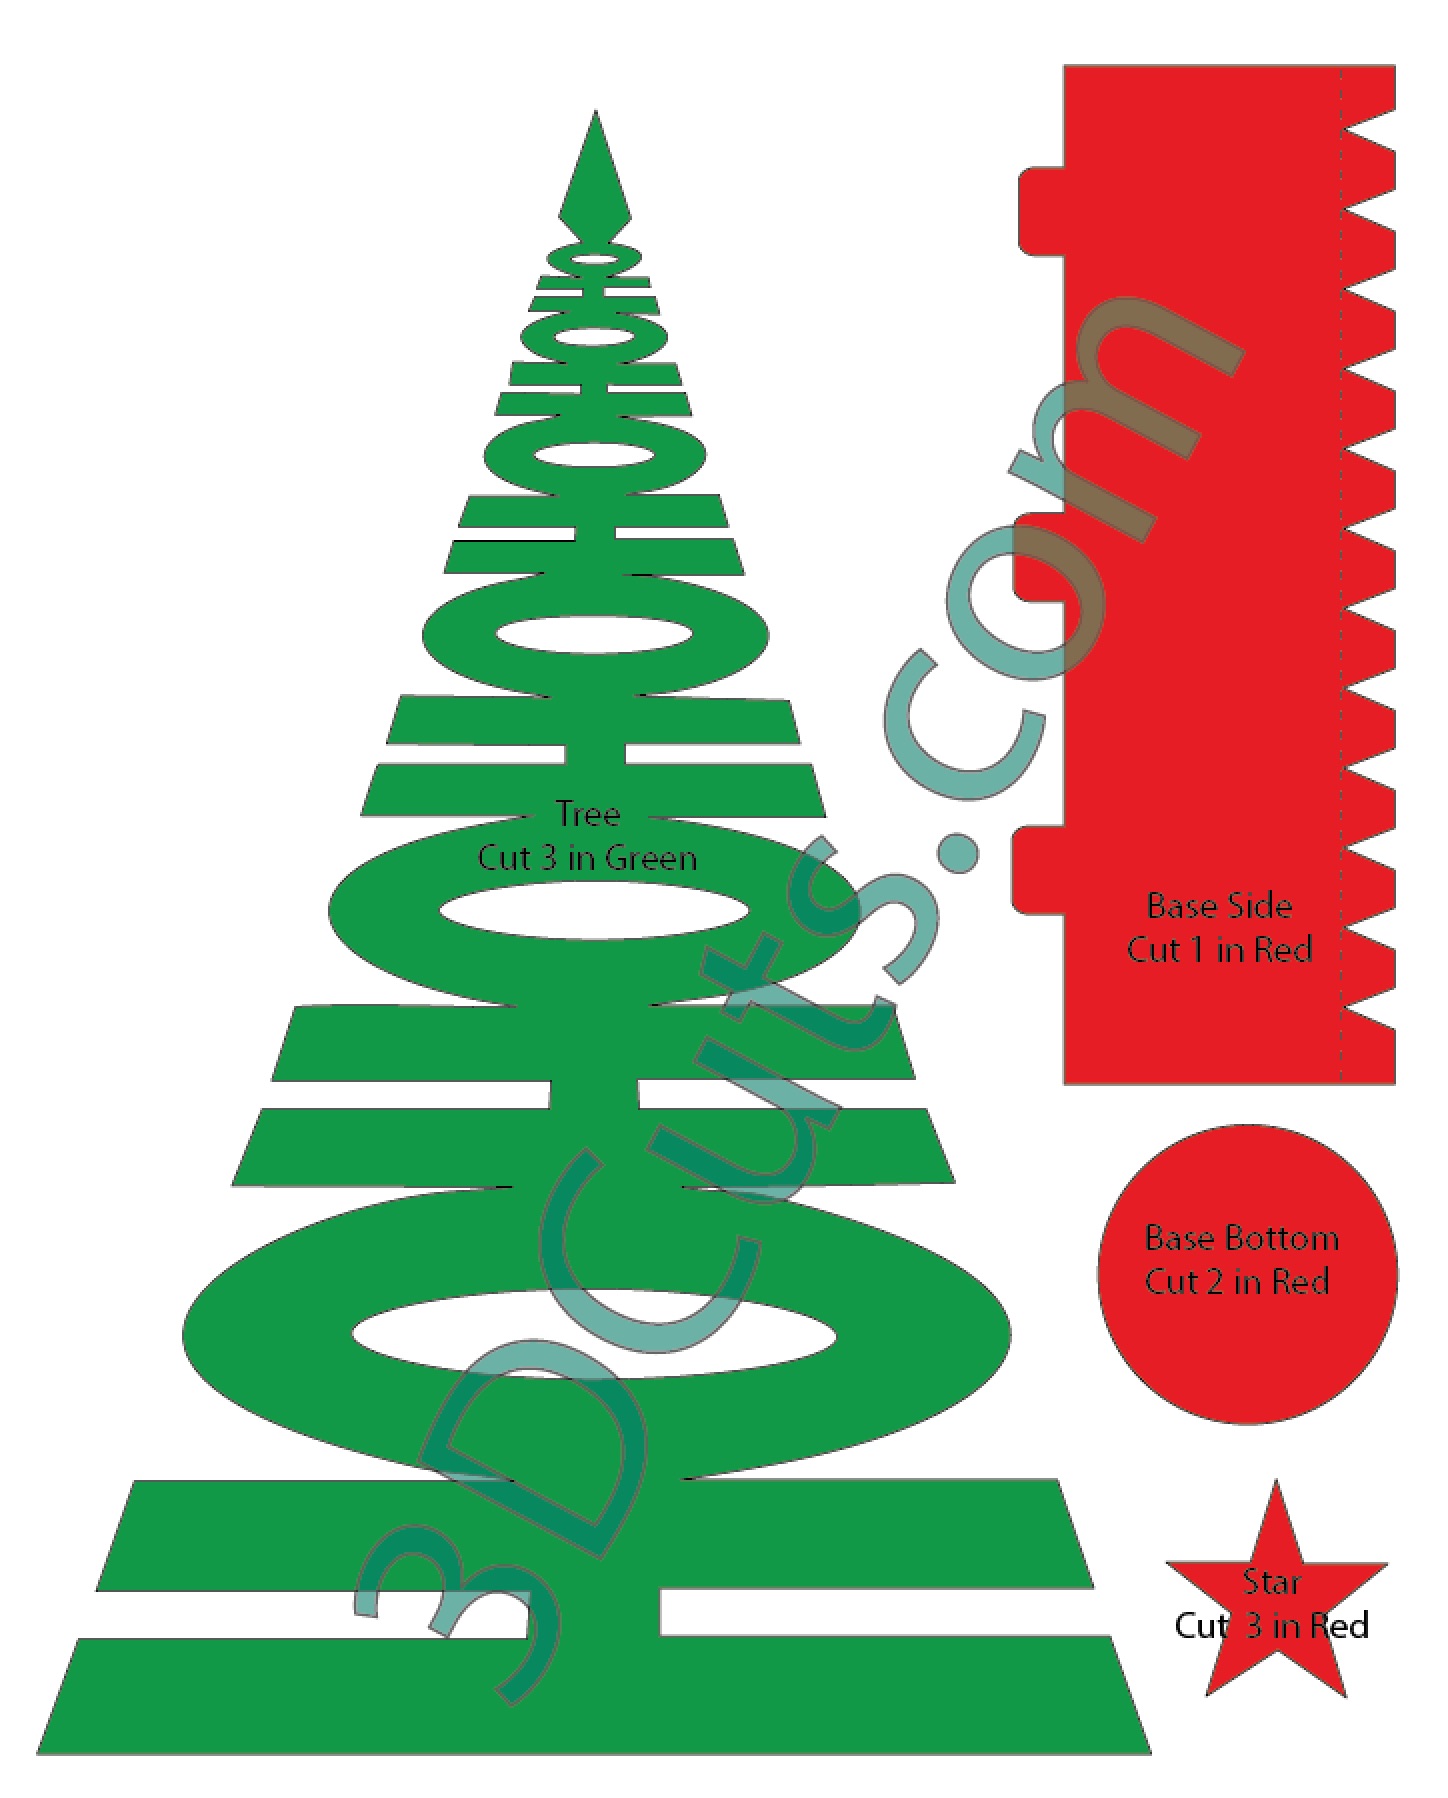
I have taken the letters in HoHoHo and turned them on their side! That is the design element behind this 3D tree design. This easy to make project creates a stunning holiday centerpiece when arranged in groups. The cutting file includes the tree in 2 different sizes however you can stretch it to any size to create variety.
HoHoHo Christmas Tree - Tutorial
Supplies Needed:
- Cutting File here.
- 8.5 x 11" card stock - I Recollections from Michael's
- Adhesive - Your favorite good paper adhesive
- Optional- white beans
- binder clips
Parts sizes: - in inches
- Large Tree 6.50063" w x 9.6011" h
- Red Base Large 2.2339" w x 5.947"h
- Red Circle Large 1.7483 diameter
- Red Star Large 1.2957" w x 1.277" h
- Small Tree 4.9599" w x 7.319" h
- Red Base Small 1.7029" w x 4.5335"h
- Red Circle Small 1.3327diameter
- Red Star Small 0.9877" w x 0.9735" h
Steps for completing the HoHoHo Christmas Card
Special Note: I update the instructions online. Check here for adjustments and additional information. Don't just rely on the pdf file that comes with the download. This file is located at http://3dcuts.com/hohoho-christmas-tree-tutorial.
1. Download the cutting files for your cutting machine from the 3dcuts.com store here..
2. Load the files into your cutting software following the steps for your cutting machine.
3. Prepare the files:.
- For the Silhouette: The SVG files from this site will need to be turned into cutting files. Click here for detailed steps on how to use SVG files on your Silhouette. http://www.3dcuts.com/tutorial-upload-svg-silhouette
- For Cricut Explore: Here is a guide for importing into Cricut Design Space. http://www.3dcuts.com/tutorial-adding-3dcuts-files-to-cricut
4. Cut the files.
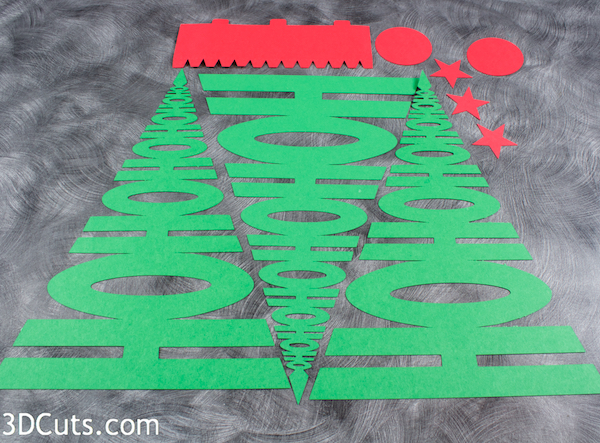
Notice instructions for number of parts needed are included in the layout plan. You need to cut 3 green trees, 3 red stars, 2 red circles and 1 red base. Duplicate the needed parts before cutting.
You can cut 2 of the large trees from 1 piece of card stock if you tilt them.
5. Remove the cutting mat carefully. I find the paper curls less if I peel the mat away from the paper and not the other way around.

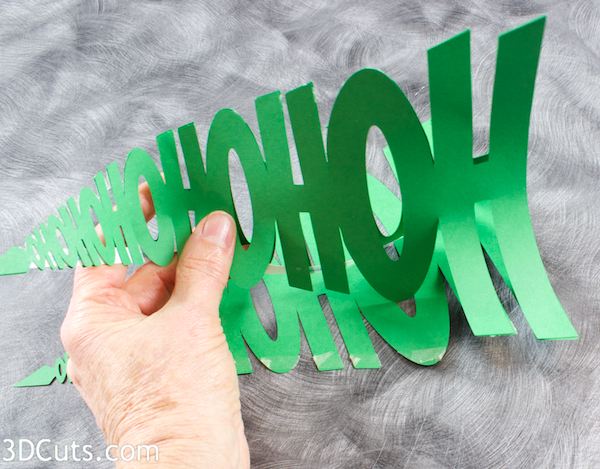
6. Adhere the edges of the 3 trees together.
- Thies image is a bottom view and it shows the 3 trees attached at the ends.
- I have made these trees successfully using both Scar-Tape and Scott Quick Glue. You can use the permanent glue you prefer.
- I used binder clips as I glued things together when using a wet glue.
- I like using Scor-Tape because it keeps my fingers clean. Here is the approach:
- Apply a strip of Scor-Tape down about 3/4 of the tree. The top is too tiny to use the Score-Tape. A Wet Adhesive worked better there.
- I then peeled the backing and snipped the openings and folded the extra glue back onto the green.
- I then attached the edge of one green tree to the other.
- Binder clips weren't necessary with this dry adhesive.

- If using a wet adhesive (I like Scotch Tacky Glue), apply a small amount of glue to the tips of each green "branch".
- Put tiny binders clips to hold in place as you continue working.


7. Add the third side
- The third tree gets connected to the tips of trees one and two.
- Work to not crease the trees. You want them to bend in with a natural fold.


8. Finish the tree tip.
- If you used Scor-Tape for the sides then switch to wet adhesive for the tip. I used Zig glue because of tis tip. The stresses aren't as strong on the glue near the tip so a weaker glue worked here.
- Allow the triple tree to dry and then remove the binder clips.
9. Add the star.
- I folded each star in half and then applied Tacky Glue to the backs.
- Glue one on each side of the tree clipping to hold their tips in place as it dries.


10. Construct and then add the base.
- Apply Scor-tape to the back of the base. Cover the bottom tabs and go up one side.
- Peel the Scor-Tape backing off the lower tabs, slit it between the tabs, and attach them to the bottom of the circle.


- When you get to the end, peel the backing off the Scor-Tape along the end and glue in place completing the cylinder.

- Spread a layer of tacky glue on the bottom of the cylinder and glue a bottom cover to hide the tabs.


- Add weight to the base. Paper decor tends to be light and it falls over if not weighted down. I add white beans to the bases but any number of household things could be used from pennies to rice.

Attach the base to the tree.
- Add Scor-Tape to the tabs on the upper edge of the cylinder base.
- Place the assembled tree over the base and position it so that one tab is in the center of each tree. Pull the tree up so it is about 2" above the table.
- Peel the backing off each tab and press in place to the inside center of a tree. Be careful to keep the tree straight as you apply these.

- Now make another in a different size. Place a grouping on and end table for the holiday season.

Tree Design © 2014 • 3DCuts.com • Marji Roy
Tutorial © 2017 • 3DCuts.com • Marji Roy