Zig-Zag Village - Haunted Version - Tutorial
Project Description
Scroll down for link to video tutorial.
This tutorial is for the assembly of Zig Zag Village - the Haunted Version - by 3Dcuts.com. Zig Zag village is a haunted collection of buildings that can be lit with either tea lights, fairy lights or window light. My favorite was orange fairy lights. But the surprising element of this village is that it easily folds flat for either storage or mailing. It is about 11" wide x 8" tall but can be quickly folded zig zag style to fit in a standard 6" x 9" booklet envelope. It comes complete with files for cats, bats, and pumpkins for spooky Halloween decor.
The assembly is easy basic 3d construction requiring mid-level organization. This version is much quicker thant the original Zig Zag Village yet not as quick as the quick version.
Click here for the cutting file.- http://3dcuts.com/zig-zag-village/haunted
Links to supplies on Amazon:
Many but not all of the supplies I use come from Amazon. Here are affiliate links to those supplies.
Order from Amazon: (Recollections Black Card Stock 50 CT 8.5 x 11” 65 lb)(Affiliate Link)
Order from Amazon: (Recollections Grey Card Stock 50 CT 8.5 x 11” 65 lb)(Affiliate Link)
Order from Amazon: Scor-Tape 1/8" X 27yds (2 Rolls) (Affiliate Link)
Order from Amazon: Art Glitter Glue with metal tip (Affiliate Link)
Order from Amazon: Xyron Sticker Maker XRN150x 1.5 inch(Affiliate Link)
Order from Amazon: 12 LED flickering Tea Lights(Affiliate Link)
Order from Amazon: Premium Silhouette Blade (Affiliate Link)
Supplies Needed:
Cutting File available at http://3dcuts.com/zig-zag-village from 3dcuts.com
8.5 x 11" card stock for buildings - I use Michael’s Recollections 65 lb Black and grey kraft available from Amazon in 50 Ct packages.
Yellow Tissue Paper (wax paper or vellum works too)
Scrap green and orange card stock for pumpkins
Adhesive - 1/4" and 1/8" Scor-Tape
Art Glitter Glue
Optional lighting - tea lights or fairy lights
Major Parts Sizes:
Side 1 Black Details Grouped - 6.4944" w x 8.0542" h
Side 1 Gray Backs Grouped - 5.9597" w x 7.9597" h
Side 1 Gray Main Grouped - 7.9" w x 10.7222" h
Side 2 Black Details Grouped - 4.8639" w x 7.9639" h
Side 2 Gray Main Grouped - 7.9083" w x 10.504" h
Side 3 & 4 Details Black Grouped - 5.0667" w x 5.1071" h
Side 3 & 4 Gray Grouped - 7.7819" w x 9.9661" h
Steps for completing the Zig Zag Village - Haunted Version:
Special Note: I update the instructions online. Check at http://3dcuts.com/zig-zag-village-haunted-tutorial for adjustments and additional information. Don't just rely on the pdf file that comes with the download. Learned hints and corrections are added to the the online tutorial. I'll also add photos submitted by other crafters for additional ideas.
1. Download the cutting files for your cutting machine at http://3dcuts.com/zig-zag-village from the 3dcuts.com store.
2. Load the files into your cutting software following the steps for your cutting machine.
3. Prepare the files:.
From the SIL Store: Important! If you downloaded your cutting file from the SIL store you will need to expand it before ungrouping. (This ONLY for Silhouette users that downloaded the file from the SIL store.) Do a proportional expand and expand the file to 25.980” w. The height should automatically go to 28.306”. The file is grouped by 8.5. x 11” cutting pages. Ungroup the file and regroup each 8.5” x 11 group. Cut each group according to the color displayed.
For the Silhouette:
The SVG files from this site will need to be turned into cutting files. Click here for detailed steps on how to use SVG files on your Silhouette. http://www.3dcuts.com/tutorial-upload-svg-silhouette
DXF files can be opened in the basic edition of Silhouette Design Studio but often require modifications. I recommend using the Designer Edition and using svg files.
For Cricut Explore: Here is a guide for importing into Cricut Design Space. http://www.3dcuts.com/tutorial-adding-3dcuts-files-to-cricut. Be sure to attach parts before cutting.
For Brother ScanNCut: The svg files will need to be transferred to files for your particular machine. You can change SVG files to FCM files at http://www.canvasworkspace.com/ or Google "How to import SVG files into a ScanNCut" for links to tutorials.
4. Cut the files.
All pieces are cut from card stock.
Below is a layout of the various pieces you will be cutting out. There are many pieces so keep each side (1-4) grouped together.
The files will download organized into groupings that will fit on 8.5 x 11" card stock.
I cut all buildings from gray card stock. That isn't a requirement.
I use the cut dotted line for score lines. Fold along these. if your cutting machine can score then you can remove the dashed lines and instead add score lines. You may need to release compound paths to access the dashed lines.
Hints on cutting details:
Use a good blade. I have found the Silhouette Premium blade to be well worth the money for those of you using Silhouette.
A mat in good condition is also important. I use the Nicapa mats from Amazon - Nicapa Cutting Mat (Affiliate Link).
If your mat and blade are good then all the little windows will cut well and come out easily.
5. Assembly
The assembly steps are detailed in the video below. Here is the url https://youtu.be/EErvAj7RA4Y
Adding the details:
In the video I refer to online diagrams to help with placement of the details. Here are the images for you to copy to help with placement:
Follow this diagram for placement of the black details on Side 1. Lumber gets placed randomly over windows.
Follow this diagram for placement of the black details on Side 2. Bats and lumber get placed randomly.
Follow this diagram for placement of the black details on Side 3 and 4. Notice things get placed on BOTH sides of side 3.
Do you prefer to work from photographs? If so, here is a quick photo tutorial of the assembly process. There is more detail in the video.
1. Cut all the files according to the instructions above.
2. Add tissue paper to all windows in all of the building liners.
Each building has a liner with holes cut for the windows.
Put a thin line of glue around each window opening, cover all with a piece of tissue paper (vellum or waxed paper could be used), then use an xacto blade to cut around the window. Do not cover the door openings. Peel away the extra. Do this to sides 1, 2 and 3. The liners will be adhered to the back side of each building. The tissue paper should be between the two so the edges don't show. Match the images to be sure you add the tissue paper to the correct side. Adhere the pieces with added tissue paper to the back of sides 1 and 2 but split them as described below on side 3.
Repeat on side 2.
Adhere to back of side 2.
On Side 3 be careful. Match the photo above. The wall is bent and one tissue paper covered back piece goes on each side.
Sides 1,2 and 3 all have openings to apply tissue paper to. There are none on side 4.
3. Add details.
Referred to the diagrams above for the placement of all the black details.
Start with the roofs and porch.
Add the dormers.
Add the dormer roofs.
Shudders get added at angles.
Lumber is placed randomly over windows to board them up - leaving space for light to shine through.
Side 1 before adding boards to windows.
Side 2 with random lumber added.
Side 3 and 4- one side. Be careful here because things get added to both sides.
Side 3 and 4 - the other side.
Add the extra tree layers. Fold and adhere using Scor-Tape.
Match sizes and styles.
One gets added to the back of the tree on side 1.
One gets added to the front of the tree on side 2. This is on the corner so portion it so it can still bend,
One gets added to the side as shown on side 3. Same side as RIP facing forward.
Fold the sides.
Here you can see the direction of each fold. Side 1 is in the middle back and folded forward.
Side 2 is in the front and folded backward.
Side 3 is on the left.
Side 4 is on the right.
4. Connect the village parts together.
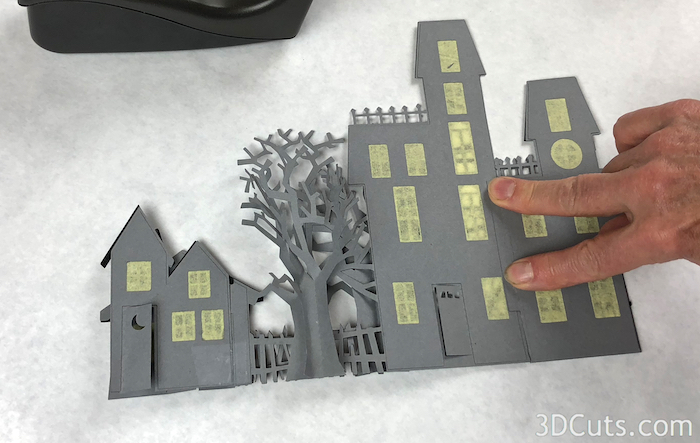
Sides 1 and 2 each fold, side one on the edge of the mansion and side 2 on the dotted line mid tree, and slide together lining up the notches. You want the bottom edges to line up.
View from bottom.
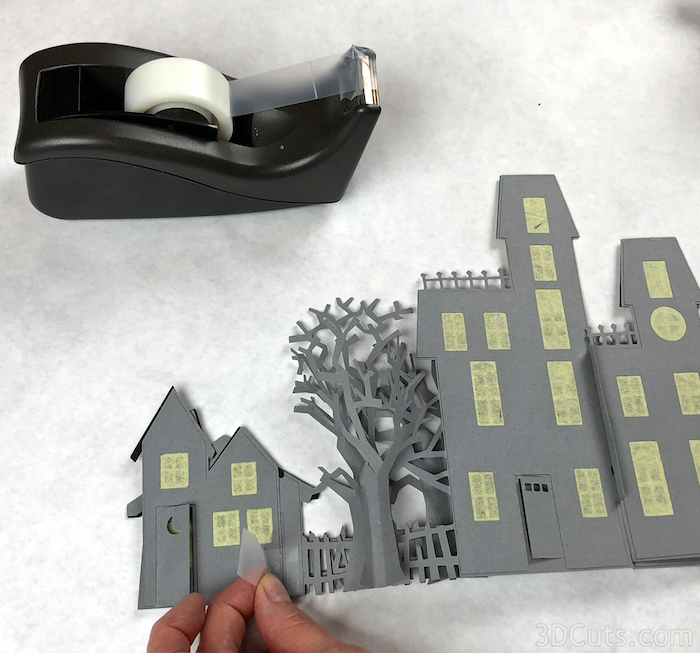
Add a piece of scotch tape to hold the short seam as shown. This is between the back of the fence on side 1 and the shed on side 4, below the window.
Add score tape to the long tab on the edge of the tower on side 2. It attaches behind the mansion edge of side 1 as shown.
Next add the left and right ends.
Fold the main part to be flat.
Fold in the tabs on one end.
The back tab goes behind the back side and gets adhered in place to the back of the mansion. I used score-tape here.
The front tab is folded in behind the side and adhered in place . It should be behind the front wall and not visible from the front.
If you do this while the village is folded flat, this piece will align properly.
Repeat on the right end.
Bottom view with all 4 pieces together.
Add the additional details. The bats and the pumpkins get added to the locations you want.
5. Additions:
The haunted mansion looks great as is but you can keep going by adding spider webbing or fairy lights or LED tea lights.
Make it SPOOKY!
Your village is now complete. How many willl you make and who will you send them too? Remember, it folds flat for storage or mailing!
Share!
Take photos of your finished project and share them to Pinterest, Facebook groups, and email them to me at marji@3dcuts.com. I like to share the creative things people do with my files here on the website.
© 2018 Marji Roy • 3dcuts.com


