
Zig Zag Tulip Card - Tutorial

Project Description
Create this versatile 3D Zig Zag tulip Card to keep or give. The tulip theme is perfect for many occasions and this download comes with the add ons for Happy Easter, Happy Spring and Happy Mother’s Day. It is designed to fold flat for storage or mailing. It fits in a standard 6 x 9” booklet envelope. It is about 10” w and 65
Construction techniques are a simple version of my other zig zag projects like the Valentine Garden or the quick village. There is a video of the assembly below. Scroll to step 7 to start watching.
Cutting File available here from 3dcuts.com.
Supplies needed:
Cutting File available here from 3dcuts.com.
8.5 x 11" card stock - I used the 65lb Cardstock from Recollections for colors and Neenah 110 Index Card stock from Amazon for white.
Adhesive - Art Glitter Glue and Scor-Tape 1/2” and 1/8”
Envelopes
Ribbon - 8” or 1/8” satin
Scotch Tape
Optional - silver ink
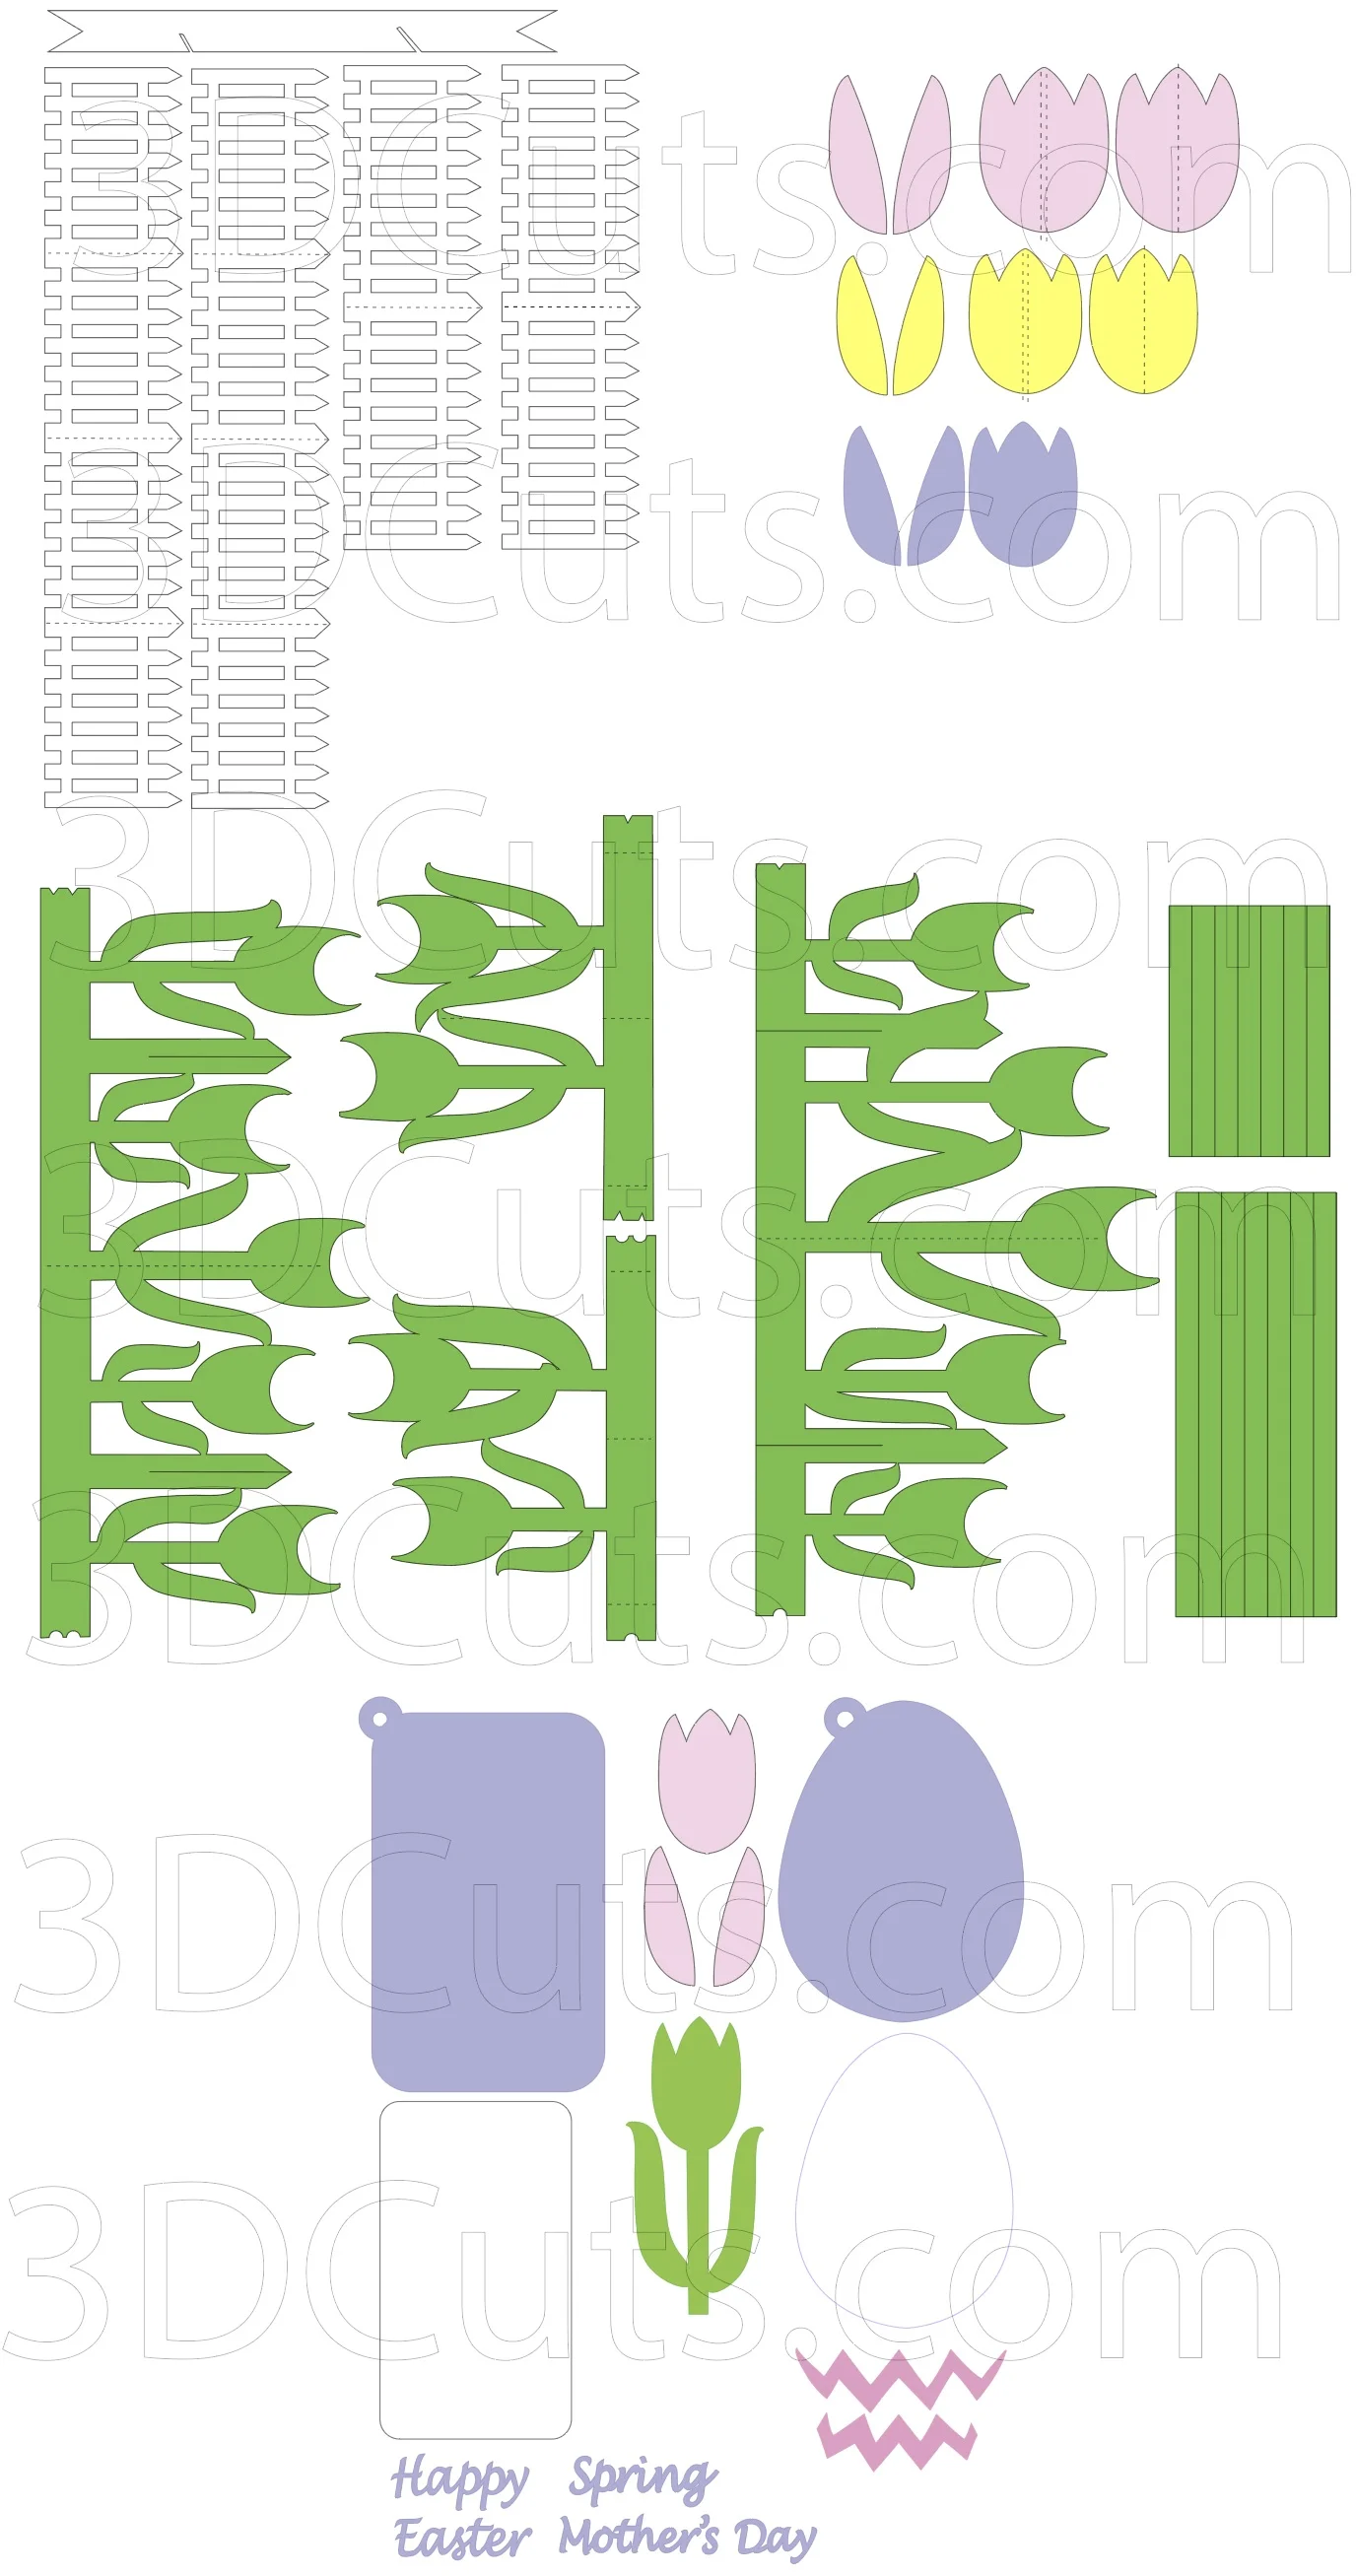
Major Parts Sizes - as download. Keep grouped for sizing:
All white pieces together: 7.1889" w x 9.6306" h
Green Parts 1 1 with 3 sides:7.4278" w x 9.9569" h
Green Parts 2 with 1 side and strips: 7.0083" w x 9.0903"h
Tulips grouped as shown: 4.9498" w x 6.0686"h
All Add-on Card Parts as shown: 8.0252" w x10.4638"h
Banner: 6.25" w x .5 "h
Links to supplies on Amazon:
Order from Amazon: Neenah Exact Index Card Stock 110lbs. 250 sheets (Affiliate Link)
Order from Amazon: Scor-Tape 1/8" X 27yds (2 Rolls) (Affiliate Link)
Order from Amazon: Art Glitter Glue with metal tip (Affiliate Link)
Order from Amazon: Premium Silhouette Blade (Affiliate Link)
Order from Amazon: Xyron Sticker Maker XRN150x 1.5 inch(Affiliate Link)
Steps for completing the Zig Zag Tulip Card:
Special Note: I update the instructions online. Check here for adjustments and additional information.
1. Download the cutting files for your cutting machine here from the 3dcuts.com store. http://3dcuts.com/easter/zig-zag-tulip-card
2. Load the files into your cutting software following the steps for your cutting machine.
3. Prepare the files:.
For the Silhouette: The SVG files from this site will need to be turned into cutting files. Click here for detailed steps on how to use SVG files on your Silhouette. http://www.3dcuts.com/tutorial-upload-svg-silhouette
DXF files can be opened in the basic edition of Silhouette Design Studio but often require modifications. I recommend using the Designer Edition and using svg files. DXF files do not always maintain file sizes and you may need to adjust according to sizes noted above.
For Cricut Explore: Here is a guide for importing into Cricut Design Space. http://www.3dcuts.com/tutorial-adding-3dcuts-files-to-cricut. Remember to attach files before cutting in Cricut.
For Brother ScanNCut: The svg files will need to be transferred to files for your particular machine. You can change SVG files to FCM files at http://www.canvasworkspace.com/ or Google "How to import SVG files into a ScanNCut" for links to tutorials. Some models of Brother Scan N Cut can directly import the SVG files.
4. Cut the files.
All pieces are cut from card stock (although experimenting with paper might be fun!).
The files are grouped to fit well on 8.5” x 11” card stock. I recommend keeping them grouped as is. The measurements listed above are by group.
There are 14 tulips on the design. You will need to cut two for every tulip so cut 28. In my sample the large folded one is pink, the small folded one is yellow.(These are the ones on the layout with dotted fold lines). For the other 12 there are 3 pink (cut 6), 4 purple (cut 8), 2 yellow (cut 4), and 3 blue (cut 6). These have no fold lines. This provided a good random mix but it can be varied.
The white banner for the sentiment is designed to be made separately on regular printer paper. It is a pdf file you print and cut using an xacto blade.
5. Consider variations.
There are endless combinations of papers colors and crafting techniques you could apply to this file. Here are a few possibilities to get your creative juices flowing.
Use pastel tiny print patterned papers for the tulips. This would provide some different and interesting visuals but also create a much thinner and lighter card for mailing.
Make the tulips all white and using a rose ink to distress the top edges for a fancier tulip with gradated color.
6. Things I would do differently and adjustments:
Every time I do a project I see things to vary next time. Here are some observations about things I might change next time.
In the video I used silver ink to ink the edges of the petals. I would only ink the single edge that faces the center and not the outer edges. I did the outer edges in the tutorial and I found that was extra effort for no added visual effect. And it got messy.
I would also only use silver on the blue and purple card stock. It wasn't attractive on the yellow or pink. May be a rose ink would be a better choice.
During assembly the tips of the green tulip supports kept showing. I adjusted the cut file to lower those so they will be visually different between the cut file and the video.
7. Assembly
The assembly steps are detailed in the video below. Here is the YouTube url https://youtu.be/4jJNOdHYHzI.
6. Sending the card:
This project is designed to fold flat for storage or to be mailed in a 6" x 9" booklet envelope.
There is an affiliate link in the supplies above for ordering them from Amazon.
Place a cardboard support in the envelope to prevent bending.
It will require extra postage.
Creative Applications:
I will post photos of cards other crafters have made. Send a photo to 3dcuts.com if you have done something interesting with this file.
Melissa Lux of Longmont, CO shares her Mother’s Day card. She used chalk to highlight the edges of the tulips and give a little more definition to the forms.

Linda Lee of Ohio did a beautiful job of varying my tulip zig zag card. The two-toned tulip in the modified shape is very pretty. She shared this photo at the Silhouette Card Making & Paper Crafts Facebook group.

