
3D Calligraphic Mobiles Assembly

Project Description:
This tutorial is for the assembly of the 3D Calligraphic Mobiles. It applies to the designs made by Marji Roy at 3dcuts.com, sold via the Silhouette Store, or for unique designs you create yourself.
Want a file for a special name or word? Design it yourself! If you are interested in creating your own calligraphic cutting files check out the step-by-step ebook tutorial by Marji Roy available here. You can create your own designs using the Silhouette Design Studio software.
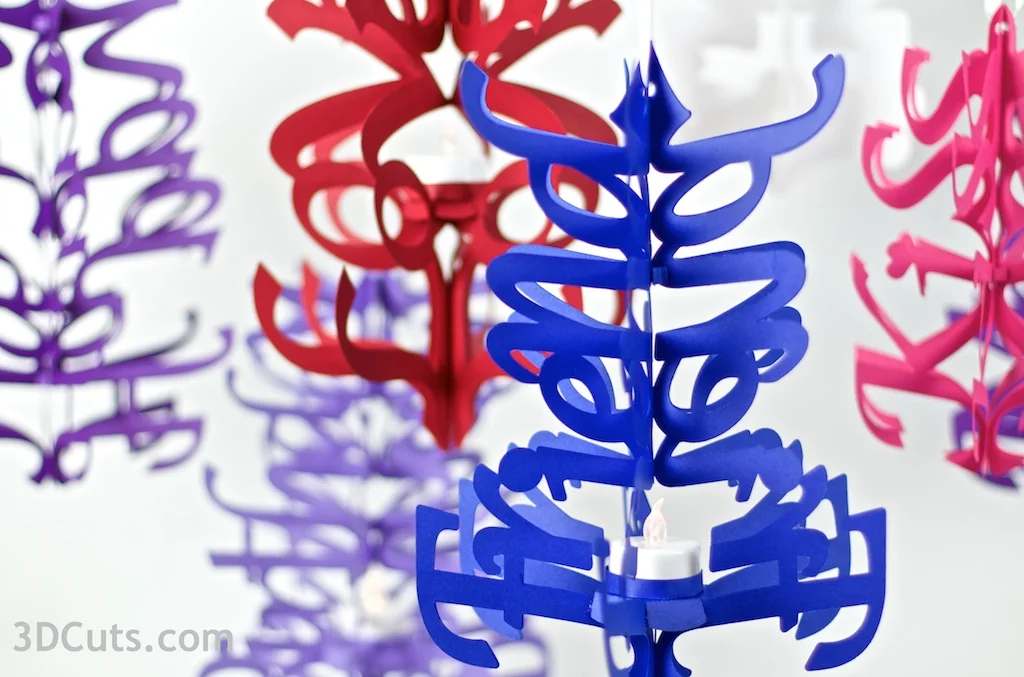
3D Calligraphic Lanterns

Supplies Needed:
- Cutting File
- 8.5 x 11" card stock - I used the 65lb Cardstock from Recollections. Each mobile takes 7 sheets of card stock
- Adhesive - I have used spray adhesive (less expensive) and Xyron (cleaner).
- Zig 2-way glue
- Ribbon (Optional)
- LED Tea Light (optional)
- Glue Dots
- Scor-Tape
Parts sizes: (For those importing into Design Space) - in inches
- Love Mobile
- All pieces together - 8.1804" w X 17.2809" h
- LOVE piece only - 8.1804" w X 10.8148" h
- Love Spacers all - 6.5416" w X 5.9561" h
- Kiss Mobile
- All pieces together - 7.7221" w X 9.8088" h
- KISS piece only - 6.2202" w X 9.8088" h
- Kiss Spacers all - 1.6583" w X 1.0876" h
- Happy Birthday Mobile
- All pieces together - 8.2965" w X 28.1514" h
- HAPPY piece only - 7.8341" w X 10.6176" h
- BIRTHDAY piece only - 7.9855" w X 10.8262" h
- All Spacers - 7.182" w X 6.3028" h
- Optional Flowers All - 10.7197" w X 8.2647" h
- Friend Mobile
- All pieces together - 6.6546" w X 15.6051" h
- FRIEND piece only - 6.3863" w X 9.4576" h
- Spacers all - 6.5416" w X 5.9561" h

Steps for completing the 3D Calligraphic Mobile:
1. Download the cutting files for your cutting machine or using the steps outlined in Marji Roy's ebook, design your own.
2. Load the files into your cutting software following the steps for your cutting machine.
- Click here for detailed steps on how to use .SVG files on your Silhouette (with Design Studio).
- Click here for steps on how to use these .SVG files in Design Space with your Cricut Explore.
3. Cut the files from the card stock of your choice.
- Each mobile word shape file needs to be cut 6 times.
- The spacer circle needs to be cut once.
- The spacer stripes need to be cut once, but possibly twice.
- There is an optional tea light holder (2 pieces) that needs to be cut once if your design is going to include an LED tea light.
4. Fold all 6 word shapes in half along the dotted score line.

5. Glue the folded word shapes together.


- Each of the six shapes will be glued back-to-back to each other creating the 6-pointed lantern shape.
- Some notes on glue choices. One half of the entire word shape must be covered with a permanent paper glue. Both spray adhesive and Xyron dry adhesive work well. I have used both.
- I like the cost and end result (no glue over-hang) of the spray adhesive but it is more difficult to apply. You must have a well ventilated area for using spray glue and it can be tricky to keep your fingers clean. I set up a spray booth inside an old cardboard box out on the porch when weather permits. I put a separator between the folded layers of a word and use hardware (heavy washer) to weight down the tips. I apply a coating of spray adhesive and quickly place it onto the next shape (see below). I keep Goo Gone nearby and have to clean my fingertips regularly.
- It is much easier to use a Xyron Creative Station sticker maker to apply complete layer of glue. I use the 5" wide version, fold the word in half and feed it through. But it takes a lot of adhesive! I can't do much spray gluing during the New England winter months and this is a great indoor alternative.
- I have found that tracing the edges before removing the backing on the Xyron helps reduce the film over-hang issue.
- Hint on gluing: The glue gets applied to only 1/2 of the design. If, on all 6 pieces you apply glue to the same half, a glue side will face a non-glue side and stick to it. You can glue all 6 pieces together that way. If, per chance, you put glue on one wrong side, it is ok but you will have to hand apply glue to the last side. This is explained in detail in the instructions. The goal at the beginning is to apply the glue to the same side of all 6 pieces.

- After applying the glue, carefully lineup the fold line near the center of one word shape to the next.
- Press in place.
- Work out to the top and bottom of the design as you stick the parts together.

- Glue all six folder parts together into a stack.
- The stack will fan out, open up and the top of the stack will wrap around and be glued to the bottom of the stack forming the 6 pointed mobile shape.
- If you applied glue to the same side of each piece, you will find a glue surface there as you wrap the last piece around to meet the first.


- If you didn't apply glue to the same side on each piece, that is not a big problem, You will have to apply the glue carefully by hand.
- For gluing this last piece in place, I choose a good, quick drying paper glue. If you can work quickly, the Zig 2-Way glue pen works well.
- Be sure to only apply glue to one letter at at time, glue it in place and then move on out to the ends and tips.
- You want to be sure to get the paper in place before the glue dries. It needs to be a good, permanent seal.
- I worked the area near the fold first, pressing it into place, and then worked my way out to be sure the glue was always wet.

6. Add the spacers:
- Fan out the 6 different spokes of the mobile. They will not want to stay in place until you insert the spacers.
- I have 2 different types of spacers. Some designs will use one, some the other, and some both. For the Friend mobile, I used both.

Tea Light circle spacer in place.
How to decide which type spacer and how many:

Tiny Triangle spacer in place

Red rectangles show the locations of spacers.
- The cutting files for all variations of spacers are included with the e-book on making your own designs. The needed spacer files are included with each pre-designed word.
- If your mobile has been designed with space for an LED tea light, you will want a circle spacer with 6 large triangle supports. That serves double duty as being a spacer and a platform for the tea light.
- If the tea light platform is near the center of the design, that might be the only spacer you need.
- If the tea light holder is near the bottom, you may find it necessary to add small triangle spacers near the top. This is the case with the Friend design.
- If there is no LED platform then you will need at least 2 sets of small triangle spacers. If you put two sets in and your mobile is still floppy and one end tries to close up, you need another set of spacers.
- If your design has a lot of long skinny legs you may need more spacers.
- You don't need to decide before you build. You can add the triangle spacers after the fact if you find they are needed.
For the Friend Mobile.
- I have included a sketch of the the Friend mobile. The actual paper shape is shown in blue.
- The long red rectangle near the base shows where I inserted a circular spacer with 6 large triangles that will also be a tea light platform,
- The small rectangle near the top is the location I chose to put a ring of small triangular spacers.
- This combination gave the lantern (which is about 10.5" tall) good rigidity and spacing.

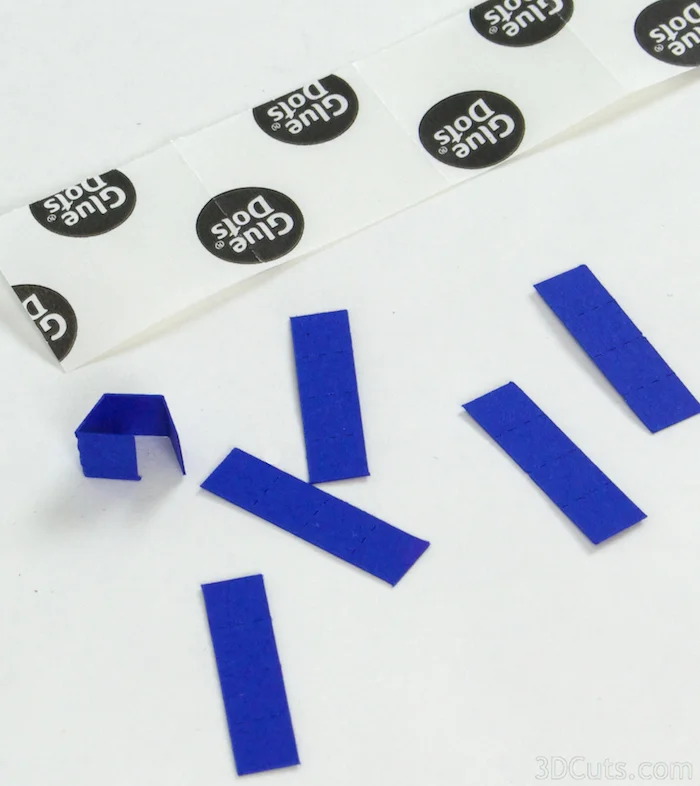
7. Adding a circular spacer.
- This step is the trickiest part of the assembly
- Note - these photos are from the assembly of a different design. The color is different but the process is exactly the same.
- First, fold the larger rectangle pieces into fourths along the dotted score lines.
- Add a piece of Scor-tape ( or other adhesive) to the last segment.
- Glue it over the first segment creating an equilateral triangle.

- Make all 6 larger triangles.
Hint: I found it helpful to balance the mobile in a coffee cup while I worked on the next series of steps.
- Place the large triangle into the center of the design at the point where the LED tea light platform will be installed. You want the center point of the triangle to be right along the center axis down through the design. Your letters may met here, or there may be a space here. If there is a space, estimate where the center will be for placement.
- Notice where the sides of the triangle come into contact with the lines of the letter. It will be different for every design.
- You need to position the triangle so the edge that will be the top, clears all the spokes. The outside dye of the triangle needs to meet up with a top edge of a letter.
- Place 2 glue dots here where the 2 pieces will touch and position the triangle in place. If you are unsure of placement, start with re-positional glue dots. The triangle will keep the two spokes of the design separate by 60 degrees.
- The diagram at the right shows how the triangles (shown in red) will nest between all 6 spokes (in blue) to keep them evenly spaced.


- Add a triangular spacer between the 2 spokes that are directly opposite the first one installed.
- These two should meet in the middle. If they don't, reposition the first one so it will meet this second one on the middle axis.
- Once you have establish the first 2 pieces, switch to permanent glue dots.
- Place glue dots on the sides of the triangle and glue in place.
- Add a triangle spacer between all spokes forming a wheel of triangles. Work to keep their tops level with each other because this is where your LED light platform will be placed.
8. Add the LED light Platform
- Add Scor-Tape to each of the tabs on the 6 sided cover.
- Fold all the tabs down.
- Place the cover over the 6 large triangles you positioned in the previous step. The tape will fabe down.
- A spoke gets positioned in each of the slots
- Turn the design over, peel the backing off one piece of Scor-Tape and fold the edge down over the side of the large triangle spacer.
- Repart for all 6 sides.


9. Add Triangular spacers.
- Little triangular spacers can be added in circles of 6 at any floppy points in your design.
- There are six small rectangles with 3 dotted fold lines.
- Fold then into little triangles and apply a glue dot so the fourth panel overlaps the first and glue in place.
- Make 6 triangles,
- Apply 2 glue dots to two edges and slide the little spacer right into the center of the design between 2 "word spokes". Stick it to both spokes.
- Repeat, at the same location between all "word spokes".
- These spacers will provide a ring of support and equal spacing that helps the mobile hold its shape.
- If you have a long design, you might find it helpful at add an additional ring of triangle spacers.

- With the spacers in place, the lantern should stay open with the 6 spokes correctly spaced.

10. Add the LED tea light cup. (optional)
- The tea light cup is made by gluing the edge piece around the circle.
- A standard tea light is 1 1/2" in diameter. If yours are a different size, adjust the sizing in the file.
- Run the edge piece over the edge of your desk to give it a natural curl. This will help in placement.
- Fold over all the tabs toward the center of the curl along the dotted fold line.
- Apply tacky glue (or run the small circle through a small Xyron ) to the outside edge of the bottom of the circle.

- Attach the side wall to the circular base.
- The tabs go on the bottom.
- Glue it all the way around the circle and add a glue dot to the end to close up the edge seam.

- Test your tea light to make sure it slide into and out of the cup easily.

- Apply tacky glue to the bottom of the cup and glue it to the center of the circular spacer platform.

- Insert an LED tea light. DO NOT use real tea lights with live flame.

11. Add ribbon.
- Thread a nice ribbon through the top for hanging.

- Find a good place to hang this unique mobile.
- The end result is very oriental looking and would work well in any place you might hang paper lanterns. It is great for celebrations, add it to a garland, string them around the patio for a party or in an archway indoors. Suspend them over the dessert table at a party. Be creative!
- Project complete!

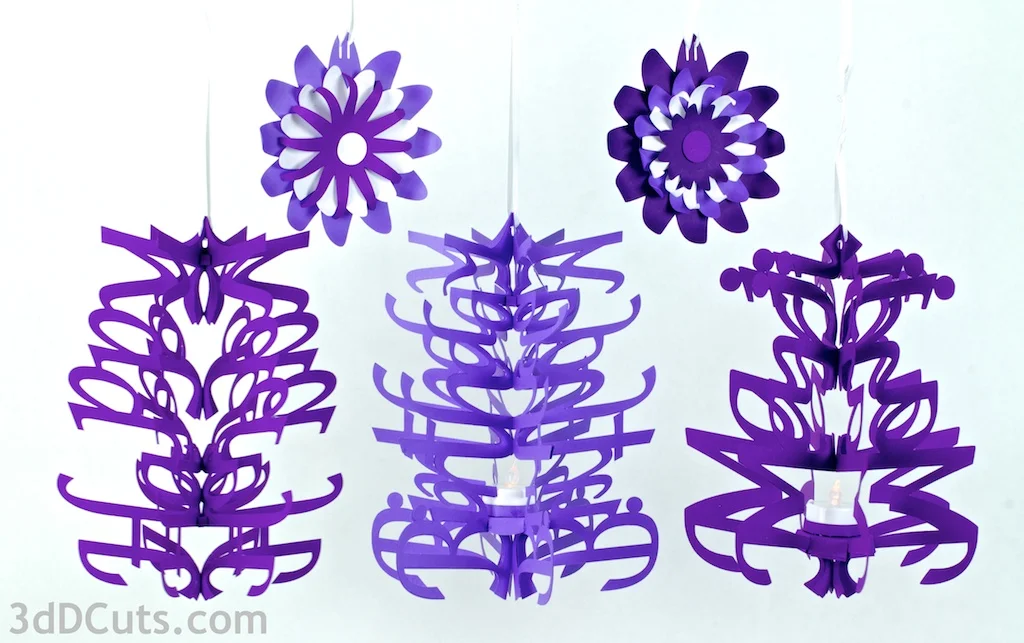
But don't stop with just one. These are easy enough to make bunches! Can you identify the words used to make these designs?
You can also try designing your own cutting files. Marji Roy has made available a step-by-step tutorial on how to create your own calligraphic mobiles right within the Silhouette Design Studio software. It is available here at http://www.3dcuts.com/calligraphic-word-mobiles.
© 2015 Marji Roy, 3DCuts.com