
Winter Wanderers Series - Shadow Box - Tutorial

Project Description:
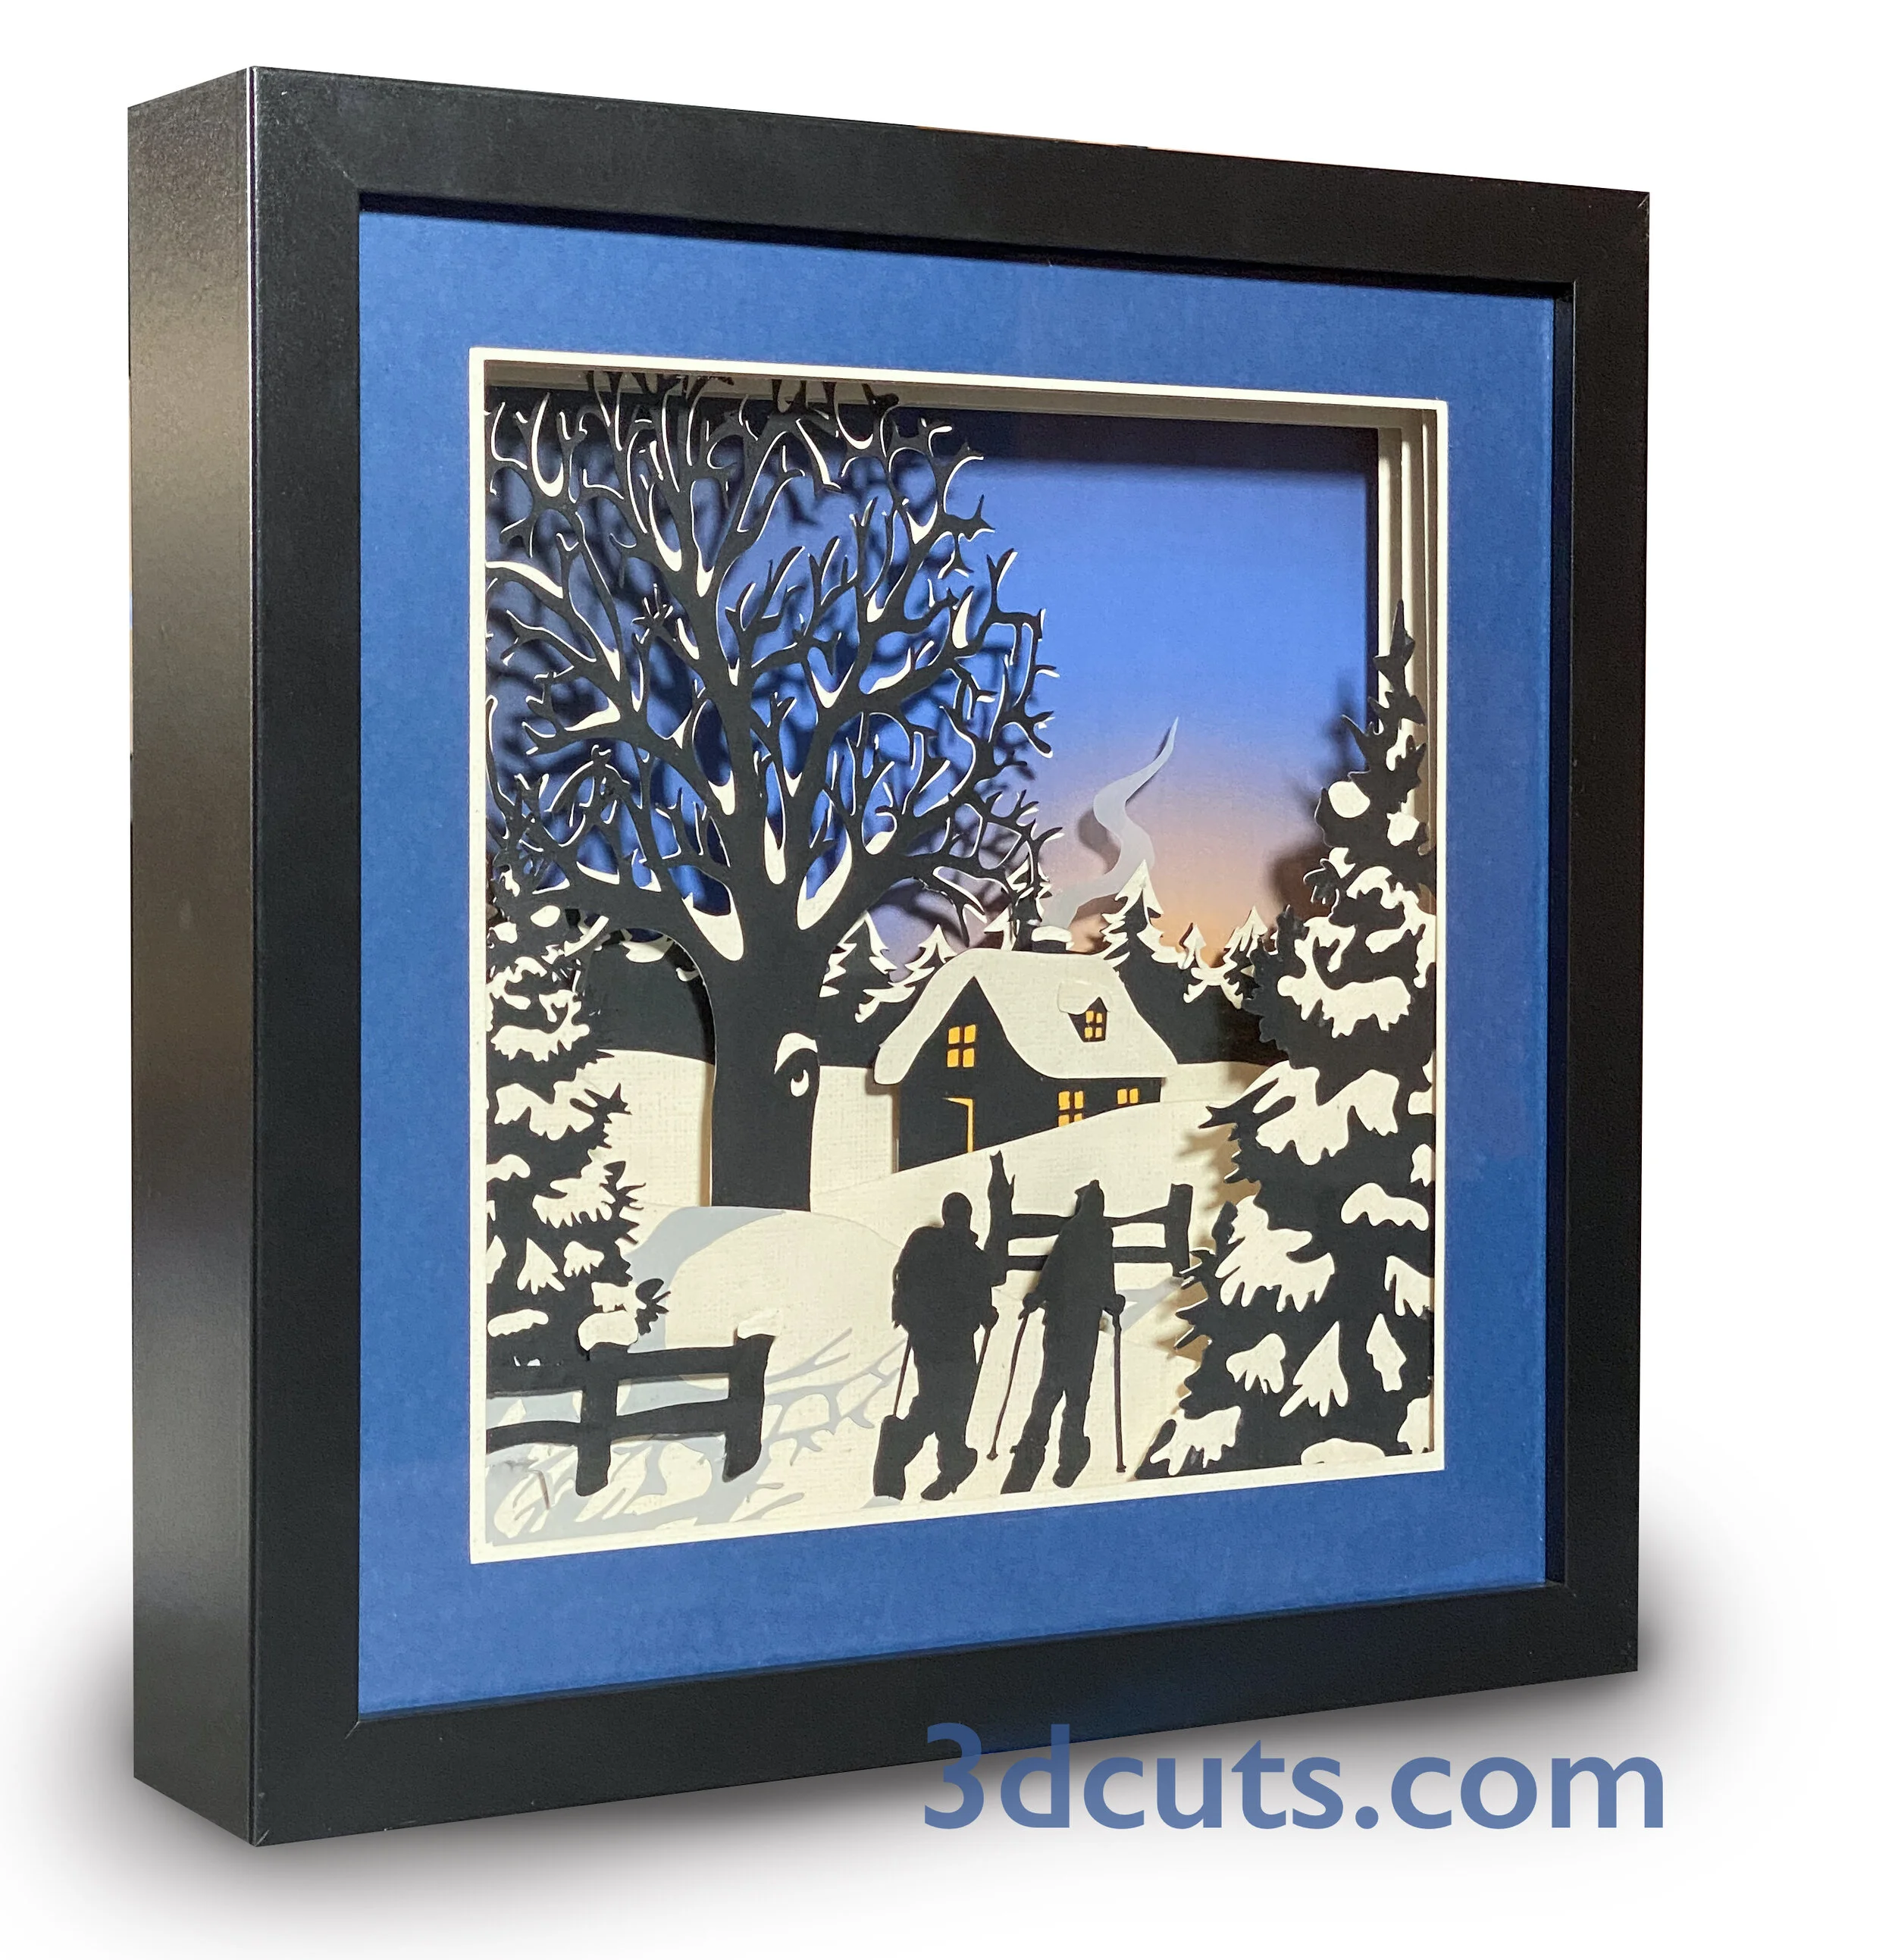
This projects has you creating a charming and customizable winter scene to be installed in a purchased 11 x11 (12 x 12 exterior) shadow box. The peaceful scene includes an isolated cottage in a snowy field to which you add a person to complete the scene. The download includes a skier, snowshoeing companions, a couple walking their dog and a man or woman walking a dog. This project features the new, easier construction technique that uses readily available straws as layer spacers. Included are two print files for the sky (stars or gradation) however other styles can be substituted.
Cutting File available here from
https://3dcuts.com/shadow-boxes-people-sports/winter-wanderers-series
Supplies needed:
Cutting File available here from 3dcuts.com.
Card stock 4 12 x 12 sheets in vanilla- I used the 80lb 12” x 12” American Craft Cardstock in Vanilla - affiliate link below.
Black and gray are 65lb Recollections (Michael’s) 2 sheets black and 1 gray needed.
1 scrap of yellow orange card stock
1 scrap of of vellum for smoke
1 12 x 12” color card stock for mat
20 10” x .28” clear drinking straws - link below
1/8” Scor Tape
Art Glitter Glue
Frame - Link below to the 11’ x 11” frame I got at Amazon. It measures 12 x 12” on the outside and 11 x 11” on the inside. You can re-size files to fit any square frame.
Inkjet printer to print background or make your own.
Order supplies from Amazon:
(Affiliate links work for USA customers only. Other countries will need to search in their local Amazon for the products.)
Order from Amazon: 11 x 11 Shadow Box Frame by AmericanFlat(Affiliate Link)
Order from Amazon: 12 x 12 American Craft Vanilla Card Stock (Affiliate Link)
Order from Amazon: 10 Inch Drinking Straws (10 Inch x 0.28 Inch) (250, Clear)(Affiliate Link)
Order from Amazon: (Recollections Black Card Stock 50 CT 8.5 x 11” 65 lb)
Order from Amazon: Art Glitter Glue with metal tip (Affiliate Link)
Order from Amazon: Scor-Tape 1/8" X 27yds (2 Rolls) (Affiliate Link)
Order from Amazon: (Precision Tip Applicator Bottle) for use with Glitter Glue
Order from Amazon: Premium Silhouette Blade (Affiliate Link)
Major Parts Sizes - as download.
Measure the inside of your frame first. Cut the layers to match that. Mine were:
Front frame Layer 1- colored - 10.99” W x 10.99” H (optional)
Frame back Layer 1 - Vanilla - 10.99” W x 10.99” H
Layers 2-4 - 10.48 ”W x 10.48” H
Black Layer with big tree and house, etc. 7.9091”W x 10.4778”W
Black Layer with 2 trees - 6.0364”W x 8.1591”H
Page with People and shadows - 6.8309”W x 9.8221”H
Page of Assorted Parts - 6.4913”W x 5.9031”H
Skier and shadow - 4.2932”W x 4.9495” H
Gray sheet of shadows - 5.2023” W x 5.5248”H
Skies 11” wide by whatever height.
Additional sizing information: All the files were created in the same scale and for most users they will come in and fit together. Occasionally there is a OS/software/cutter combo that does not recognize the size meta data and brings the individual files in the random sizes. Compare before cutting to be sure your sizes match. You can adjust to the numbers noted above. If your software allows a larger file you can import the SVG ALL file that has everything in it. It is included in the download but not all cutting software can open the file. That can be used to keep sizing consistent or to re-size for a different shadow box. The skies which are in that file can not be imported into Cricut Design Space but the other parts will import.

The above images are included (along with shadows) in the download. You can make 5 different shadow boxes with this set.
Below is the layout of the files as divided in the download.

Steps for completing the Winter Wanderers Shadow Box:
Special Note: I update the instructions online. Check here for adjustments and additional information.
1. Download the cutting files for your cutting machine here from the 3dcuts.com store. https://3dcuts.com/shadow-boxes-people-sports/winter-wanderers-series . For those of you that are reading this as a pdf I recommend viewing it online at my tutorials page at this url. https://3dcuts.com/winter-wanderers-tutorial There all the links will be live.
2. Load the files into your cutting software following the steps for your cutting machine.
For the Silhouette:
SIL Files from uploaded SVG purchased from 3dcuts.com:
The SVG files may need to be turned into cutting files. Click here for detailed steps on how to use SVG files on your Silhouette. http://www.3dcuts.com/tutorial-upload-svg-silhouette
DXF files can be opened in the basic edition of Silhouette Design Studio but often require modifications. I recommend using the Designer Edition and using svg files. DXF files do not always maintain file sizes and you may need to adjust according to sizes noted above.
For Cricut Explore: Here is a guide for importing into Cricut Design Space. http://www.3dcuts.com/tutorial-adding-3dcuts-files-to-cricut . Remember to ATTACH files before cutting in Cricut.
For Brother ScanNCut: The svg files will need to be transferred to files for your particular machine. You can change SVG files to FCM files at http://www.canvasworkspace.com/ or Google "How to import SVG files into a ScanNCut" for links to tutorials. Some models of Brother Scan N Cut can directly import the SVG files. Some files are on 12” mat so you may need to select 12 x 24” mat for correct sizing.
3. Cut the files.

Detail photo of the straw construction technique for shadow box spacers by Marji Roy of 3dcuts.com
Do you need to re-size? Do so before cutting.
If you want to re-size the files bring ALL parts into one work space, group together and do a proportional re-szing. Then ungroup the files and separate into individual cutting files again.
It is best to have good quality card stock and a good blade and clean, sticky mat. I use the Premium blade and the Nicapa mat.
Decide on which figure you will add to your shadow box. You do not need to cut them all. Just cut one figure and its shadow.
4. Print the sky and the plan.
Included in the download are 2 jpg sky files. The jpgs are not in the folders but at the top level of the download. Decide which you want to use or visit Pixabay.com and select a different one. The file is designed to be printed on an 8.5 x 11” piece of card stock on a color printer. I used my ink jet printer on high quality and printed on regular white card stock. Make sure to print in landscape orientation.
You may insert any sky you wish behind this shadow box. Options include:
Using the one included in the download.
Printing a photo of a sky from another source (Have you photographed a favorite sky?)
Making a watercolor wash on paper
Using another type of gradated paper.
Print a copy of the layout of the scene you are going to create. I have included images of all assembled below the video. You will want to refer to it as you follow the video.
5. Assembly
The assembly steps are detailed in the video below. Here is the YouTube url https://youtu.be/Arce4RdgZrQ
Below are the 5 different designs that are included with this download. Print the one you want to make to use as a reference during assembly.


6. Share
I love to see your finished projects. Please send photos to me at marji@3dcuts.com or share your photos on facebook, facebook crafting groups, pinterest and instagram.
https://www.facebook.com/3dcutsPaper
https://www.instagram.com/3dcutspaper/
7. Give
Who are you making this for? Enjoy giving.
Variations: Here are photos of this project completed by other crafters. I am always looking for variations to share. If you do something creative with my file send a good photo to me at marji@3dcuts.com. I will include some here.
Deborah Verkerke modified the Winter Wanderers shadow box by replacing the people with 2 children sledding. I designed this shadow box to make it easy for you to swap in different silhouetted figures.

Brian Moss eliminated the building from his rendition of Winter Wanderers. He also found a dramatic sky.

Carola von Straden did some gorgeous variations. She added family members but also used a glistening glitter paper for sky which blends beautifully with the mat color.
