
Heart Tree Shadow Box Tutorial - Square Format - Straw Construction Technique
Project Description
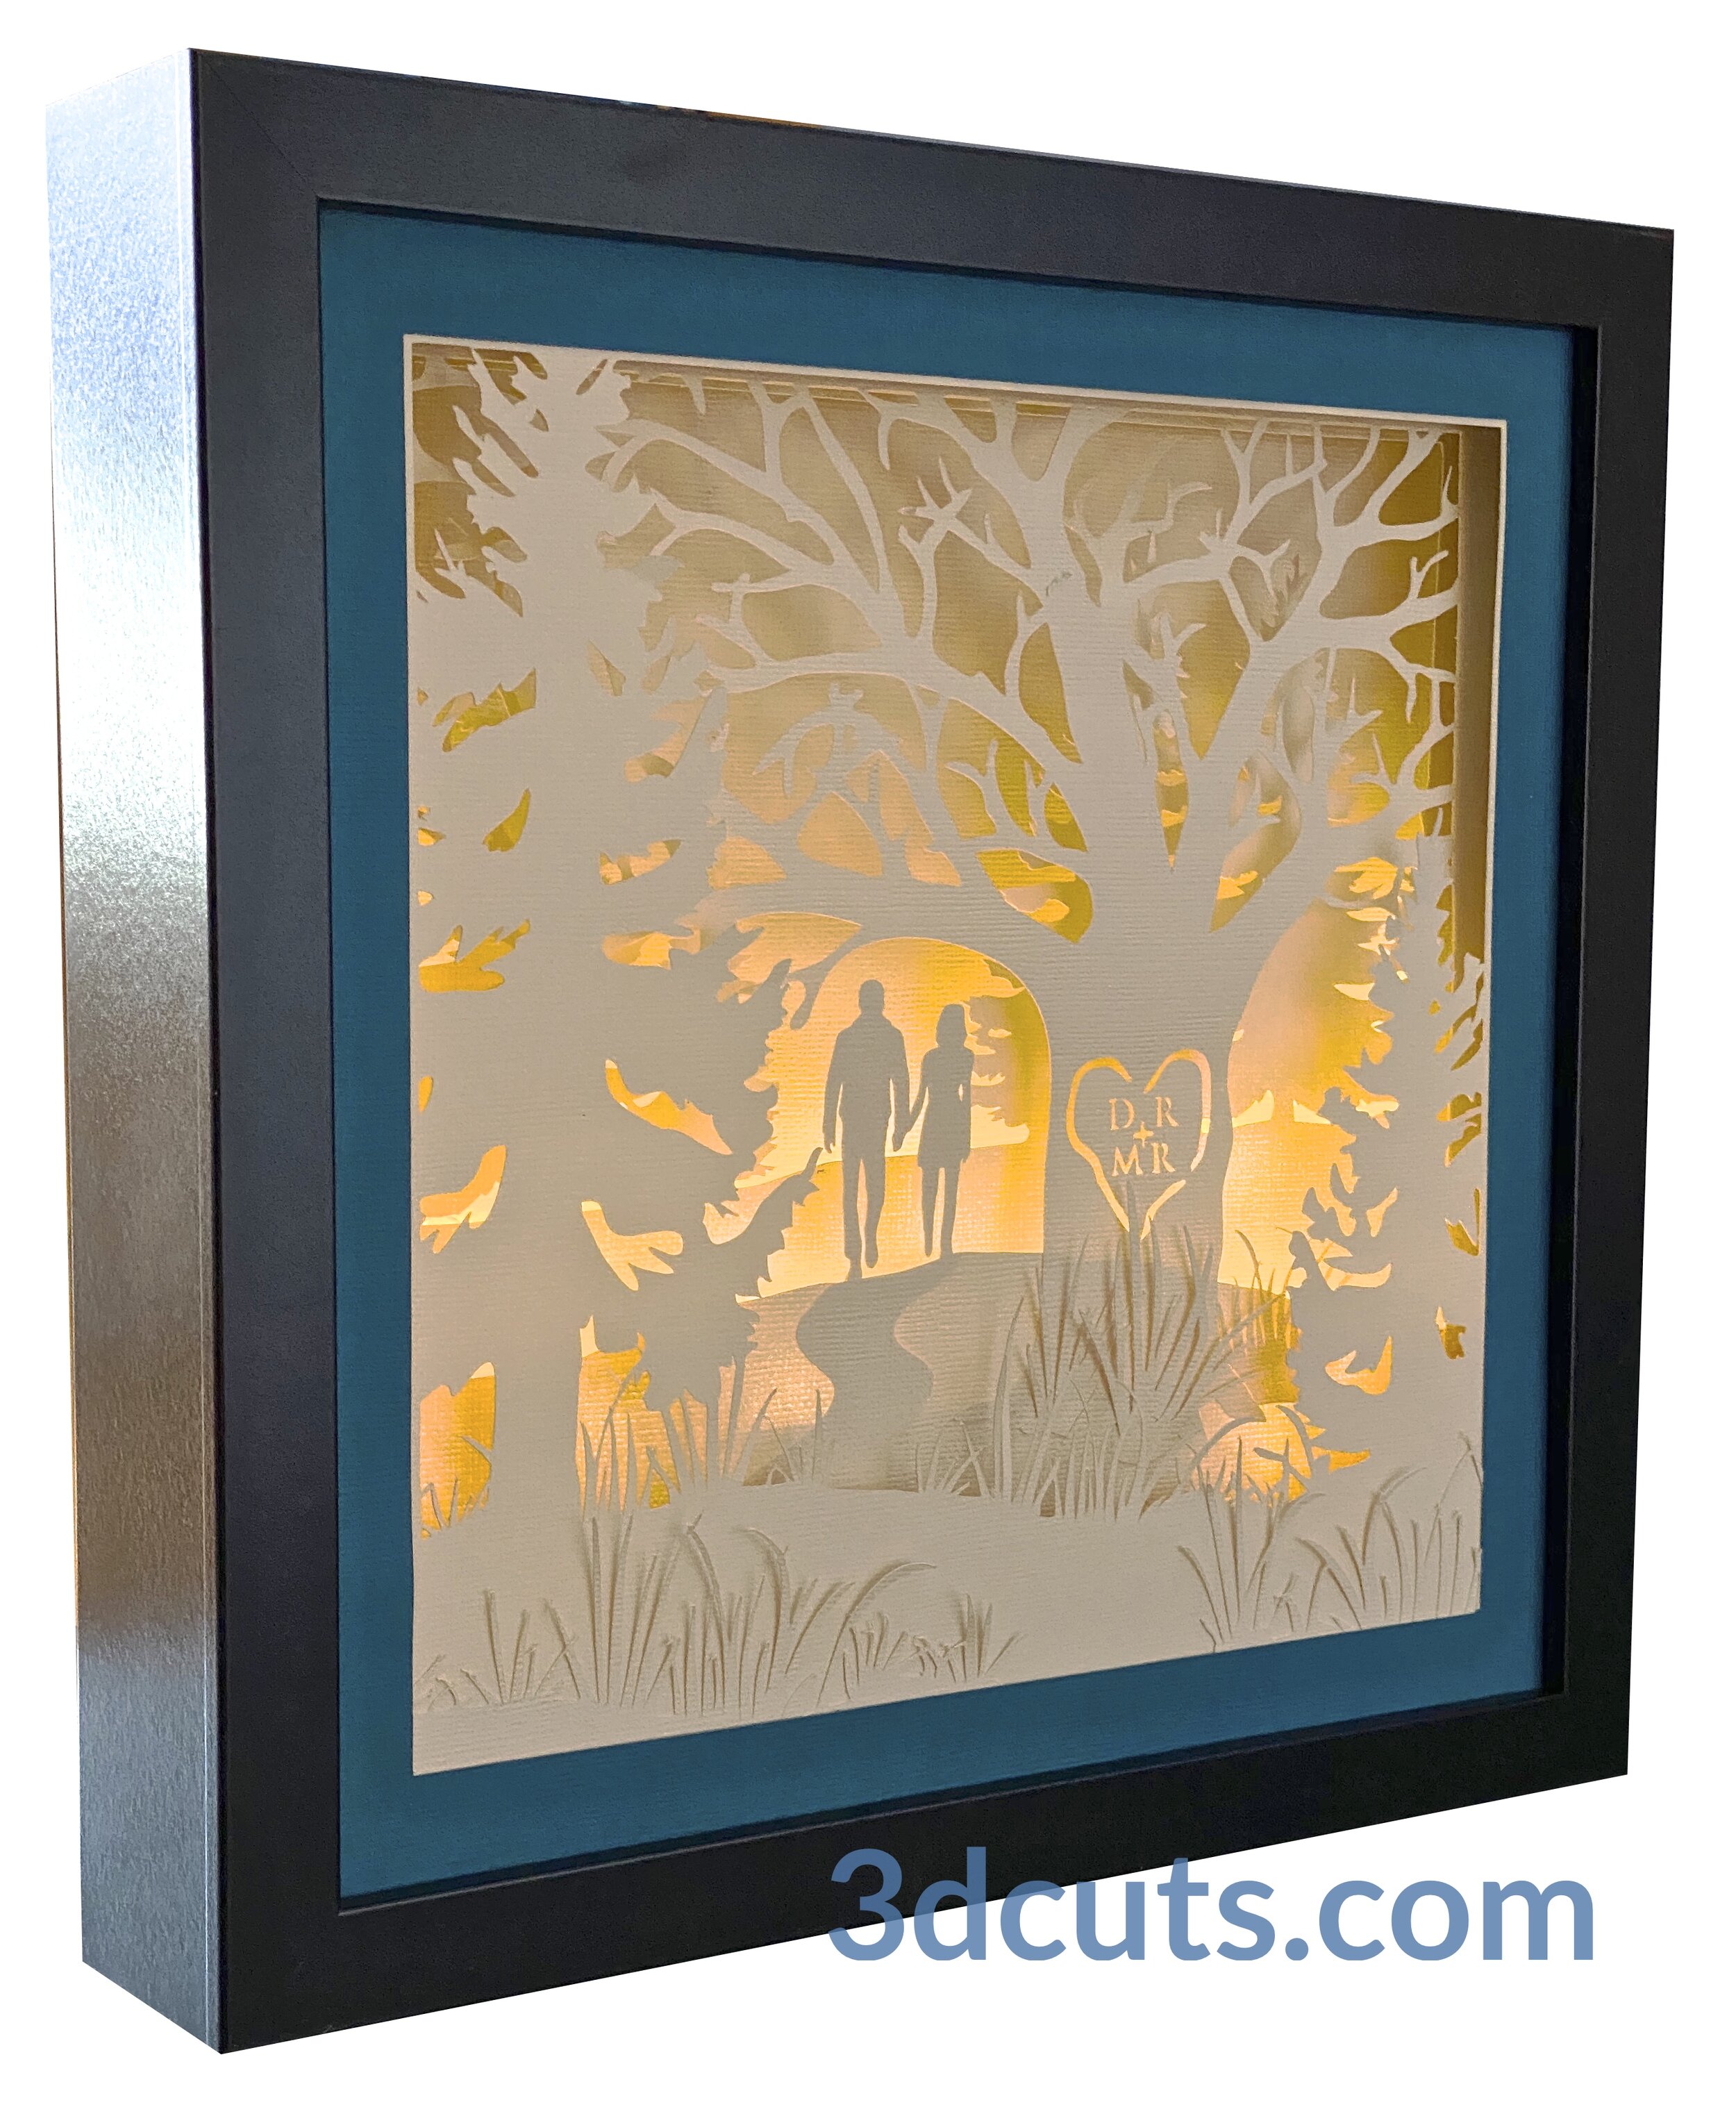
Make a stunning illuminated shadow box to be installed in a standard wooden 11 x 11” shadow box frame (outside measurement 12 x12”). This tutorial is for the assembly of the Heart Tree Shadow Box in the square format using the STRAW construction technique. Make sure you are using the correct tutorial for the correct file. I have 3 different versions of this tree. If you are confused scroll to the bottom for more info.
This project uses 12 x 12” card stock for the multiple internal layers but is designed to fit in a purchased glass front frame to create a lasting gift. (Links for frame and lights below).The download includes three couple selections- either male/female, male/male or female/female. You select and cut the couple that is appropriate for your project. The initials carved into the tree are also customizable.
Download cutting file here at 3DCuts.com:
https://3dcuts.com/illuminated-shadow-boxes/heart-tree-square-straw
Links to the other Heart Tree Shadow box tutorials. Make sure your file matches the tutorial.
Supplies Needed:
Cutting File available here from 3dcuts.com.
12 x 12" card stock 5 pieces needed in light color (cream or ivory). I used 80lb American Craft Vanilla
12 x 12” card stock1 piece in a color of your choice -
8.5 x 11 card stock - 1 for battery box
1 10.48 x 10.48” piece of mat board ( Use scrap- color doesn’t matter.)
14 - 3/8” fat straws - link below
Tape Adhesive - I used Scor-Tape (1/8”, 1/4" and 1/2” - Link below)
Liquid adhesive - I used Art Glitter Glue
String of 50 LED fairy lights- battery operated with remote control - Link below
Scotch Tape
Glue dots
Parts Sizes: (need for dxf files)
Front Mat - 10.975" W x 10.975" H
Layer 1 - 10.975" W x 10.975" H
Layer 2 - 10.48" W x 10.48" H (Both front and back)
Layer 3 - 10.48" W x 10.48" H
Layer 4 - 10.48" W x 10.48" H x
Battery Box - 6.6708" W x 4.9083" H
Backboard (Mat) - 10.48 x 10.48”
Move two couples inside layer 2 and group before re-sizing to maintain correct sizing.
Links to supplies on Amazon:
Order from Amazon: 11 x 11 Shadow Box Frame by AmericanFlat(Affiliate Link)
Order from Amazon: American Crafts 71661 Vanilla Card Stock (Affiliate Link)
Order from Amazon: String Fairy Lights 4 pack with remote 50 LED (Affiliate Link)
Order from Amazon: 3/8” Plastic Straws 100 count (Affiliate Link)
Order from Amazon: Scor-Tape 1/8" X 27yds (2 Rolls) (Affiliate Link)
Order from Amazon: Art Glitter Glue with metal tip (Affiliate Link)
Order from Amazon: Premium Silhouette Blade (Affiliate Link)
Steps for Completing the Heart Tree Shadow Box - Square Version - STRAW construction technique
Special Note: I update the instructions online. Check here for adjustments and additional information. Don't just rely on the pdf file that comes with the download. Learned hints are added to the online tutorial.
1. Download the cutting files for your cutting machine here from the 3dcuts.com store.
2. Load the files into your cutting software following the steps for your cutting machine.
3. Prepare the files:.
For the Silhouette: The SVG files from this site will need to be turned into cutting files. Click here for detailed steps on how to use SVG files on your Silhouette. http://www.3dcuts.com/tutorial-upload-svg-silhouette
DXF files can be opened in the basic edition of Silhouette Design Studio but often require modifications. I recommend using the Designer Edition and using svg files. It takes advanced skills to use dxf files for something this complex.
For Cricut Explore: Here is a guide for importing into Cricut Design Space. http://www.3dcuts.com/tutorial-adding-3dcuts-files-to-cricut. Remember to ATTACH files before cutting in Cricut.
For Brother ScanNCut: The svg files will need to be transferred to files for your particular machine. You can change SVG files to FCM files at http://www.canvasworkspace.com/ or Google "How to import SVG files into a ScanNCut" for links to tutorials. Some models of Brother Scan N Cut can directly import the SVG files.
4. Select card stock.
I recommend 80 lb test light colored card stock for this project. I especially like the American Craft paper collection. It cuts well with the intricate cuts. I do not recommend card stock with a heavy texture or card stock with a white core.
The backing is a 10.48 x 10.48” square of mat board. This needs to be heavy because it holds the battery pack for the lights in place. Color doesn’t matter because it is in the back and covered. Heavy chip board is fine.
The battery box fits on 8.5 x 11 card stock and can be any light color. It is a support item and not visible.
5. Customize the cutting files.

Couples: The shadow box includes a couple holding hands and walking. The download comes with three couples - male/female, male/male and female/female. Position the two layers for the couple into the empty space of layer 2 (back)before cutting. You do not need to cut the couples you are not using.
Initials in Tree: The initials in the tree can be customized. The entire alphabet is included in a carved style font. These are objects and you can slide them onto the tree into the heart. Remove the ones there and replace with the appropriate initials for your couple. You may need to ungroup the file to gain access depending on your software. Delete all the unused alphabet characters before cutting to save time.
Different Frame: I designed the file for a specific frame that can be easily purchased from Amazon. (Note: The frame I use is sold as an 11 x11” frame. Its exterior measurement is 12” x12”.) The file can be adapted to other square shadow box frames. But know that the depth of 2 1/4” is important. If you go with a different frame you can adjust the size of the pages but not the size of the battery pack. To adjust the layers make sure that are all in the same document, group them together and shrink or expand proportionally. I did try this in a 9 x 9 frame but there wasn’t enough room for the depth of the battery pack and it had to stick out on the back side. I really was much nicer in the 11 x 11” size.

6. Cut the files.
There are some fine lines. It is best to have good quality card stock and a good blade and clean, sticky mat. I use the Premium blade.
Dashed lines: I use dashed lines for fold lines. On my cutting machine these cut much fast when they are positioned horizontally for cutting.
Separating these files from the mat took care. I carefully separated parts as I lifted. Smaller pieces had to be weeded out after.
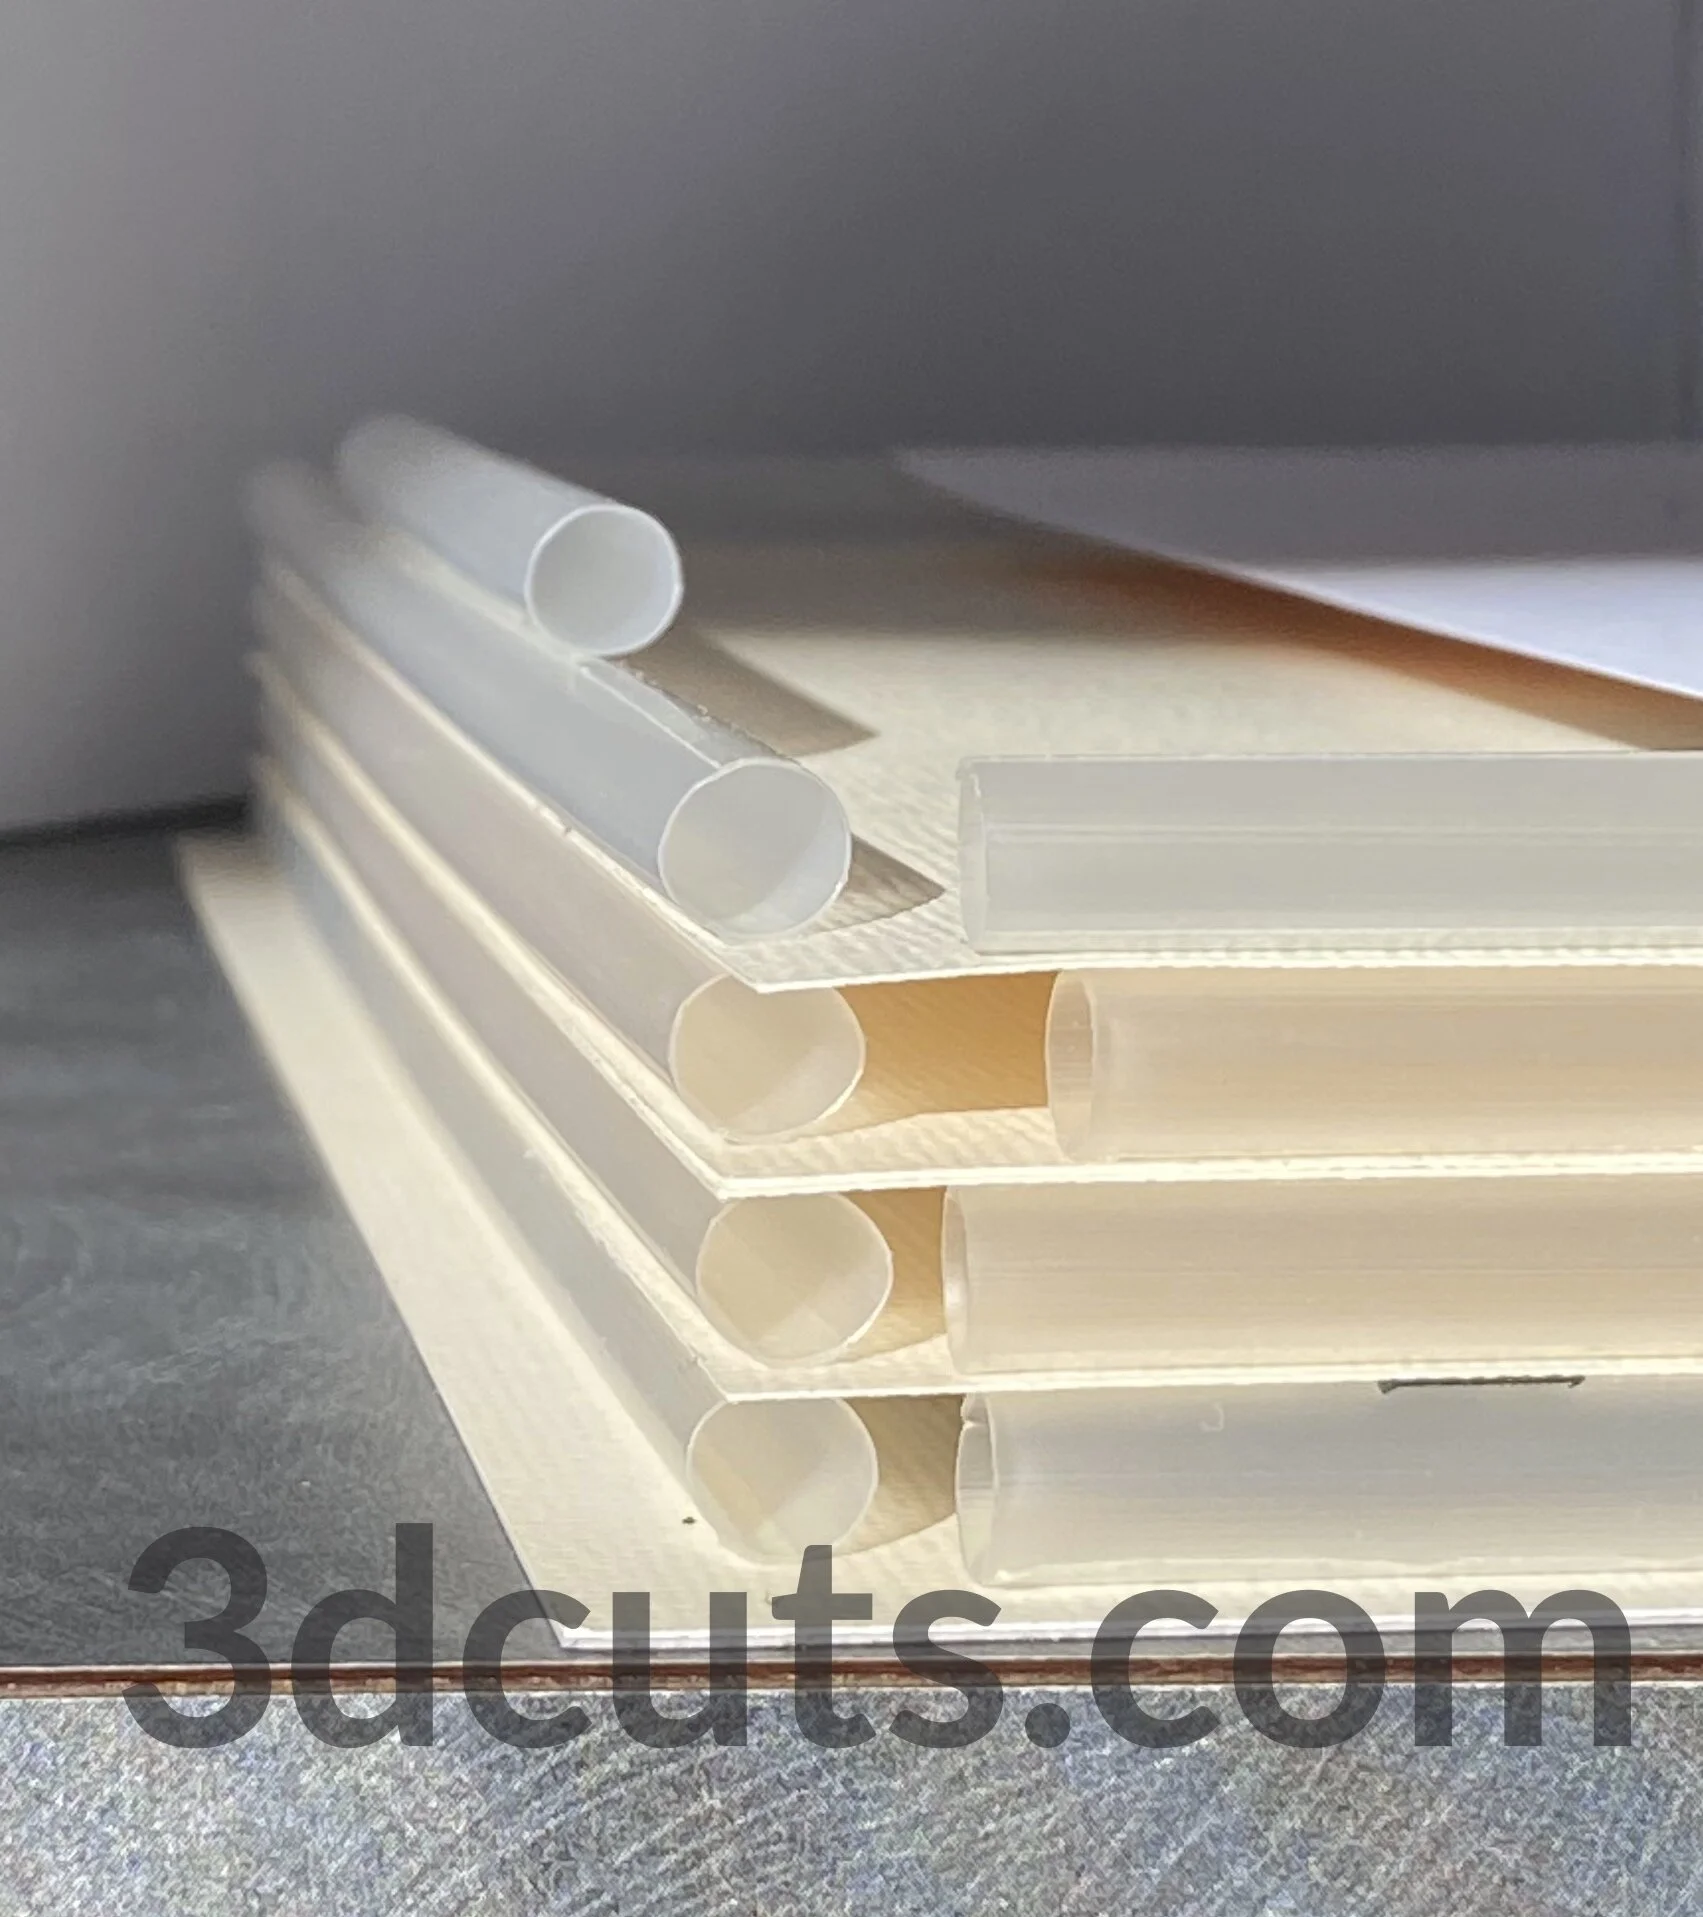
Straw construction technique for 3dcuts shadow boxes.3dcuts.com
7. The straw assembly technique uses clear straws as dividends for the layers. Here is a side view of the technique. You use the shadow box frame as a guide to stacking.
8. Assemble all the parts: This video walks you through the assembly step-by-step.
Which File and tutorial to use:
Are you confused about which file and which tutorial to use. I can understand why. Here are some explanations of why all the variations.
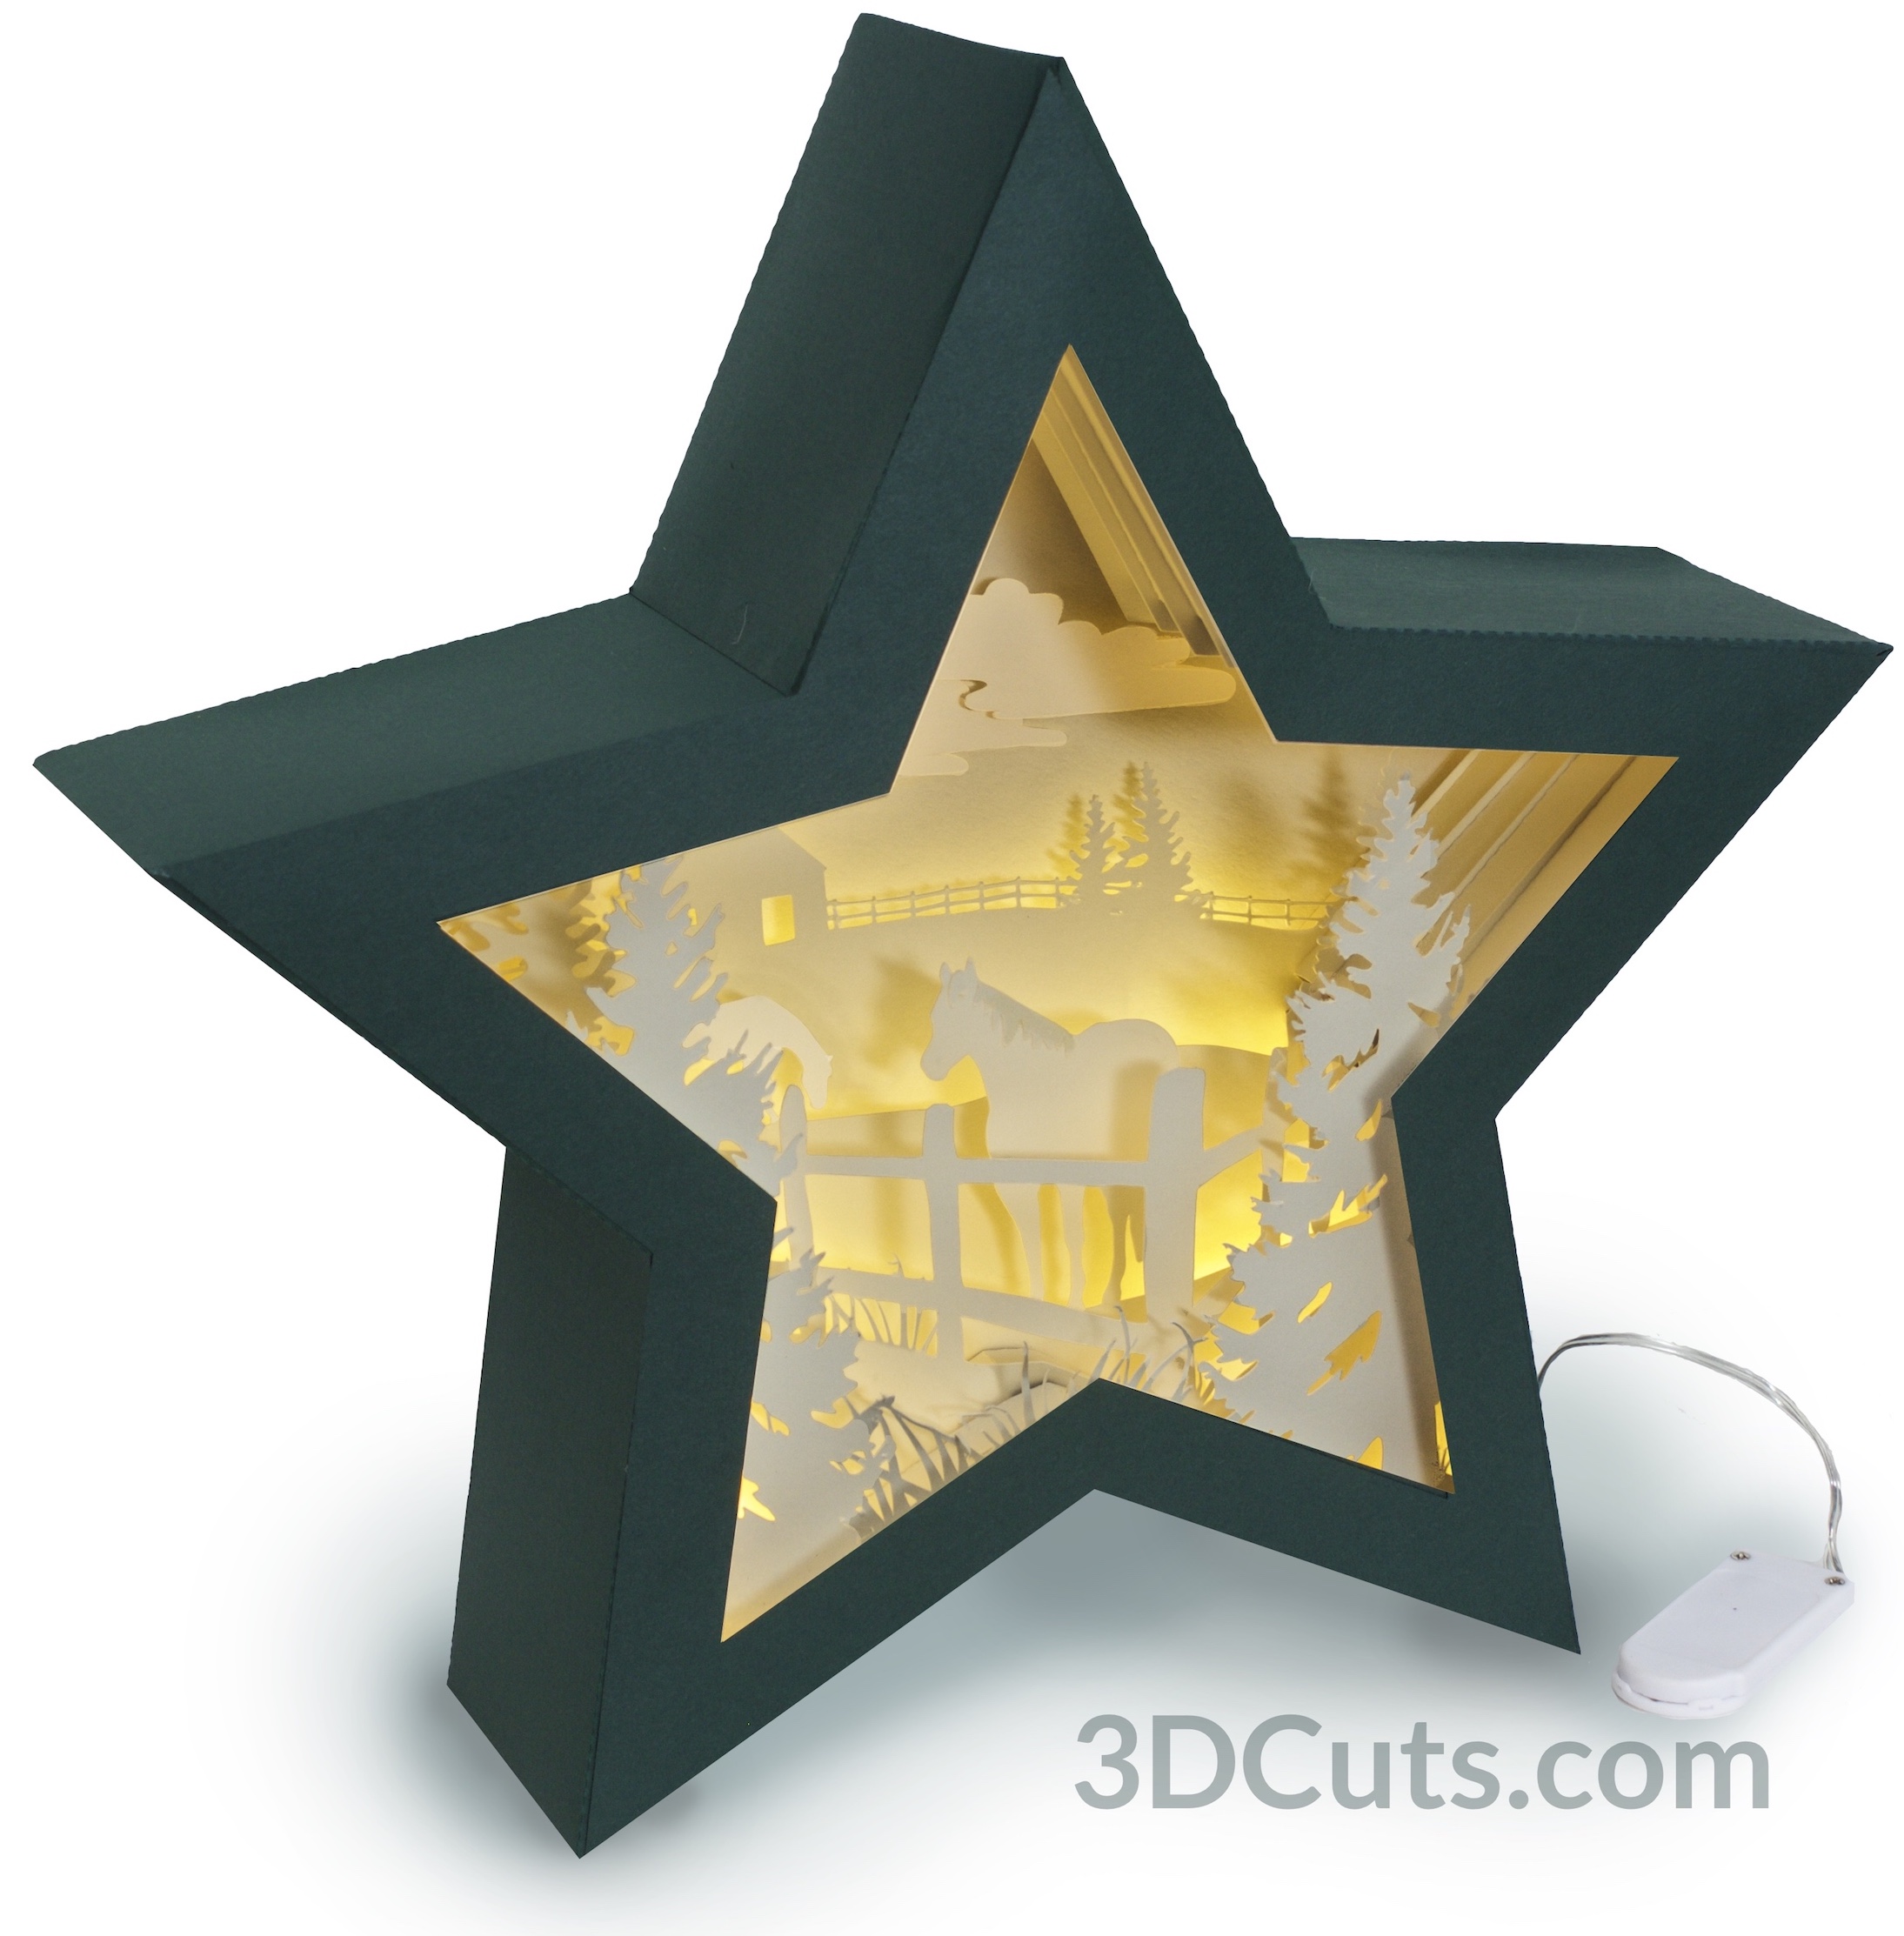
First I designed the Heart Tree Shadow Box in the Star Frame. People loved the file but wanted it redesigned for a purchased wooden shadow box to make it more of a keepsake.
So I designed the second version which is the Heart Tree Shadow Box - Square format. That is also a much loved file.
For a different project I experimented with using straws as spacers in shadow boxes. I designed two projects - Deer at Moonrise and Moonrise Stroll using this technique. It is much easier than the folded side support system I developed first in the star shadow box and then used again in the square format and customers asked me to re-do the Heart in the Tree Square format using this new technique.
That is why there are 3 versions and three tutorials. Make sure to choose the correct tutorial for the file you downloaded.


Adjusting the original square format file.
If you have already purchased the original square format Heart tree Shadow Box file you can alter it for the straw construction technique. Here are the steps.
Resize Layer 1 to 10.975 X 10.975 (It should already be this.)
Make a Mat layer which is 10.975 x 10.975 with a centered opening that is 9.0625” square.
Group each layer with the parts inside of it and resize layers 2,3,and 4 to measure 10.48" W x 10.48" H square.
Check the opening for the battery box and make sure it is close to 4.1042” w x 2.7347”h. Adjust this on both layers 3 and 4 and make sure they line up with each other.
Adjust the battery box file to fit into this hole.
I thickened all the sides on layers 2 and 3 by welding on a strip that aligned with the edge and was .77” wide. This made the side edges wide enough to hide the straws. This is optional.
Here are three other illuminated shadow boxes designed by me. Cutting files are here.


©2019 Marji Roy, 3dCuts.com