
Project Description:

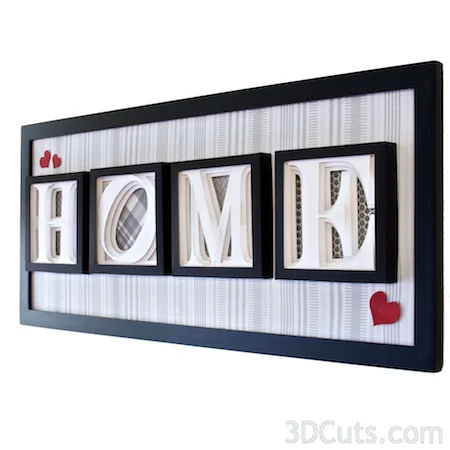
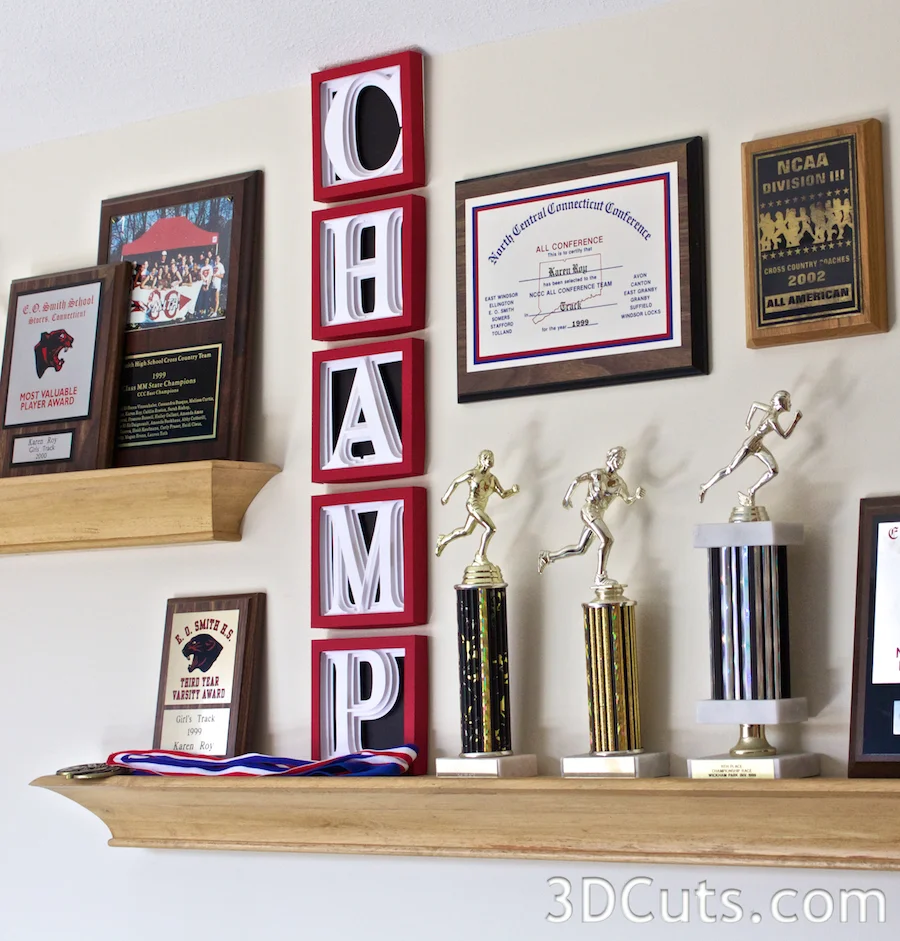
This tutorial is for all files in the Alphabet Shadow Box series (letters, numbers, shapes, Greek letters). The construction of each is identical. Each is built from 5 box layers and one background. The finished box is 5" square. Each letter can be used as an independent monogram or combined with other letters for initials or words. The series as has numbers, shapes and additional Greek letters. Visit the Store at 3DCuts.com to view all.
Click here for display ideas.
Additional Purchasing Options:
Entire Alphabet available in .svg, .dxf, or .pdf formats for $10.99 Click here.
Word Groups available here.
Numbers are available here.
Shapes are available here.
Greek Letters are available here.
This series continues to grow. All of the shadow boxes are designed to work together. All are assembled using this tutorial.
Alphabet Shadow Box Tutorial

Supplies Needed:
Cutting File available here
Glue dots 3/16"
8.5 x 11" card stock - 5 pieces - I used the 65lb Cardstock from Recollections for the colors and plain index card stock for the white layers.
4 7/8" square patterned paper
Tape
Double stick foam spacers ( I used double-stick window weatherstripping!)
Parts sizes: (For those importing into Design Space)
Universal 1 (Just the box with out hanger) - 6.4505 w x 6.4307 h
Layer 2 - 5.8991 w x 5.9503 H
Layer 3 - 5.4915 w x 5.4908 H
Layer 4 - 5.1632 w x 5.1938 h
Universal Layer 5 - 6.3563 w x 6.3879 h
Universal Layer 6 - 4.7708 w x 4.7643 h
Hanger Size - 1.33 W x 4.9" h
Note: Starting with the Greek Letters - sizes have changed slightly. Check for updated sizing included with the download.
Silhouette Users: The two new files for 2019 (Drama Masks and Sewing Shadow Boxes) have been uploaded to the SIL store following the new Silhouette requirements. One of the requirements is that all parts of the file need to fit on a 12 x 12 mat - even they don’t. This file has all of the parts grouped together and reduced to fit. You must first expand the grouped file to measure 18.85 “ w x 14.25” h. You then can ungroup the parts and arrange them for easy cutting depending on the size of your paper (12 x 12 or 8.5 x 11).
Steps for completing the Alphabet Shadow Box project:
These directions apply to all the shadow boxes in this series- letters, numbers, Greek letters and shapes.

Cut the files.
1. Download the cutting files for your cutting machine. The files are available here.
2. Load the files into your cutting software following the steps for your cutting machine.
3. Prepare the files:.
Helpful Hint: For the Silhouette, the SVG files from this site will need to be turned into cutting files.
Click here for detailed steps on how to use SVG files on your Silhouette.
Expand to 18.85 w x 14.25h” before ungrouping. (Only for those downloading from SIL store.)

Keep the identifying numbers in the upper left when viewing from the front.
4. Cut the files:
The shadow box is made up of 6 pieces - the 5 frames and a back ground paper.
For my shadow boxes, I cut Layer 1 (the front layer) from a solid colored piece of card stock.
I cut layers 2, 3, 4 ( the letter layers) and 5 ( the back layer) all from white index card stock. You certainly can experiment with other color combos. A gradation of color will provide a different effect.
5. Notes about the frames:
Note: Each cut file has dotted lines. These are fold lines. For those wanting to alter the file to use a scoring tool understand that there are fold lines on layers 1,2,3,4,5.
Also notice the cut out number on each frame. All frames are numbered to help in the instructions and construction. Always make sure the corner with the number cutout is in the upper left corner when viewed from the front.
If cutting by hand from PDF file - It is not necessary to cut the identifying numbers. Just write them with a pencil.

Fold edges on frame 1-4 back, and on frame 5 forward.
6. Fold the 5 frames
Fold frame 1, 2, 3 and 4 sides BACK away from the front along all fold lines.
Fold frame 5 the other way. Fold the sides toward the FRONT.

Glue corners keeping things square.
7. Glue all corners square
I like to use Glue Dots on the corners although other glue types are appropriate.
It is important to make square corners.

Optional hanger is attached to layer 1.

Finished Alphabet Shadow Box with hanger.
8. Adding the hanger (Optional)
Use the included paper hanger depending on how you anticipate mounting the shadow box. If you will be attaching it to a ribbon for a vertical application, the hanger isn't needed.
It gets folded and glued to the inside top of frame 1.
Make sure to center it.

Glue background paper in place.
9. Cut the background paper from a complementary paper or card stock.
It is 4 7/8" (124mm) square. You can use the cutting file or just cut it by hand.
It does not need to be card stock.
Glue it inside frame 5.

Add foam spacers to critical areas.

Assemble layers 2,3, and 4 using foam spacers and tape.
10. Assemble the 3 Letter layers (layers 2, 3, and 4).
Place a double-stick foam spacer in any critical locations on the back of layer 2. (This step is optional but adds strength to the design.) Critical locations include any long runs (examples - the long sides of F, or the long vertical of L, etc. Especially critical are any parts that are not supported on both ends (examples - middle line of E and F, etc.)
Slide layer 3 into layer 2.
Align the back edges of the frames and tape together on all four sides. I use regular scotch tape. The lining up of the back edges is important because it maintains the spacing of the layers.
Repeat with placing layer 4 inside of the combined layer 2 and 3. Add foam spacers, insert behind, match back edges and tape in place.

Insert combined letter layers into back layer.
11. Insert the combined letter layers (layers 2, 3 and 4) into layer 5.
Be sure to keep the numbered corners all in the same corner.
You can add glue dots to the sides to hold in place but......
Helping Hint: I don't glue these layers together until I am sure about the colors. I did some mixing and matching after the fact so you might want to leave that option available.

Place layer 1 over all the others.
12. Place the front layer (layer 1) over the combined layers 2-5.
Again, this will get glued in place but wait until you are sure on color combinations.
13. Combine with other letters to create all types of signs and wall decor!
Go to https://marji-roy.squarespace.com/alphabet-shadow-box-display/ to see many display ideas.
Copyright 2014 3DCuts.com, Marji Roy


© 2014 Marji Roy, 3dCuts.com