3D Snowy Town Christmas Card • Tutorial
Project Description:
Every year for over 30 now I have design a handcrafted Christmas Card. The 2014 design is created a 3D rectangle that has the silhouette of a town cut from the sky-line. It opens to provide a 3D effect of layers. The space in the middle can have an LED tea light added for a different effect.
The card folds flat and fits it a stander 6 x 9 brochure envelope for easy mailing. This finished card is 8" tall and 2 3/4" square. When flat it measures 8" tall x 5 1/4" w.
I have constructed it out of both dark blue and all white for different effects, especially when used in combination with an LED light.
Cutting file link: http://3dcuts.com/christmas-projects/3d-snowy-town-christmas-card-2014
Handmade Christmas Card Design. Silhouette Snowy Town Card by 3dCuts.com, Marji Roy, 3D cutting files in .svg, .dxf, and .pdf formats for use with Silhouette and Cricut cutting machines, paper crafting files,
Handmade Christmas Card Design. Silhouette Snowy Town Card by 3dCuts.com, Marji Roy, 3D cutting files in .svg, .dxf, and .pdf formats for use with Silhouette and Cricut cutting machines, paper crafting files,
Silhouette Town Christmas Card - Tutorial
Supplies Needed:
Cutting File here
8.5 x 11" card stock - I used the 65lb Cardstock from Recollections.
1 sheet Dark Blue for town
1 sheet White for roof tops
ScorTape or other paper adhesive
Zig Glue
6 x9 Envelope (standard pamphlet size)
Parts sizes: (For those importing into Design Space) - in inches
All pieces together- 10.84 w x 11..66 h
Leave all pieces grouped together until you have resized them in Design Space. You can then separate them for cutting from different paper.
Steps for completing the 3D Silhouette Snowy Town Card:
1. Download the cutting files for your cutting machine here.
2. Load the files into your cutting software following the steps for your cutting machine.
3. Prepare the files:.
Click here for detailed steps on how to use .SVG files on your Silhouette (with Design Studio). Ungroup and separate the white pieces onto a separate cutting file by cutting and pasting them into a new file.
Click here for steps on how to use these .SVG files in Design Space with yourCricut Explore.
4. Cut the shapes.
5. Remove the cutting mat carefully. I find the paper curls less if I peel the mat away from the paper and not the other way around.
6. Apply snowy roof tops
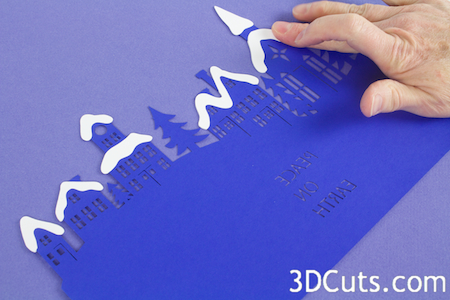
For each roof there are 2 snowy roof pieces. I placed them in matching building order on the file to help you identify them.
One set is a mirror image of the other.
One set gets glued onto the front of each building roof overlapping the top edge and the second matches it on the back side.
If you like to move fast you can use hot glue but you might want to only do about 3 points before placement.
In the photos I am using zig glue to adhere the roof piece first to the front of the school, then flipping the card over and adhering the matching piece to the back.
Be sure to apply glue on correct sides so they match.
Hint - I left my roof tops attached to the cutting mat to keep things in order and not confuse glue sides.
6. Repeat with all roof tops.
7. Fold along dated fold lines.
There are 5 vertical fold lines. Fold along each of them so that the Peace On Earth is in the correct direction when viewed from the outside.
8. Apply a line of Scor-Tape to the front of the tab that runs down the left side. Other paper adhesives will works as well. I like Scor-tape because my hands stay clean while using it!
Fold the other end over, line it up and press in place. You want the card to lay flat when glued together.
The card now forms a 3D box and is complete. It can be folded flat to mail, or opened to display.
You can put a LED Tea Light in the center for display in a dimly lit room.
Are you making one card or enough for your entire Christmas Card List? I make about 70 handmade cards every year! Time to get to work.
Copyright 2014 • 3DCuts.com • Marji Roy


