
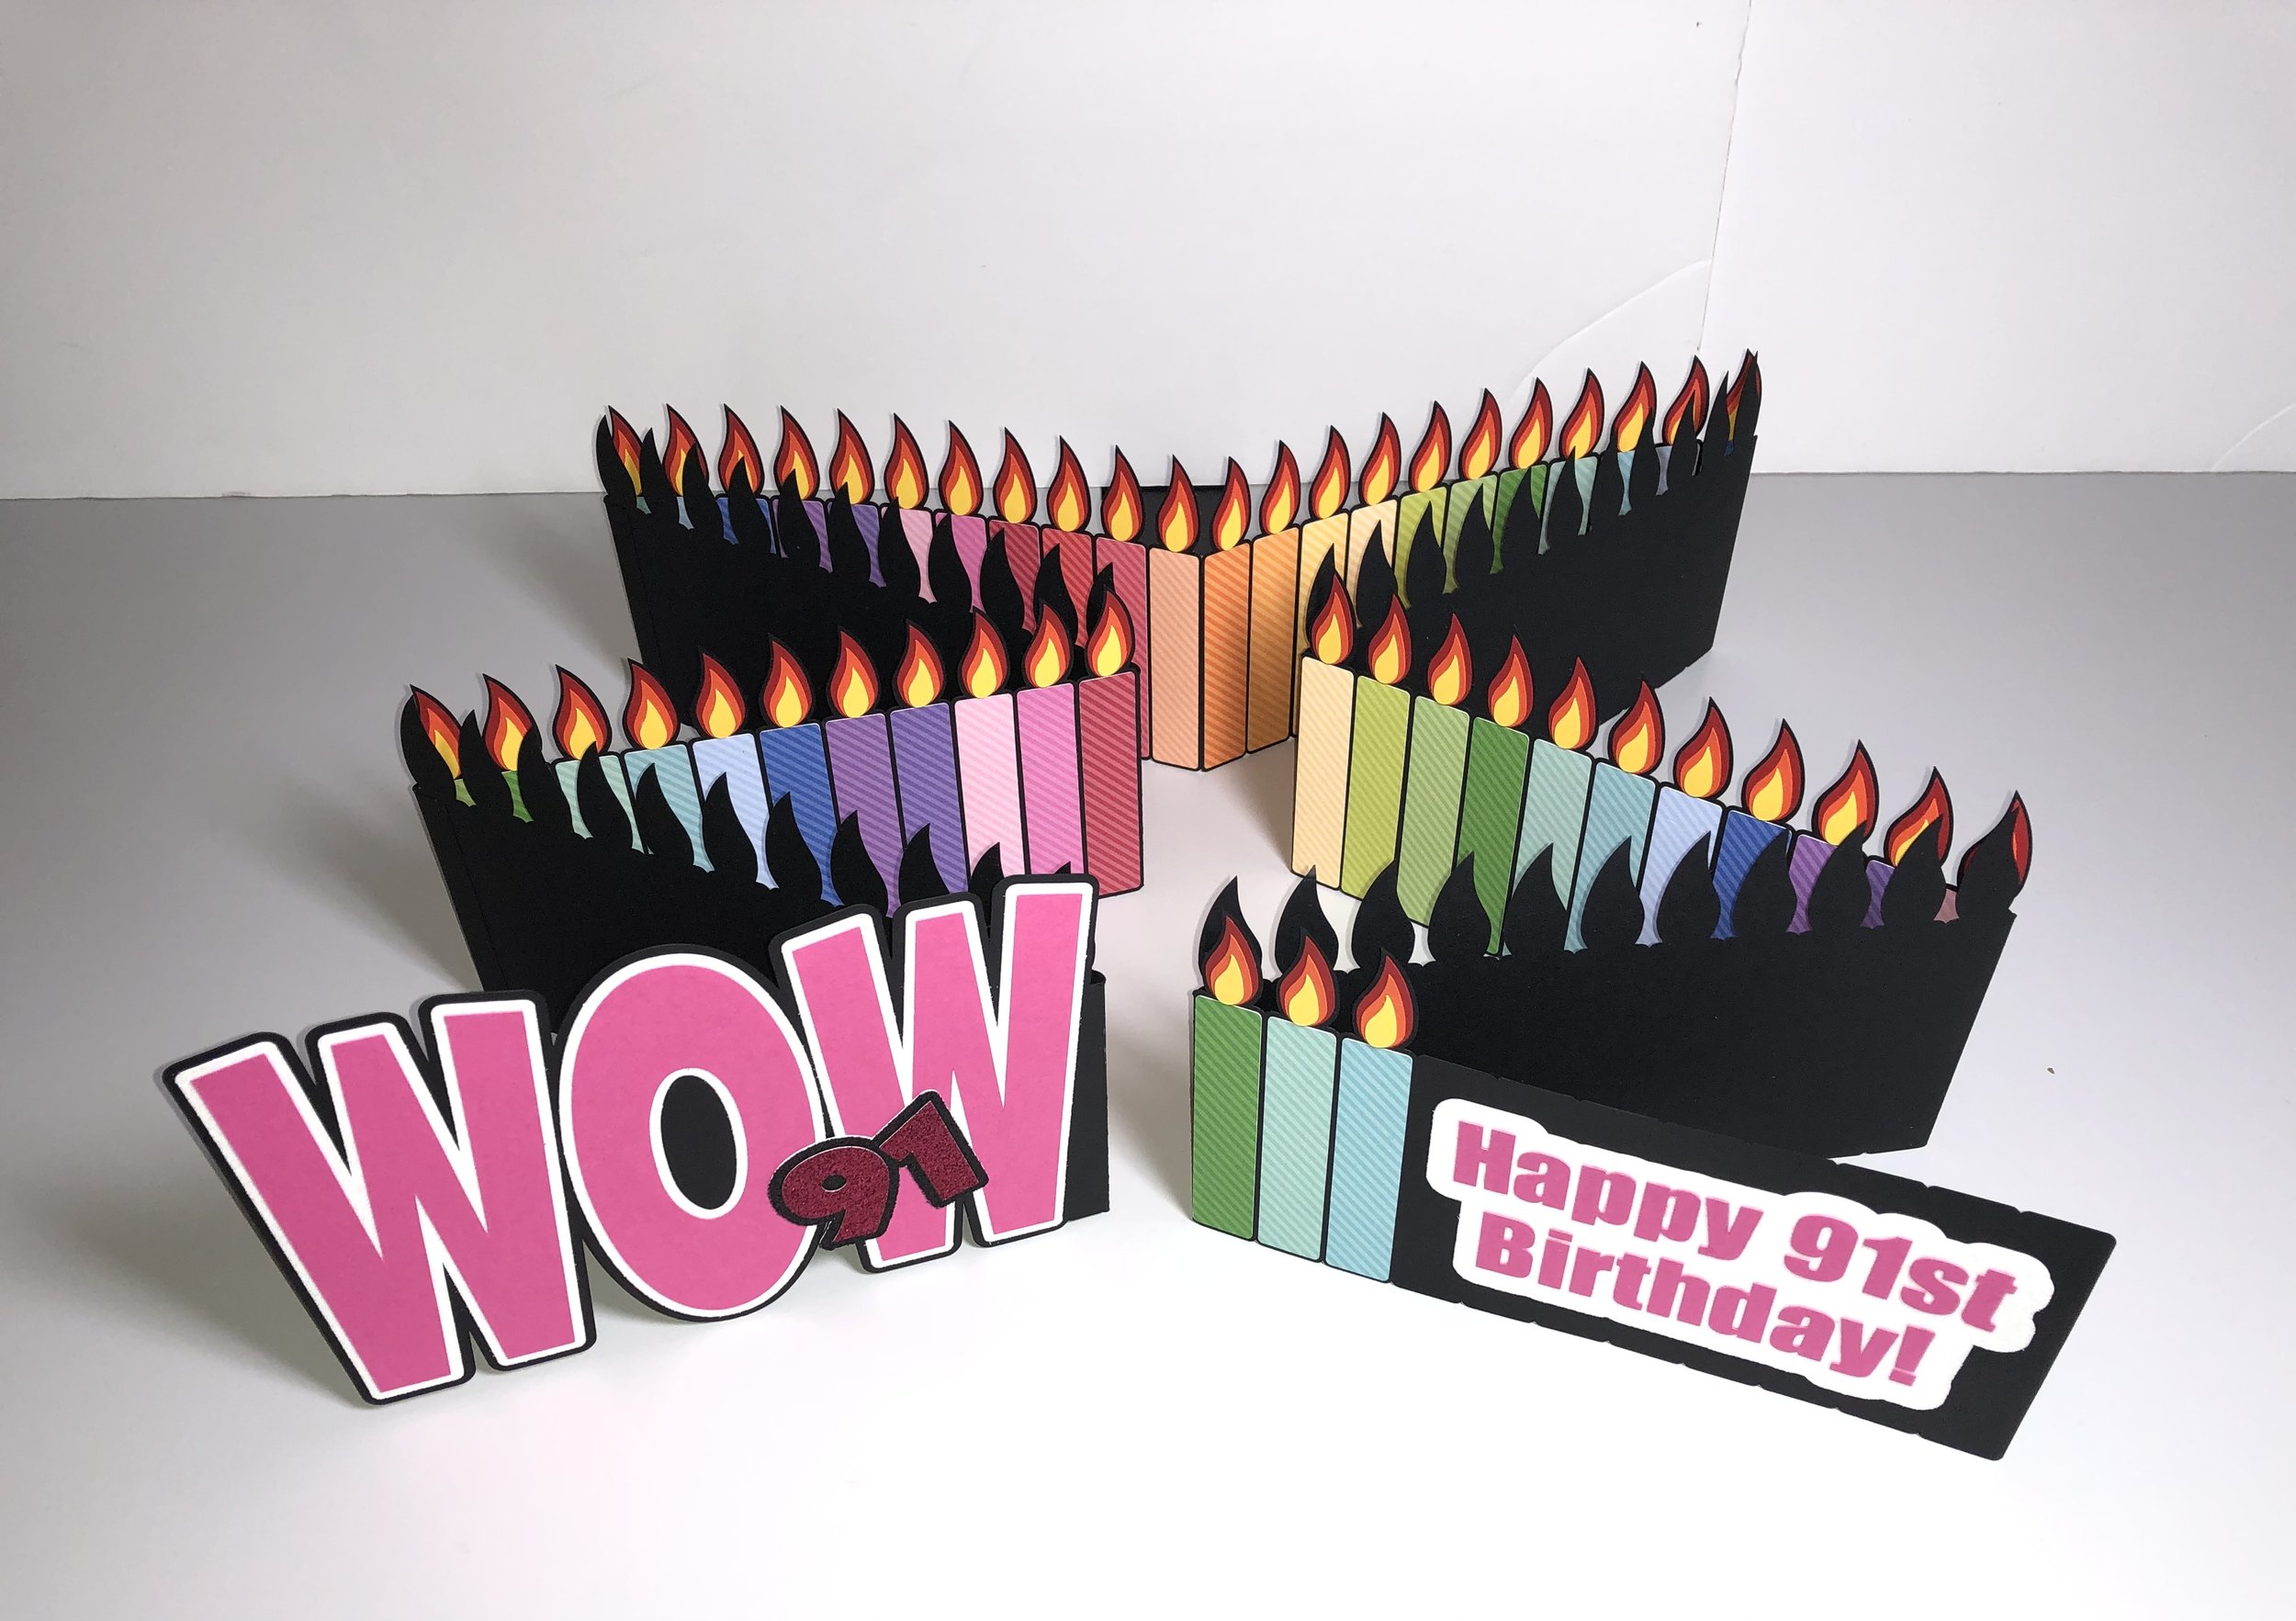
WOW - Expandable Candle Birthday Card • 2016

Project Description
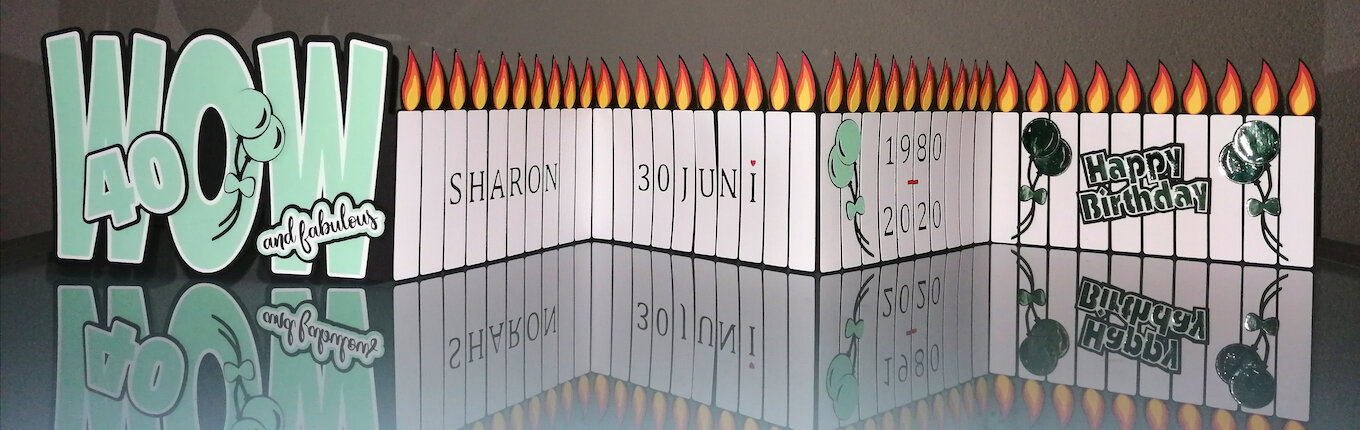
Here is a card file designed to celebrate years. It has become known as the WOW car. Customize it to include the correct number of candles needed for the birthday person by adding or subtracting folds and flames. The more candles needed, the better this design becomes. It can not be used for ages under 11 but it can be adjusted for any age over that. It is designed to fit into a standard 6 x 9" booklet envelope but you might need a bigger one for the higher decades. This makes a perfect gift for the elderly person in your life who has everything. It is special enough to show you care! And it has great impact for younger generations as well.
Cutting file is available here. http://3dcuts.com/birthday-celebrations/expandable-birthday-card-with-candles

Supplies Needed:
Cutting File from 3dcuts.com . Cutting file is available here.
8.5 x 11" card stock - many pieces
Spray Glue (Aileen's Tacky Spray)
Zig Two Way glue pen
Tape Adhesive (Scor Tape)
Sizes of all files as downloaded - grouped by each file:
Candles 30.svg - 8.05” w x 10.4644” h
Candles Background for 10.svg - 7.3699” w x 9.2967” h
Candles Background.svg - 4.838” w x 8.5436” h
Extra Full Background.svg - 5.1603” w x 8.424” h
Flames.svg - 7.4254” w x 3.3204” h
Happy Birthday Letttering.svg - 5.115” w x 9.3725” h
Numbers as objects.svg - 5.7945” w x 6.468” h
WOW Background.svg - 5.1603” w x 8.0138” h
WOW Letters.svg - 7.5949” w x 4.7603” h
Steps for Assembly:

1. Download the cutting files for your cutting machine. Cutting file is available here.
2. Load the files into your cutting software following the steps for your cutting machine.
3. Prepare the files:.
Click here for detailed steps on how to use .SVG files on your Silhouette (with Design Studio).
Click here for steps on how to use these .SVG files in Design Space with your Cricut Explore.
4. Cut the shapes.
Compare sizes of parts to listing above - some software imports at different sizes!
You will need the following cut from card stock. You will need to copy and paste the specific pieces in the numbers needed for your card.
1 WOW background in the color of your choice.
The letters WOW in a contrasting color
1 Candle background for each 11 years of age. Cut one more if over on of the ages between multiples of 11. Cut 2 for 12-22, 3 for 22-33,4 for 34-44, 5 for 45-55, 6 for 56-66, 7 for 67-77, 8 for 78-88, 9 for 89-99, 10 for 100-111.
1 candle for every year, and 1 small flame in yellow, 1 medium flame in orange and 1 large flame in red for every year.
Hint- some folks have recommended merging these shapes and making them as a a print and cut. It will save you lots of time!
If the age is an even multiple of 11, cut the blank back page from the background color.
The letters for Happy Birthday need to be cut from 3 colors but wait until you understand the sizing before cutting those. It may vary depending on your number of candles.
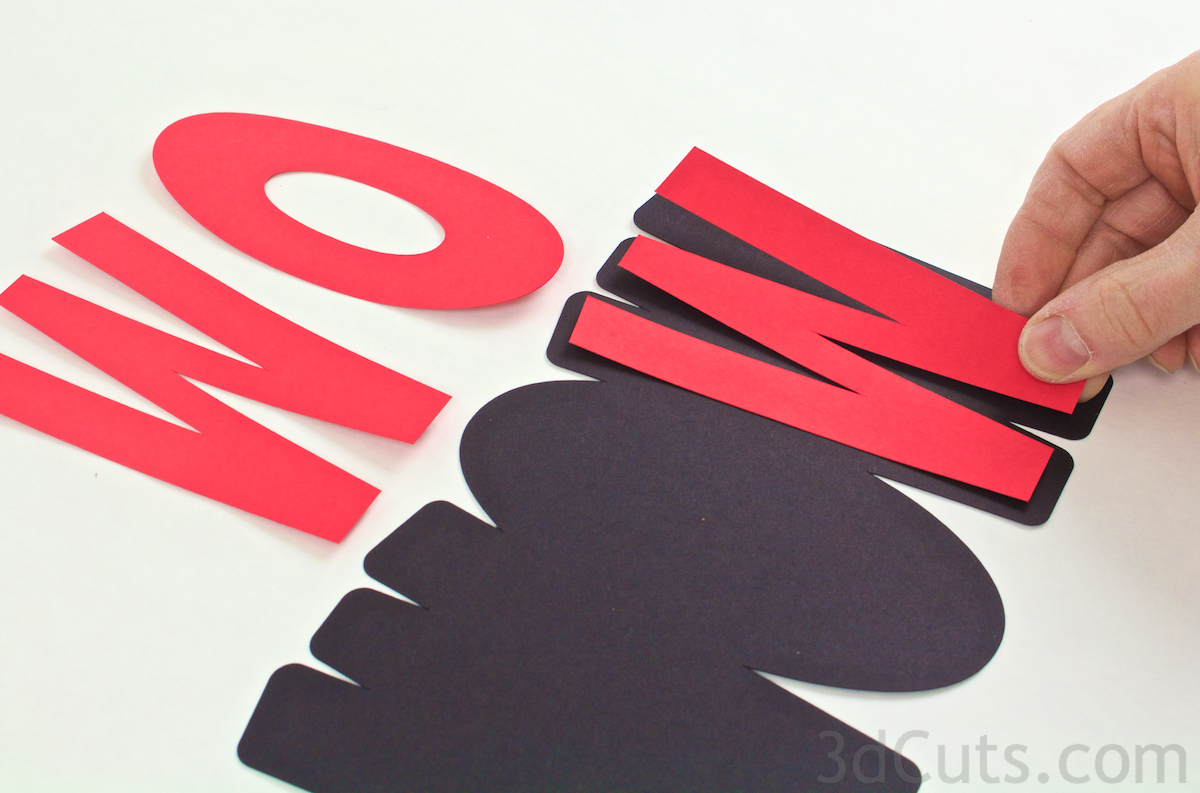
5. Assemble the WOW cover.
Apply adhesive to the back side of the WOW letters. I used Aileens Tacky Spray because complete coverage is needed. Xyron would work as well.
Carefully position each letter onto the front of the WOW backing page. The squared tab should be to the right.
Press in place.
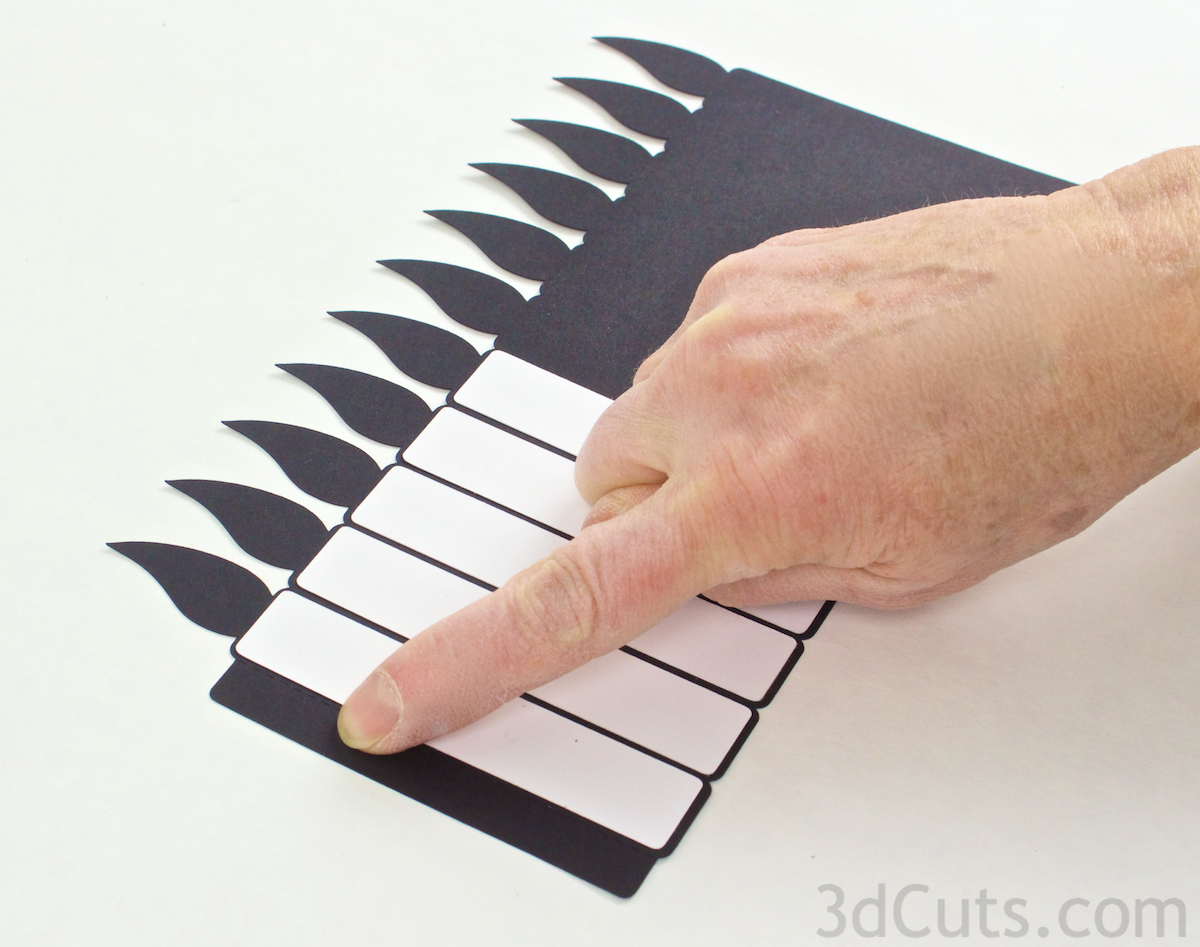
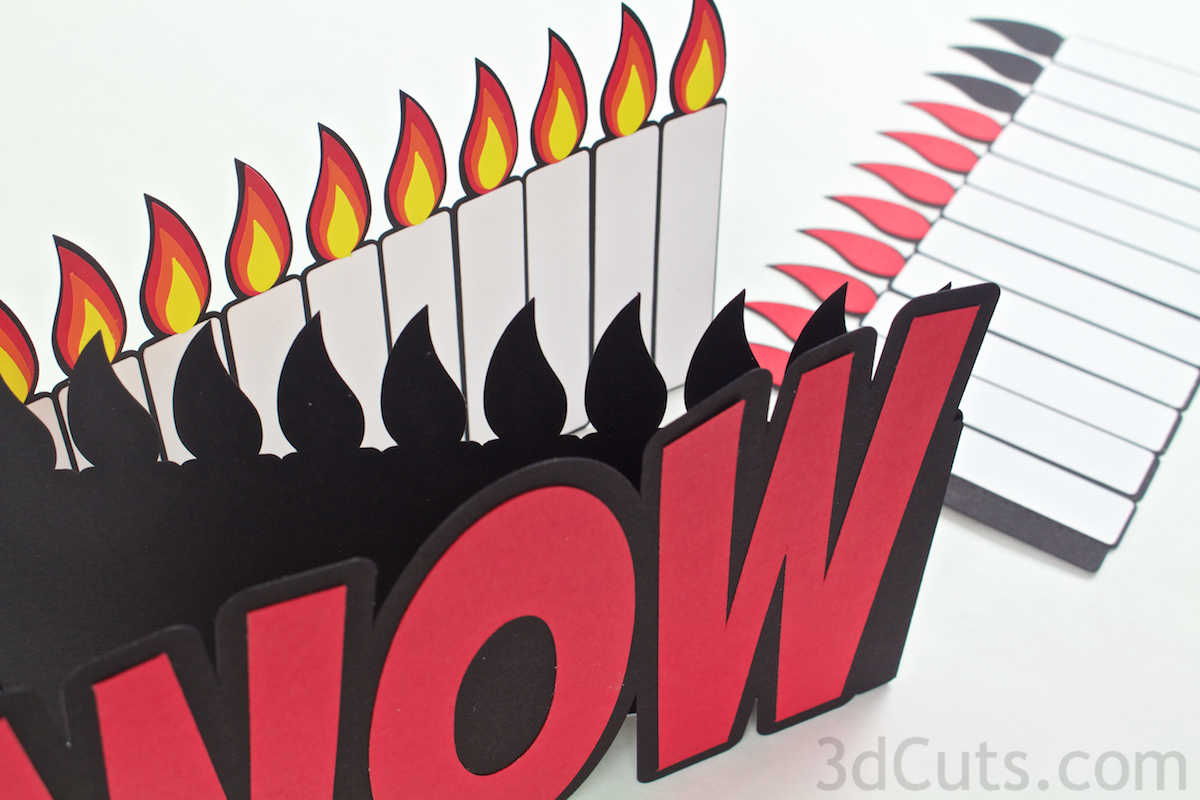
6. Assemble the candle pages.
Identify the front of the candle backing pages. For all of them the connection tab (see what I am pointing to) will be on the left.
Glue a white candle rounded rectangle under each flame, one for every year of the recipient.
I again used spray adhesive for complete coverage.
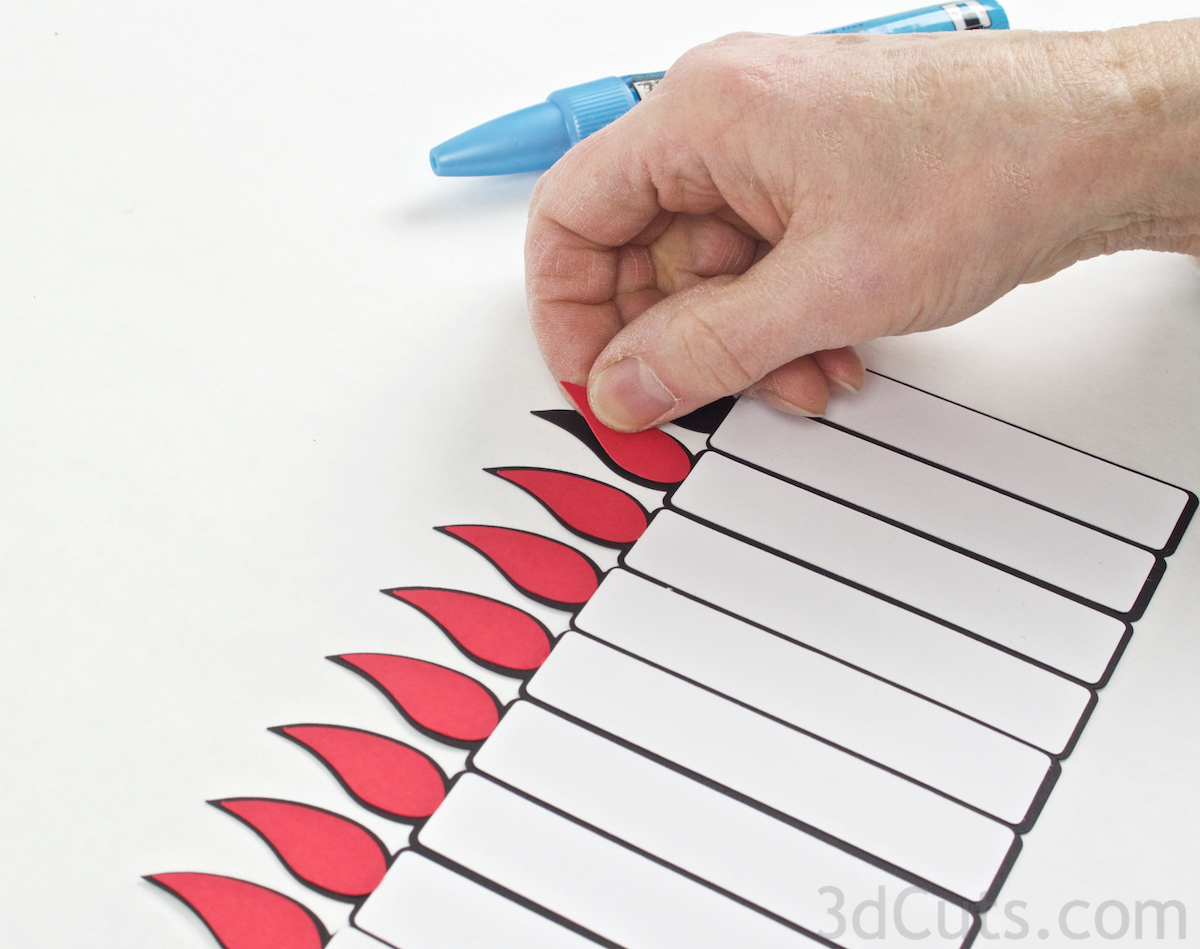
Add the red flame to each candle. I switched to Zig Glue Pen for the flame pieces. My glue choice reflects permanence, ease of application and keeping my fingers clean!
You might want to enlist help for the flame steps if you are adding lots of candles!

Next add the orange flame. All parts of the flame align on the bottom edge.
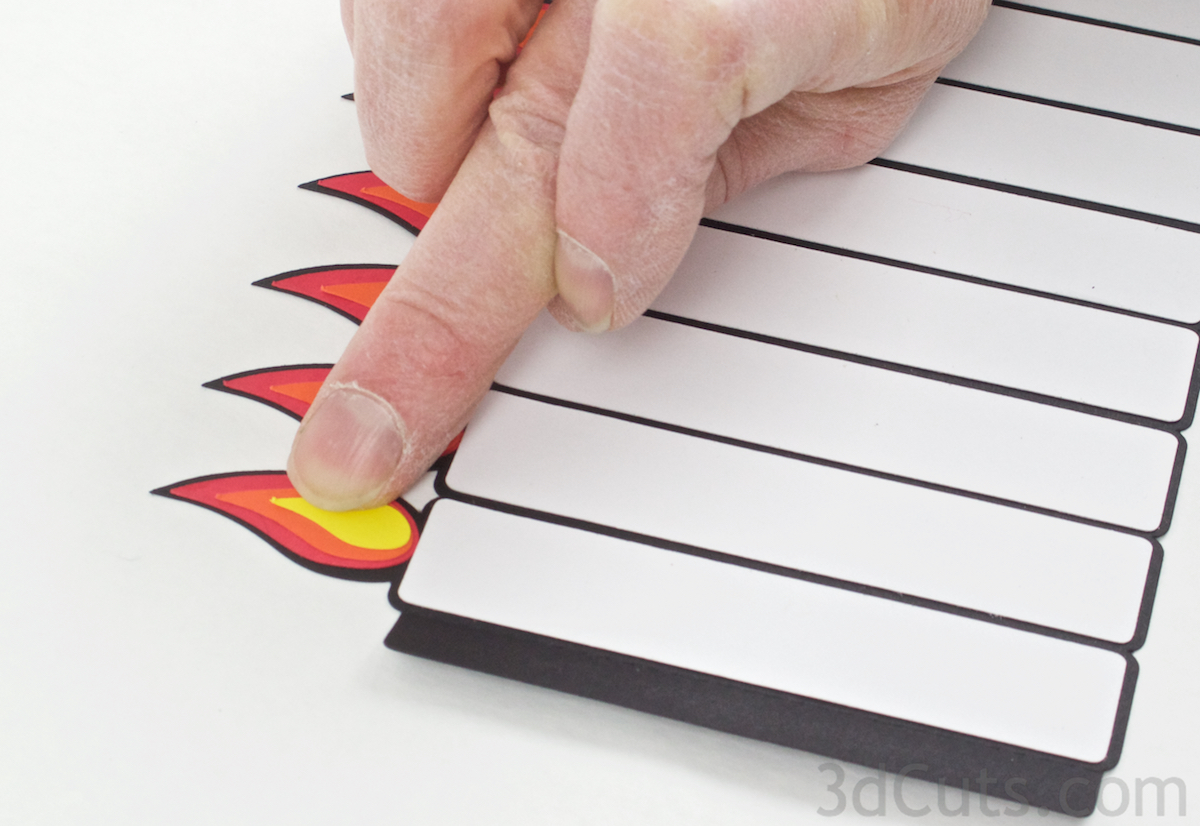
And then add the yellow center to the flame.

7.Assemble the card pages.
Each of the candle pages has a dotted fold line. Fold that and then add a strip of strong tape adhesive (I like Scor Tape) along the tab.

Connect the candle pages together by putting the tab from the left side on one behind the right edge on the previous one.
Press in place.
Fold the hinge back and forth to create the accordion fold card.

Design decisions:
Now it is time to make some design choices and some will be dictated by how many candles your card needed.
If the age was evenly divisible by 11 (22,33,44,55 etc.) then your last page will be full of candles.
If it is any other number, it will not be. Cut off the flame tops of candles you do not need. How much black space is left that will not be candles?
The black space that is left to the right of your last candle can be used for the happy birthday letters. You may need to resize them to best fit your remaining space.
Group all 3 layers together in your cutting software and adjust them as one so they will still nest when layered.
Then separate them and cut from separate colors. There is quite a bit of flexibility in sizing.
If your candles cover most of the page, leaving only a few blank, then you will want the Happy Birthday lettering to overlap some of the candles as well as some of the black space.


If your card ends with the last page being all white candles then you can choose to have the words over lap the white candles or you can add the optional blank last page. The sample that I photographed has this added last page.
It attaches with a tab just like the previous pages.
You can then increase the size of the lettering to fill that space.

Once you have deiced on the size needed for the letter and resized them, you can cut them from different card stock colors. I chose red, orange and yellow to reflect the flames but other combinations would work as well.
The front layer is the lacy cut out letters. Use a spray adhesive to spray the back of that.
Place the second layer (yellow here) on the back. The second layer is slightly smaller and shows through filling the letters with color.

Spray adhesive on the backside of the second layer and adhere to the front of the back layer (red here). Press together.

Spray adhesive to the back of this and attach to the card. Its location is really a design choice you can make. Because my receipient is 66, I added the extra page and put the letters there.
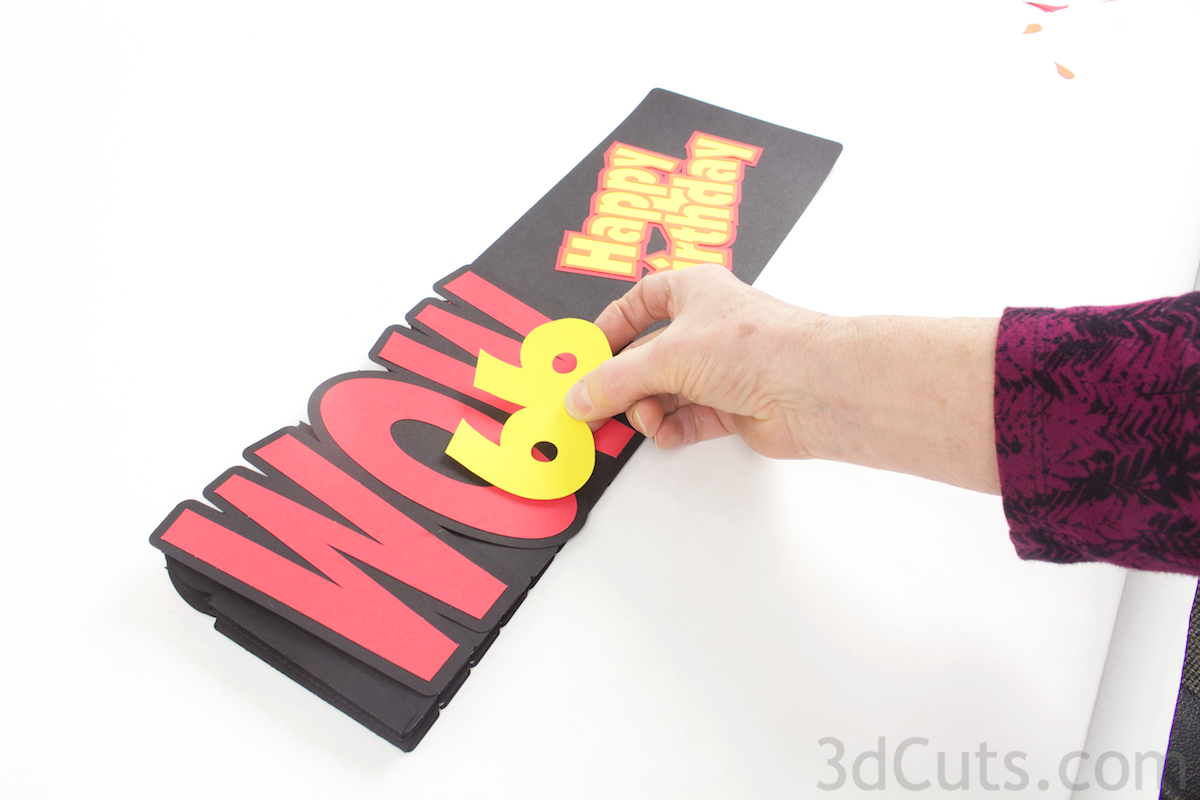
The cutting file also includes number shapes. You can cut those out and add them to the card as well.
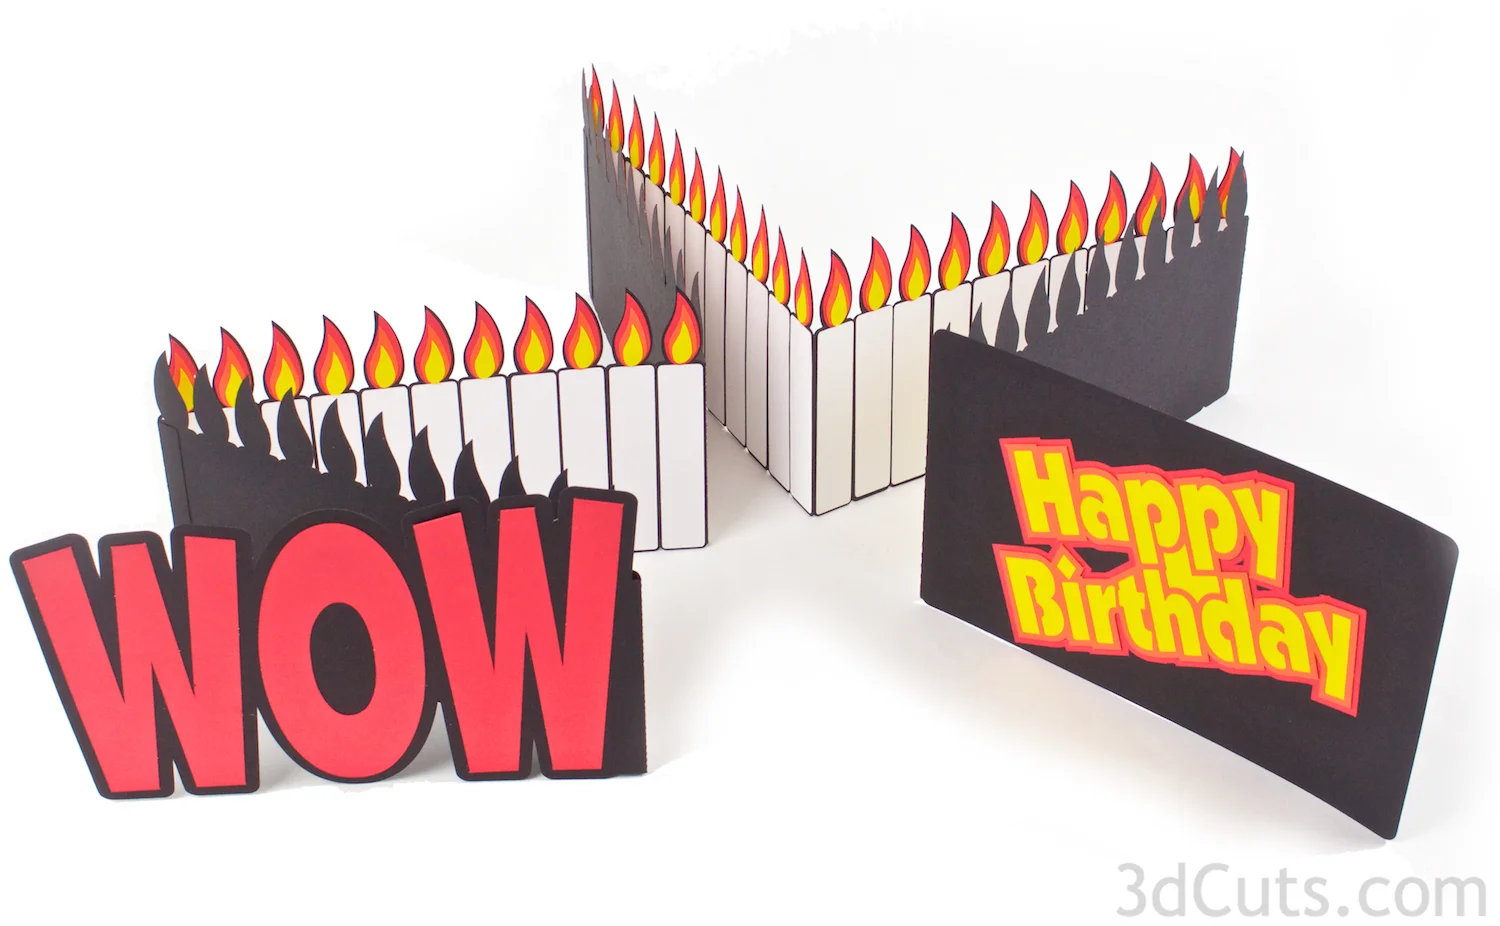
Finished and ready for signing and delivery.
It is designed to fit in a standard 6 X 9" booklet envelope but it will require extra postage! Also, it fits with 66 candles. I am not sure it would still fit with 88.
So many people have been sharing wonderful photos and stories of their WOW cards in the facebook groups. Here are a few of them showing different techniques. Share yours as well, or send it to me at marji@3dcuts.com.
This beautiful example is by Dana Johansen Smith. She used metallic for the flames.


Marjorie de Bont-Felix Has been very busy. She sent me photos of three of the WOW cards she has customized for her friends. The personalization you can do with this file is endless.

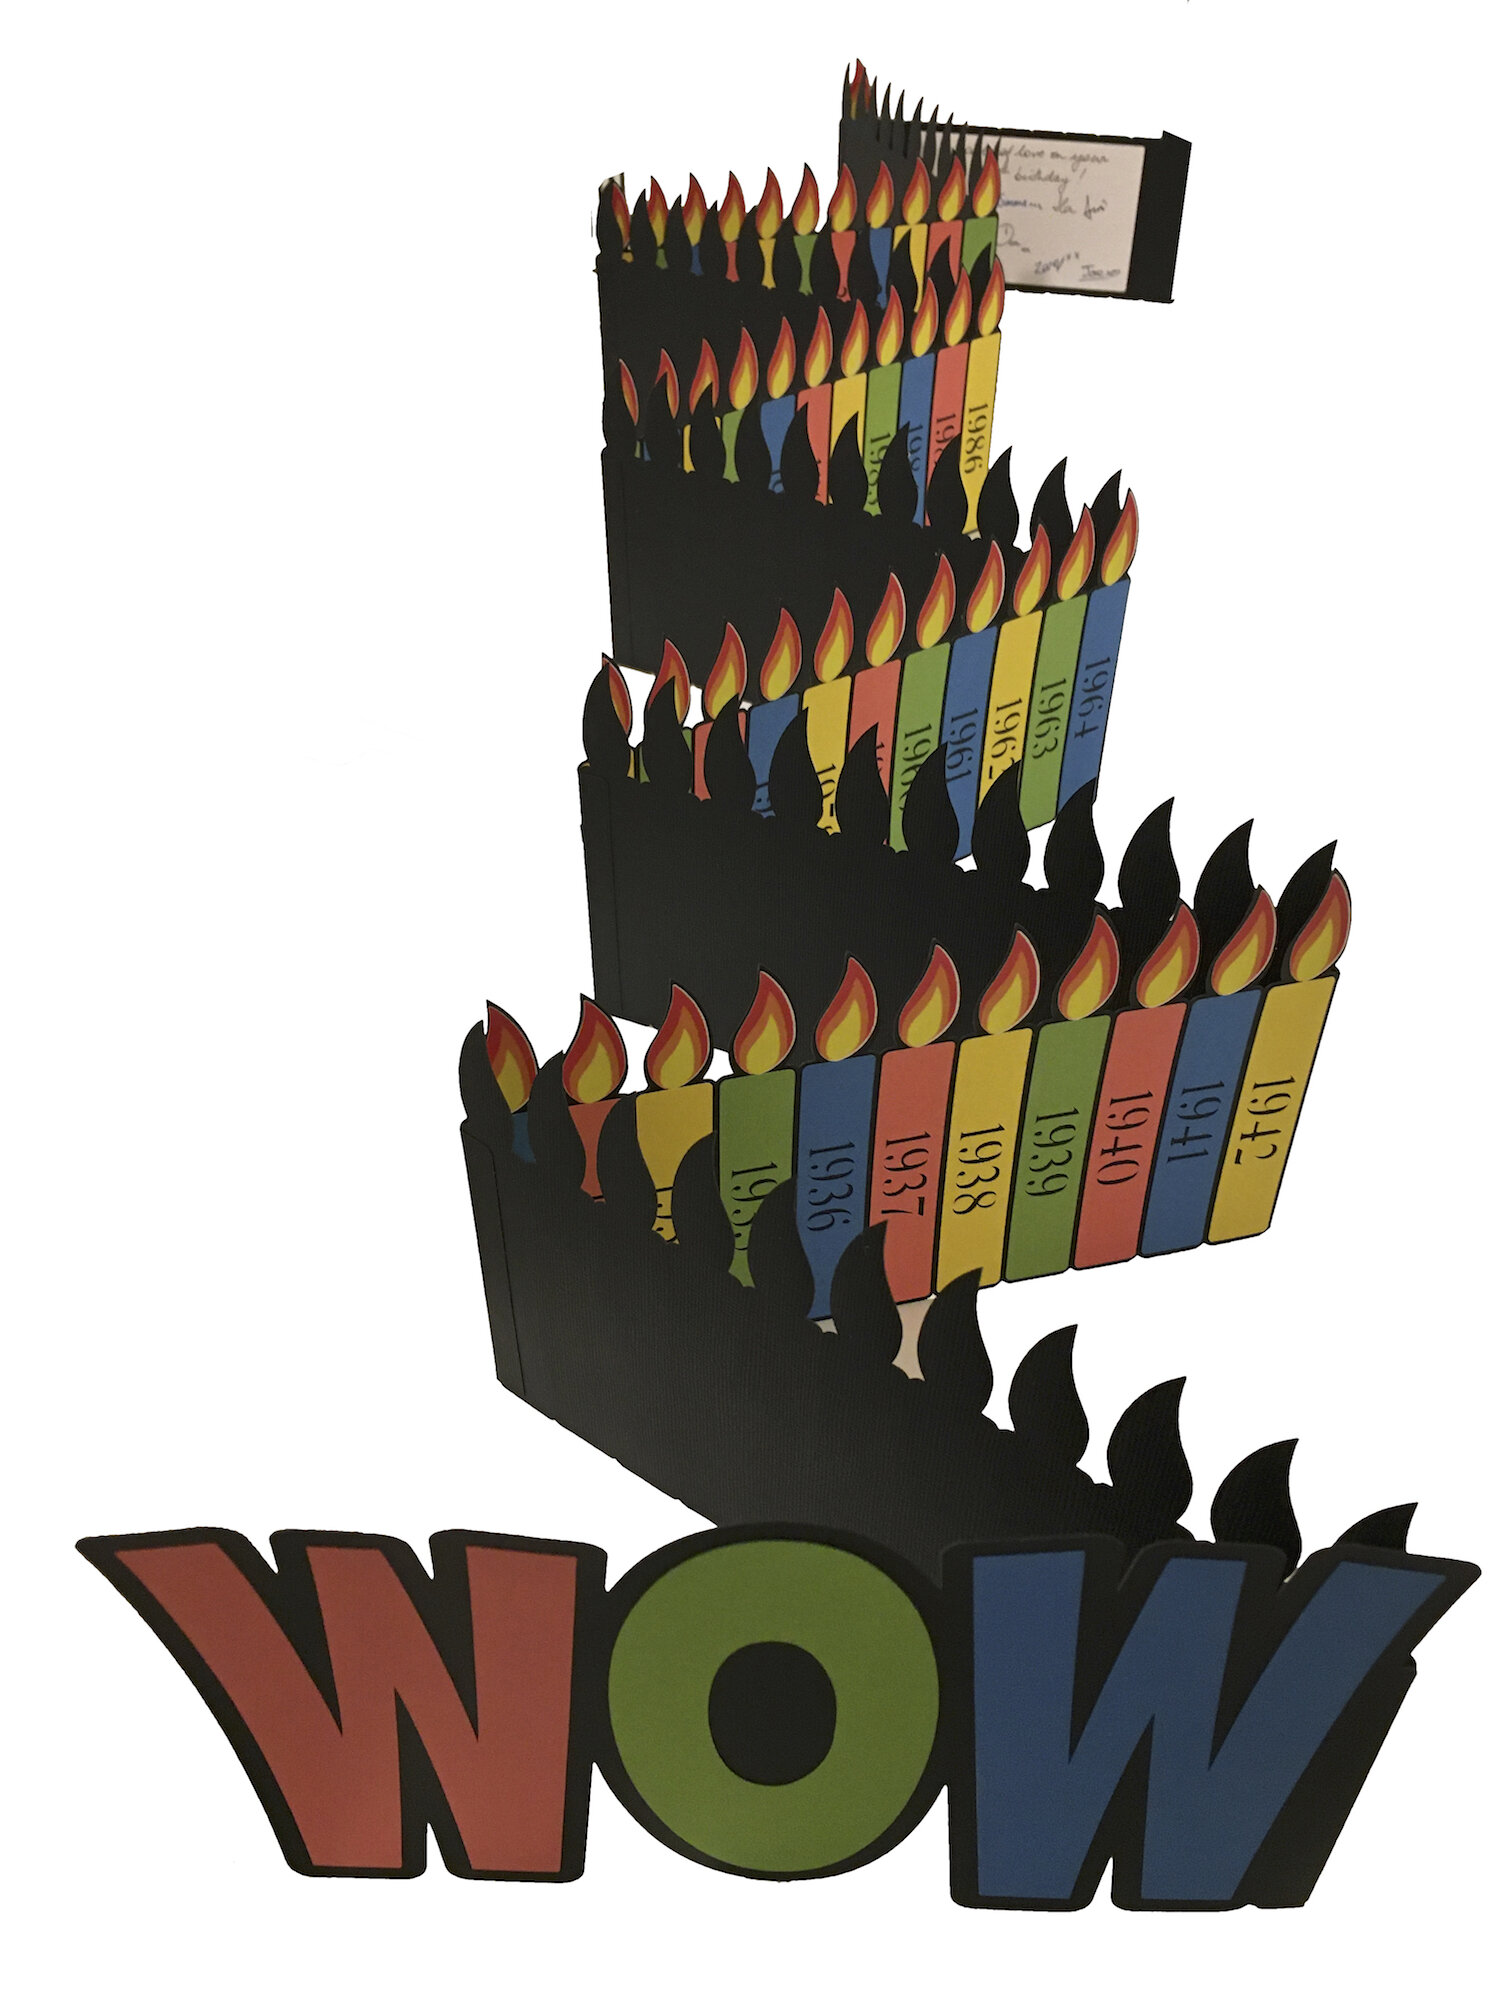
Ila Neustadt and Jim Arlow recently made this version for the 100th birthday of Ila’s mum. They printed an annual year on each of the 100 candles. WOW!
This one is by Valerie Jackson Korup. She embossed the cover letters for a different effect.

Lori LaRocco Roberts used metallic print card stock for a stunning effect.

Brandy Kivett used glitter card stocker the WOW!

Here is a new idea. Mary Faye Kecko added LED lights to the WOW card she made for her son’s 30th birthday. WOW!

Dana Johansen Smith has made multiples. Here is one for 95. Again a beautiful choice of colors.

More embossed paper choices by Carol Wolfe.

Yes, I have this card stack pack in my stash. It was a great choice for this card by Lori LaRocco!

Denise Phillips sent in this photo and said “Wow is right. I made with sixty candles, with a word on each candle that described the birthday boy. I had to split this project into two Cricut projects in order to cut. (one with just the candles and the words on them). This card has received tons of praise. Stretched end to end it is over 5 foot long.”


Gayle Weyman sent me the photos of this version of the WOW card. Love the colors!!!
©2016 Marji Roy, 3dcuts.com